Quick Trick: Level Your Horizons
![]()
PDF Version : https://bit.ly/3y3EaWg
Have you ever had some stunning photos of a lake or the ocean except that something just looked wrong? It could be that your water is flowing out of the photo… There’s one hard-and-fast rule about landscape photography where you have both a body of water and a visible horizon: the horizon and the surface of the water must be absolutely level (unless you’re composing your photo at an obvious angle for artistic purposes, of course). But often we’re not really seeing the slight off-kilter angle we’ve snapped, caught up in the magic of the scene in front of us. Today I’m going to show you a Quick Trick for straightening those photos, well, really, any photo that needs straightening. And there’s a keyboard shortcut for that! There are several ways to straighten photos, but this is about the easiest I’ve tried.
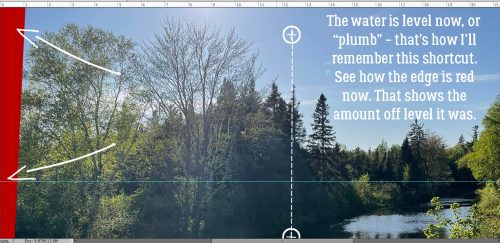
My sister took this shot last summer. It’s hard to see where the edge of the river is in the screenshot, so instead look at the reflections. Another object in the photo that can guide straightening this photo is the spruce tree.

With the turquoise Guide in place, the tilt is a bit more obvious. To create a Guide, click on the top or left edge of the workspace then drag your cursor to where you want the Guide to be.

Click on the P key to activate that bubble level. Then click and drag a line using something in the photo as a reference – I used that spruce tree – to tell Elements which direction to rotate the photo. You probably won’t need to go too far off perpendicular to get where you want to go. If it’s still not quite right, click and drag another line.

This is what happens on your workspace. Notice how my click-and-drag line is perfectly perpendicular to the Guide and the reflections on the river are level. I think the developers chose the letter P for “plumb”, and that’s how I’ll remember the shortcut going forward.
I’ve Zoomed in so you can see more easily how the reflections on the river have leveled out.
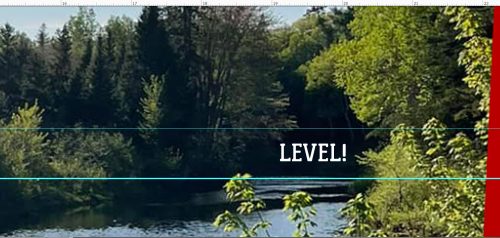
The only thing left to do is to Crop the photo inside the red border and Save it for later.

Thank you for giving me grace for taking last week off. Stuff just piled on me all at once. We bought a new car, my husband had a biopsy done, I had some medical testing done, we had company and a birthday to celebrate, AND I had to get some government paperwork squared away. It was exhausting! The good news is hubby’s biopsy was negative, all my tests are good, the wait at Service Canada for my documentation was about a quarter as long as I expected and we’re getting used to all the high-tech gear in the car. Back to normal!
![]()