Tutorial Tuesday (Photoshop Elements)

Anchors Aweigh! (Reverse Masking)

Hey GingerScrappers! It’s raining in the Okanagan… something that hasn’t happened much around here for months. That makes today a perfect day to do some scrapping.

I want to talk a little bit about anchors though. Not the heavy iron pieces that keep ships from floating away. The kind that help bring cohesion and polish to our layouts by keeping our photos from floating away! Think for a minute about how template designers create their templates and what draws your eye to them. There are lots of factors that come into play when choosing a template, and consciously or unconsciously, anchors are usually involved. They can take many forms. Paper strips and stacks are likely the most common anchors. But paint splats, brushes, masks, scatters and ephemera can all play that supporting role. Even a grungy paper itself can provide an anchoring effect when there’s a faded area that sort of frames your photo. But what if you want something a little different? Let me show you how to create an anchor point using paper, brushes and a reverse mask. The suggestion for this topic came from Ellen [gmae], with a hat-tip to AnnieA for the example she provided in the Gallery.

In my demo, I’ll be using a semi-solid paper and a patterned paper from Aprilisa‘s (retired) Captured Romance kit. [I chose it because my layout will be showcasing a heritage wedding photo.] If you choose to use this technique, you can use whatever combo you like: solid/solid, solid/patterned, patterned/patterned or any other combination you like. I’m using a freeform method in my demo; if you choose to use a template, turn visibility to all layers but the background and your focal photo spot off so you can see what you’re doing while we work through it. My photo spot is sized to the wedding photo I’m going to use.

I stacked the semi-solid gray paper behind the photo spot and popped the patterned paper above it.

If you’re a faithful follower [thank you!!] you’ll already know I love layer masks. They’re considered a non-destructive way of removing parts of a layer; you’ll see that the colour pickers change to white and black when you add a layer mask. White reveals, black conceals. But whatever you’ve concealed is still there, lurking in the background, just in case you want it to reappear. That’s the definition of non-destructive in the Photoshop/Elements context. If you’re concealing some part of a photo or an object and you oops, all is not lost. Just click the X key to swap conceal for reveal and paint it back in! The uses for layer masks are infinite, limited only by your imagination. So to create a layer mask, click on the blue square icon with the circle in the centre, found across the top of the layers panel. You’ll see the mask appear to the right of the layer you’re masking, and it’ll have a blue box around it indicating that’s the part of the layer that is active.

Elements has a default selection of brushes already installed in the software when you download it. They’re pretty basic brushes but are useful for a lot of things. My assumption is that we’re not making a nice straight, crisp edge on our contrasting papers so for this demo I’m going to use a Wet Media Brush. The number at the bottom of the thumbnail is the default size of the brush. You can ignore that. [Yeah. I have a lot of brushes. Many of them were free.]

Resize the brush so it’s manageable but not too big. 200 pixels is a good place to start. The default brush settings are shown in the Brush Settings menu.

Before using the brush, the layer mask must be inverted. We want it to conceal everything then reveal only the parts we want to see. The mask thumbnail will be black and the paper/object being masked will be invisible. To get there, just click CTRL/CMD>I. Make sure the foreground colour in the Color Picker is white… otherwise nothing will happen!

My first version is a simple oblong heart shape. I just dragged the brush to draw out a heart! Check out the layer mask. See what happened?

Here I’ve just dragged my brush in a sort of swath, cutting off a corner of the gray paper.

Zig-zags can look pretty cool.

Or making several vertical passes frames the photo as well as anchors it.

But what if we go horizontally?

Following are a few examples of using a brush as a stamp to create an anchor. To do this, make the brush as large as you can. With this butterfly brush, I think it would look better under a smaller, squarer photo. See how the polka dots on the paper show up?

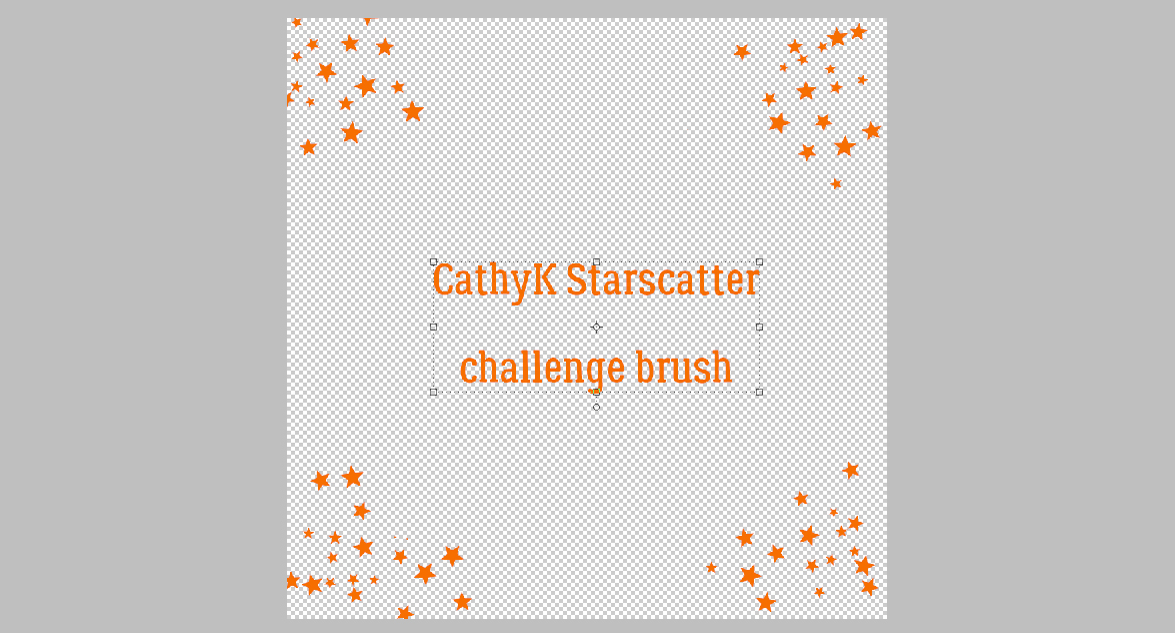
This star scatter [a challenge brush from CathyK a long time ago] would work better with a much smaller, more obvious pattern, don’t you think?

Ooh, I like the idea of this one. Not necessarily the execution though… I used three different brushes from a free set called Corners with Birds. I’d want to make sure the brushes don’t overlap because the contours are muddied.

Then there’s this filigree floral corner. I really like this one! But which version will I settle on? You’ll have to look for my layout in the Gallery to find out. I’m still on the fence!!

If you’ve seen something you’d love to emulate but aren’t sure how to get there, just shoot me a message and I’ll see what I can do to make it work for you!

PDF Version: https://bit.ly/39cdrH3

Tutorial Tuesday (Photoshop Elements)

How Did They Do That? (Outlining a Title with Paper Cuts)

Are the kids all back to school now? Are you able to just sit in silence for a while? I remember how that feels! This week’s tutorial is a short snapper, not too complicated, since I don’t want to distract you from your relaxation. Sherry (spenny) messaged me a couple of weeks back, asking for some help. She’d seen some really interesting titles in the Gallery where the scrapper had lined her title up so it overlapped a series of paper/photo strips. Then she cut some of the paper strips away, leaving a background paper border visible around the alpha she used. Sherry wanted some input on how it’s done. This is what I’ve come up with. Now remember, you don’t have to follow my instructions to the letter; do what looks good to your eyes. I’m offering guidance only!

This technique can be used at any angle. Vertical, horizontal, diagonal… all the same steps. If you want a crisp look, choose a sans-serif (no extensions on the terminal strokes) alpha with some substance and clean lines. I went with a bit more of a fun alpha from the GingerBread Ladies‘ collab Happiness Is. My papers are also from this collab. Here you can see I have 8 paper strips, one for each letter in my title. I’ve resized the alpha so each letter is the same height as the paper strip. If you want to, you could double up some of the letters to a single strip for a really unique look. To make the steps easier, I’ve sandwiched the letters between the paper strip layers.

I decided how far over I wanted to move my letters so that they sit on top of the paper then I dragged out a Guideline to snug them up against. Guidelines are really useful for precision. All you need to do is ensure the Rulers are active [View>Rulers] then with your cursor inside one of them, click-hold and drag the cursor to the place where you want the Guideline. The actual Guideline won’t be this obvious. I’ve enhanced it for better visibility.

Next, I nudged the first letter over so it’s just touching my Guideline, and then I CTRL/CMD>clicked inside the LETTER‘s layer thumbnail in the Layers Panel to Select the edges of the letter. See the marching ants?

I need to make the area inside the marching ants a bit bigger. Otherwise there won’t be a border around the letter later, right? Select>Modify>Expand will make the Selection grow.

Here’s where personal preference comes into play. There’s no hard-and-fast rule for this step, and it may take some experimentation to find the right number of pixels to go with. I ended up at 15 pixels, but 20 or 25 might have worked well too.

Here you can see where the new line of marching ants, the new Selection, is.

Now, with the turquoise paper layer active, I Cut some of the paper away. Edit>Cut or CTRL/CMD>X will work for that.

I followed the same process with each of the letters in the title. Where there are little bits of paper completely disconnected from the paper strip, I used the Eraser tool and got rid of them.

Where the paper bits are still attached, like inside the C, the S and the E, I left them there.

Then I shadowed up each layer and my title is done!

The layouts Sherry showed me as examples can be seen here, here and here.

If you try this tip, let me know so I can leave you some Gallery love!!

PDF Tutorial: https://bit.ly/3kYGNyg

Designer Spotlight: September 2121

It’s HeartMade Scrapbook!

Today I’d like to introduce you to one of our newest designers, HeartMade Scrapbook – who is also known as Ngoc! She very graciously agreed to let me pick her brain, and now I get to share what I’ve learned about her with all of you.

J: So tell me, how long have you been designing?

N: I’ve been designing since May last year (2020).

J: Ah, another CoVid convert! Welcome to GingerScraps!! What made you decide it was time to hang up your Creative Team hat and jump into designing?

N: In 2020, the CoVid-19 epidemic broke out, I have more time and I want to try a whole new field. And there’s really a lot to learn, but I’m very happy with the design.

J: I think all of us would be thrilled to have more time. What tools do you use in your design process?

N: I use Photoshop and Illustrator.

J: Well, you’re way ahead of me. I’m still plodding along with Elements. What’s your design motivation/inspiration ?

N: My main motivation and inspiration are my kids and the life around me. I want to be a memory keeper!

J: Most of us would say the same. It’s pretty much the whole purpose of our community. Now I’d like to know which of your kits currently in the GingerScraps shop is your favourite, and why.

N: Cool Summer: Because I like pastel colors and summer is my favorite season!

J: Abrupt subject change!! What would you do if you won the lottery today?

N: I will buy a farm in the countryside to grow vegetables and flowers.

J: That sounds like a LOT of work! Are you more likely to sing, or to dance, in the shower?

N: Yes, I will sing sometimes, even though I’m not very good at it.

J: Everybody is a star in the shower! Weird question… If time travel was possible, would you go forward in time or back, and why?

N: I would go to the future, I want to know when covid-19 will end.

J: You and all the rest of us! 🙂 It has really turned the world upside down, hasn’t it? Design-y question again. What colours do you love, or NOT love?

N: My most favorite colors are pastel & bright colors. My least favorite colors are dark and heavy colors.

J: I love jewel tones most. And I’m so happy there are designers who do too. Last question, another one about favourites. If you could only eat one meal for the rest of your life, what would it be?

N: It’s PHO Vietnam, widely known as Vietnamese noodle soup, is a highlight of Vietnamese cuisine. I can eat it everyday and never get bored – Vietnamese people love eating PHO for breakfast, lunch, and dinner. Despite looking simple outside, PHO has the fascinating complexity of textures and flavors. Normally, PHO Vietnam is made of rice soft noodles called “banh pho”, some slices of meat, traditional herbs and is served with consommé which is made by the simmering bone of the chicken, pork or beef.

J: I’m missing out, clearly! I’ve never had pho. But to do it justice, I think I’ll wait until my CoVid-damaged sense of taste goes back to normal (if it ever does…) since all of a sudden I’ve developed an extreme distaste for anything containing onions.

Now, before we go, Ngoc has a gift for us! She’s got a 50% off coupon for her store. Thank you so much for visiting with us, sharing your talent, and for the gift!


The coupon code is HMS-SPOTLIGHT and it’s valid until midnight September 30th.

Tutorial Tuesday (Potpourri)

Colour Palettes, Swatches and How to Use Them

Hey ladies! Welcome back!! Did you know that my very first Tutorial Tuesday Blog post appeared FIVE years ago yesterday? I never dreamed we’d still be here, learning new things together after this long. It’s amazing! [And I already have topics lined up for the next two tuts. Crazy!!]

This week I’d like to shine the light on colour – challenges, swatches, palettes and colour codes. I had a request for this info, but I can’t find the original correspondence so I can’t remember who asked for it. My apologies. Essentially, her questions were how she could save swatches and how she could make better use of those alpha-numeric colour codes the Color Picker assigns to the rainbow. [It’s raining here today – something that hasn’t happened much for more than four months. Rain is on my brain.] So let’s talk.

Our friendly GingerScraps designers host the Forum Challenges, as you know. Each month there’s a Color Challenge, where the hostess provides the Challenge palette, most often by supplying a swatch, but sometimes it’s a photo or simply a list. I’m a Color Challenge nerd, 100%. If there’s a swatch in the Forum thread, there will be a swatch somewhere on my layout. I typically tuck it under the edge of a paper or photo, but it’s there if you look for it. This is how I make it part of my workflow. I right-click on the image in the thread and select Save Image As from the dropdown.

Usually at this point I’ve already decided I’m doing a Color Challenge and have created a subfolder to put all my pieces-parts into for ease of access. So it’s easy for me to decide where I’ll put the swatch image. I renamed it here for clarity but I don’t bother when it’s just for me.

Now that it’s in my Challenge folder I can go to my stash and pick my papers and elements. This palette reminds me of my daughter’s wedding, so I chose some photos from that folder then paired them with Ooh La La ScrapsJust Breathe and Pocket Full of Sunshine. The colours aren’t a perfect match but they’re in the ballpark.

I’ve already done a tutorial on recolouring so this next part will be mostly just review. If you want a more detailed look at the subject, you can look here. In the context of this tutorial you’ll see how I use the swatch to get my chosen elements to match the colours as closely as I can.

I start by dropping the swatch on top of whatever it is I want to adjust and moving it around so the colours touch. Sometimes no adjustment is necessary. To easily adjust colour, click Enhance>Adjust Color>Adjust Hue/Saturation… [CTRL/CMD>U] then play with the sliders. For this orange brad, I just needed a minor tweak of Lightness and it slid right into place. Once I’m happy with the change, I Delete the swatch layer – it’s still in my Photo Bin so don’t worry about it getting lost. The changes I’ve made to the brad will be kept until I close Elements.

Here I’m adjusting the brown flower. It took a bit more convincing to change. Just remember that any colour adjustments you make to something composite like this flower will be made to the entire object unless you exclude some parts.

Can you believe this paper was originally a bright off-white?

I was happy to see that making these adjustments to this paper didn’t touch the white flowers. I like the contrast.

This button looks pretty good too!

Here’s a quick refresher on selective recolouring; I don’t want to change the button in the middle of this flower. I used the Magic Wand took to outline it with those marching ants.

Without this step ALL that would be altered is the button. So I Inverted the Selection: Select>Inverse [CTRL/CMD>SHIFT>I]

Here you can see the marching ants around the button Selection. It’s not being touched by the adjustments made to the petals. They needed a lot of persuading!

Now let’s make a swatch of our own! It’s easy to do, and can really make a difference to your work. This photo has a lot of neutrals in it, but the Ball jar, flowers, hat… they’re all beautiful.

Start off with a blank New Document [CTRL/CMD>N] of whatever size you think will work based on how many colours you plan to add to your palette and with a transparent background. Make it something that is easy to divide. I’m making a grid with six columns and four rows, for a total of 24 colour blocks.

Elements has many hidden tools like the Grid. It’s activated by clicking View>Grid [CTRL/CMD>’] The parameters of your grid can be personalized in the Edit>Preferences menu. Mine are set to a major division every inch with guidelines every 1/4 inch. Using the Pencil tool with a diameter of 30 pixels and white in the foreground, I clicked at the top of the canvas at the 1 inch mark then held down the SHIFT key and clicked again at the bottom at the 1 inch mark. Then I worked across the canvas in the same way until I had 6 columns all 1 inch wide. Then I worked across, putting my lines at 1 1/2 inches apart.

I used the Eye Dropper tool [CTRL/CMD>I] to choose a spot on the darker, shadowed area of the Ball jar.

Next I used the Paint Bucket tool [CTRL/CMD>K] to fill the first block on my grid with that blue colour. I want to include the colour code on my swatch so then I clicked on the foreground colour – the darker blue – and made a note of the code in the box shown. If you trust your memory you don’t need to write the code down… I typed the colour code on top of the block in white and then Simplified the text layer – right-click and Simplify Layer. Why? If I didn’t, and I later needed to change the colour of my text for better visibility, ALL the unsimple text boxes would change too. No bueno!


Following the same process I used the Eye Dropper to pick a spot of lighter blue.

And filled the second colour block with the Paint Bucket.

Then getting the colour code from the Color Picker.

And here’s my palette derived from my Pixabay photo. I picked colours from the Ball jar, the tulips and the satin clutch purse. You might have chosen differently, and isn’t it grand that we’re all unique?!

Curious about the layout I built this tutorial around? It’s here.

Have fun with colour!

PFD Version: https://bit.ly/2WDWxyi


Tutorial Tuesday (Photoshop Elements)

Faking the Wood Burning Look

Last week Ellen (gmae) sent me this message:

Hi Jan, The above YouTube is for wood burning in Photoshop. He talks through this way too quickly for me so it will take me a few stop and go’s to get the directions down pat to try in Elements but I can see it being great for rustic, western, and camping titles. Since its from Photoshop not Elements there are some things he says to do that may take some figuring. My first attempt not so wood burning looking. Has a lot to do with the styles he puts on at the end I think. Just an FYI if you look at this.

Well, you know how much I love a challenge! And this one was a doozy. As Ellen said, it’s all about the styles he puts on at the end. Because this tutorial is adapted from Photoshop AND a 7 minute video, there are 46 screenshots so I can show each step clearly. That doesn’t mean it’s hard or will take all day. I just want to be sure even the most inexperienced user can follow along.

I’ll be demonstrating using a word art file from Word Art World‘s Jen Arbon. The woodgrain paper is from the GingerBread LadiesCabin Fever collab kit. If you’d like to use your own text or image, the technique will be exactly the same. [Simplify your text layer though!]

To start off, I made a Copy of the word art layer. You can right-click on the layer and choose Duplicate Layer then click OK on the pop-up, or you can use the keyboard shortcut CTRL/CMD>J. [It’s been awhile since I explained the keyboard shortcuts. These are simple keystrokes that take the place of several steps using the other methods of achieving something. I use Windows, which has a CTRL key. On a Mac, it would be a CMD key. Windows uses ALT and Mac uses OPT. So when I show you a keyboard shortcut I’ll give you both Windows and Mac keys.]

Next I created a new blank layer BETWEEN the two word art layers by holding down the CTRL/CMD key and clicking on the New Layer icon [looks like a sheet of paper with a corner dog-eared] from the top left of the Layers panel. The CTRL/CMD key tells Elements to put it UNDER the active layer.

With the blank layer active, I made the layer solid white: Layer>New Fill Layer>Solid Color

Since I’m filling the whole layer with white the box for Use Previous Layer to Create Clipping Mask can be unticked.

There are a couple of ways to choose a colour from the Color Picker: click on an area of a photo/paper/element with the Eyedropper tool, click on a spot inside the colour swatch or type in the colour number. Pure white is “ffffff“.

Then I Merged the white layer with the word art Copy layer: SHIFT>click on the two layers then right-click and choose Merge Layers or even simpler, CTRL/CMD>E.

Now I have three layers, with the wood paper on the bottom of the stack and the black-and-white word art layer on top as shown. I want to Select just the word art on the black-and-white layer so I CTRL/CMD>clicked on the layer thumbnail [the little image on the left of the layer in the panel] of the word art with the black-and-white layer active. See the marching ants?

I want to Modify the Selection. I clicked Select>Modify>Expand as shown.

I only want it to Expand by 1 pixel.

To fill that hairline space with black [in the foreground colour box] I clicked ALT/OPT>D and Elements did the work.

Next I Inverted the colours so the word art is white on black by just clicking CTRL/CMD>I. This tutorial has a bunch of things I’ve never tried before. This is the first one. Filter>Stylize>Wind.

This menu opens up. Make sure the Method is Wind. The Direction doesn’t matter at this point. You can see in the Preview pane what the Filter will do.

This Filter will be applied two more times. Elements will remember the last Filter used, so you can click Filter and Wind will be right at the top. Or, even easier, just click CTRL/CMD>F. Just make sure it’s applied three times in total.

This is what it’s supposed to look like. Don’t be alarmed!!

Now I’m going to do the Filter step again. Because I’m going to make a change to the settings I can’t just CTRL/CMD>F my way there.

This time the Direction has to be changed so the streaks go the opposite way.

Here’s after the first hit with the Wind Filter. The change isn’t very obvious.

So I hit it again two more times! CTRL/CMD>F and CTRL/CMD>F.

Wow! But don’t worry, that’s what it should look like!

And then I Inverted the colours again so the word art was once again black-on-white. CTRL/CMD>I.

I’m not done with Filters yet. This time I’m going to add a Filter>Blur>Gaussian Blur to the mix.

But not too much of a Blur… just a Radius of 1 pixel.

The black is a bit harsh, so I clicked Enhance>Adjust Lighting>Levels. Keyboard shortcut: CTRL/CMD>L.

And I changed the Output Level from 0 to 72. That grays the black a bit, but not too much.

Remember Blend Modes? They’re such a great tool!! I changed the Blend Mode to Color Burn by clicking on that bar above the Layers panel that usually says Normal and choosing Color Burn from the dropdown list.

Now the sugars in the wood look like they’ve been caramelized!

It’s a little TOO obvious, so I dropped the Opacity of the layer to 60%.

Once again I Selected the edges of the word art by CTRL/CMD>clicking on the word art layer thumbnail with the altered word art layer active. Then I did something else I’ve never tried before… Select>Feather to soften the edges of the caramelized areas just a teensy bit.

I gave it a Feather Radius of 2 pixels. Everything about this needs a light touch.

With the edges still Selected, I added a new Fill Layer. Layer>New Fill Layer>Solid Color. This new Fill Layer will be the base for the next few steps.

Again, I didn’t need to tick the Use Previous Layer to Create Clipping Mask, because only the Selected areas will be filled. On this settings menu, I dropped the Opacity of the Fill to 40%.

The Color Picker opened, and I wanted pure black. The code number for black is 000000.

After I created the Fill Layer, I Simplified it so the mask went away. Right-click on the layer and choose Simplify Layer.

Next I made 2 Copies of this black Fill Layer and turned Visibility for the top two Copy Layers off. I wanted to see what was happening to each active layer, starting with the original Fill Layer. [In Photoshop the next several steps can all be accomplished on the same layer, but Elements isn’t that skillful. Each step needs its own layer. *Where have you heard that before?*]

To the bottom Fill Layer, I added a Bevel Style. Click on the Styles button at the bottom of the Layers panel then choose Bevels. From the dropdown menu choose Simple Outer as shown. [If you hover the cursor over the thumbnails in the dropdown, a description box opens so you know what’s what.]

Each of the Styles has a default setting, but you can easily change the settings by double-clicking on the fx icon on the far right of the layer. The settings menu opens. Here I changed the Lighting Angle to 130°, the Drop Shadow settings to Size 29 pixels, Distance 13 pixels, and Opacity 22%, then the Bevel settings to 20 pixels and the Direction to Down.

Next I activated the first Copy Layer just above the layer I last worked on, but this time I chose Styles>Inner Shadows.

I double-clicked the fx icon and from the settings I made the Lighting Angle 147°, Size 50 pixels, Distance 4 pixels and Opacity 20%.

Then I changed the Blend Mode for this layer to Linear Burn.

It’s looking pretty good!

I wanted just a bit more depth to the image so I activated the top Copy Layer and from the Styles menu I chose Outer Glows.

I used Simple from the menu as shown.

After double-clicking on the fx icon, I adjusted the settings: Lighting Angle 130°, Size 21 pixels and Opacity 25%.

The Outer Glow layer looked odd on top so I moved it to the bottom of the Copy Layer stack and lowered the Opacity to 10%. This took a bit of experimentation based on what I wanted to see.

Last but not least, I turned the original word art layer’s visibility back on. I’m quite pleased with how it turned out.

Some comments: The way this technique looks in the end will depend on several factors. If you use a smooth wood paper, your burned area will be smooth too. If you use a darker or lighter wood paper, you may need to fiddle with Opacity to get the looks you want. Obviously, doing this to a darker wood will result in darker burned areas, and it may be hard to see. On a lighter coloured wood, it may look too black, and again, you’d need to make some tweaks. I scrapped my work (and about 100 screenshots) 4 times before I was comfortable with this enough to show it to you. Don’t be afraid to make some of your own decisions! If you’re not happy with it, make some changes!!

PDF Version: https://bit.ly/3zAdEQ4

Tutorial Tuesday (Elements+)

How Can I Run an Elements+ Script on a Template?

I found this Forum post from DianeInOz that referred to a previous Blog post where I mentioned I’d had to upgrade my Elements+.

After reading a recent GS blog post, I discovered the elements + add-on and downloaded it! I have been playing all morning and searching everywhere, but I am having trouble. When I run scripts (lets say “torn edges”) and I click on a layer (say a single photo), open the script box, hit run. It runs the script on the whole layout instead of just the one layer so the edges of the 12×12 layout look torn, but the photo layer is just the normal photo.
Does anyone know if these scripts can be done on just one layer in a layout??!?

What a great question! Right away my wheels started spinning and I had to try something that I thought might work. And it DID! So I’m going to show you all what I did and hopefully it’ll help Diane too.

In my example I’m using a template from Aimee Harrison‘s Singular V.2. I’m intrinsically lazy, so if there’s a quick work-around, I’m going to find it.

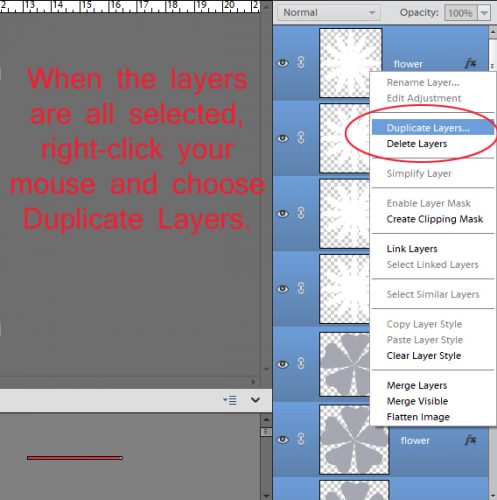
After I clipped my photo to the photo spot so I’d have a frame of reference, I selected the three layers that make up the photo spot. When you want to select multiple layers that are all stacked one on top of the other like these are (or are in side-by-side order in a folder, for example), hold down the Shift key, click on the first layer then on the last layer. All the layers in between will show a blue flag in the Layers panel as shown. [If you want to select multiple layers or objects that AREN’T stacked or in order, hold down the CTRL/CMD key and click on each of the things you want to select.] Next I’m going to Duplicate the three photo spot layers. There are 2 ways of doing this. One is to right-click then choose Duplicate Layers… and the other is using the tool bar at the top of the screen, click on Layer>Duplicate Layers… Which one you use is up to you.

This dialog box opens up. Select New from the Document menu and give it a name (or don’t – it’s all up to you). I named my new document Script Layer.

And here they are! As you can see, Elements has created a new document the same size as the template, it’s kept the photo spot layers the same size as on the template, and put them in exactly the same place. This might be a valuable thing in another situation (like creating a title that will fit exactly in the spot designated for it) but for this purpose only keeping the photo spot layers the same size will be a time-saver.

Here’s where the let-Jan-do-the-experimenting-so-you-don’t-have-to aspect comes into play. When I just ran the script on the new document, it put the torn edges around the 12×12 background. Not what I want. So I tried Cropping the new document down to the very edges of the photo, on the photo layer itself.

Now on to the fun part! When you install Elements+ it embeds itself into the Elements menu so you can find it quickly. Click on File>Automation Tools>e+ Scripts.

To find the Torn Edges Script, click on the pull-down menu bar to select Edges. This menu opens and Torn Edges is near the bottom. Select it, and click on the green, rightward-pointing arrow as shown. Stand back and let E+ do its magic!

After the Script has run, this is what it has done. That solid white background might present a problem. Time to do a bit more experimenting….

Okay, I’m back. Problem solved. Onward and upward!

AHA! I can turn the visibility for all but the Copy layer E+ created of my photo, with the torn edges preserved. That means they can be Deleted.

So I did just that!

All that was left was to move the new torn-edges photo onto the template. With the original photo spot still in place, it’s just a matter of positioning the Script Layer photo and either turning off the photo spot layers or Deleting them. Another choice that’s left to you.

This tutorial only looks at a single Script. But it has applications for other purposes too, so don’t be afraid to try it if what you want to see isn’t what you’re getting. Have fun with it!

Next week – God willing we’re not under wildfire evacuation – we’re ironically enough going to play around with digital wood burning. Meanwhile, I’m praying for more rain.

PDF Version: https://bit.ly/2VYjP1U


Tutorial Tuesday (Potpourri)

Which Template Format is Best for You?

Let’s see how smoothly this goes. The new laptop is all set up but I’m still getting used to how it works. Forgive the haphazard formatting of my screenshots, I’m also learning to use a new version of Photoshop Elements. One thing I was thrilled to learn is that I can screenshot the little pop-up messages I see when I hover the cursor. That’s going to be helpful with tutorials going forward. You’ll see a couple of examples today!

Tanya posted this comment on last week’s tutorial:

Jan, I was wondering about template files and if you could answer my questions on those because designers list many different formats and I don’t know which is best to keep. TIFF, PSD, PNG. If you can do an upcoming article on the differences and I guess advantages or disadvantages of each type. Since it’s basically the same information, I want to optimize what I actually use storage space for. If you have already done this sort of tutorial, can you link up in the comments instead.

First, why are templates so popular? Easy! They make Working Smart Not Hard so easy! They give you a roadmap to build your layouts upon and tell you where everything goes. You can whip up a beautiful layout in very little time and if speed’s your thing, templates should be in your arsenal. But templates are NOT engraved in stone and they don’t stifle creativity, because you can do whatever you want with them.

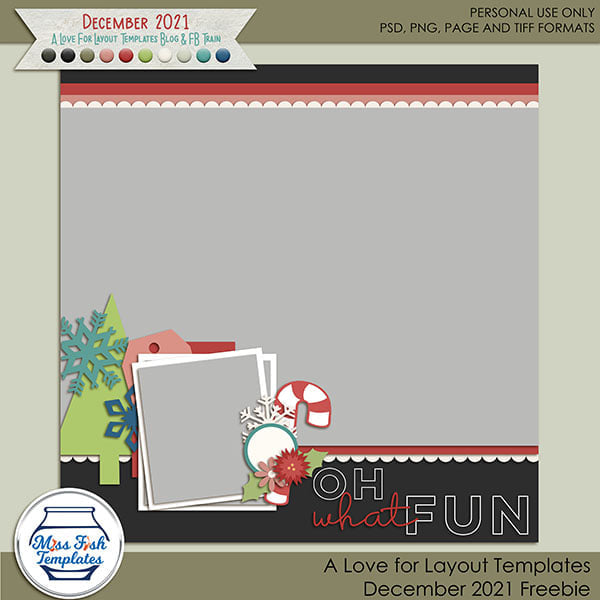
I know I’ve talked about template formats before, but mostly in passing rather than directly. So today we’re going to look them a little more closely. I’m sure when you first started digi-scrapping, you opened up a template download and just looked at the contents in confusion. Below is an image of a template download I haven’t yet organized with my own preferred method (and yes, I DO realize it’s a year old). The only thing I’ve done with it is to extract the contents. As you can see there are a bunch of things in it: a folder labeled with the file tag PNG, an image of what the template looks like, a blank sheet of paper with the file tag .page, a Photoshop icon, another image of what the template looks like and a folder label/preview. We’ll start with the PNG folder and work our way through the template download left to right.

PNG refers to Portable Network Graphic. You’ve seen that tag on literally every element in your digi stash. PNGs are on transparent backgrounds and can be manipulated in a lot of ways. When talking about templates though. this is the most versatile format in that it’s usable on any platform. About the only thing that matters is that they show the location of an element on the finished page. Look below; each of the PNGs in the folder is on a 12×12 transparent background. And there are LOTS of them. In this template they’re numbered in reverse order from the top down. The very last PNG is the background. This method of layout building would be a real challenge for me because a) I work from the background out and b) Elements needs a “pin” for layers, something that tells it where in the layer stack a newly added item goes. It would be quite frustrating for me to have to continually reorder layers but if it’s what I had I’d make it work.

Here you can see what I mean about order. This is PNG #1, but it’s the very top item on the page – the centre of the flower in the upper left of the layout at the top edge of the larger photo. The PNG layer shows the use where on the page to put the element it’s a placeholder for.

Here you can see a couple of the layers I’ve created from the PNG files. Some layers aren’t visible, as you can see. Using the PNG method of layout building, you’d stack all of them in the correct order into layers, then replace each object with your chosen object. Then the PNG layer you’ve just replaced is either turned off or deleted.

There are more layers visible in this image. As the text describes, I’ve reordered them in numerical order to have them layering properly. In retrospect, what I’d do when using PNGs as a template would be to just stack them in reverse order to begin with, starting at the end of the queue and layering as I go. That may eliminate some of the “pinning” issues. Having a transparent background behind each of the PNG elements means PSE has no sense of how to layer things; it needs some sort of fully opaque reference or pin to orient itself.

Next in the folder is an image of the template. It’s basically a preview of the template in JPEG format – Joint Photographic Experts Group. (Don’t ask me how they came up with that as a file name. I don’t know!) It’s how we most commonly save our photos and finished layouts; one thing to bear in mind when using this format for any purpose is that it’s a “lossy” proposition. This format compresses images somewhat, and in compressing, some of the detail is lost. Each time you make adjustments to a JPEG and save it again, you’ve lost a tiny bit more of its clarity. I do like to have a 600×600 pixel JPEG of my templates to use as a “shopping list” when I’m deciding what I want to include in my layouts. For that purpose I’m not worried about sharpness.

The next item in the template folder is tagged as a .page. This format is supported by a very limited number of applications, like Storybook Creator and Artisan. I won’t pretend to know anything about this format, so I’ll link you up with a tutorial if you’re just learning either of those applications. Kate Hadfield has a good one here.

Ah. Now we can talk about the format I use ALL the time! PSD Photoshop Document – is an Adobe Photoshop/Photoshop Elements proprietary file type that won’t open in other applications. It creates a fairly large file, in this case it’s 7.04 MB.

This format preserves all the layers and all the adjustments that have been made to those layers; this includes layer masks, fill layers, blend modes, opacity changes and layer styles, including drop shadows. That’s why the files are so weighty. When you save your layout in this format, you can go back any time and make changes – let’s say you’re planning to print your layout and you see a huge, obvious spelling error that you CAN’T leave. No problem. Open up the PSD, correct your spelling and save the corrected version in whatever format you want.

Okay, I’m going to admit I had to do some research on TIFF files. TIFF stands for Tagged Image File Format. These templates are considerably smaller files than PSDs; this template is slightly less than half the size at 2.91 MB. Many scrappers choose to only keep and use the TIFF format to save space on their hard drives.

In some ways they’re like PSDs, since they can also preserve layers and layer styles, you use them in a similar way to create layouts and neither format can be displayed as is on web platforms. UNlike PSDs they’re not proprietary and are supported by a broad range of graphics applications.

When saving your layouts as flattened (all layers merged) TIFFs rather than JPEGs, using LZW compression doesn’t result in a loss of image data, thus maintaining more sharpness and detail. This is the best way to save your layouts for PRINTING, but not for online posting because, as I said a moment ago, this format isn’t compatible with online display.

The second-to-last item in the folder is a cover page/folder label preview image. I usually don’t hang on to them but I know there are a lot of scrappers who use them. (I’d rather save the hard drive space for my PSDs.)

Last, but not least, there’s a terms-of-use document where Juli (Miss Fish) tells people how they can (legally) use her templates. Very important information!! I typically only keep one copy of each designer’s TOU, since they don’t change much over time.

So there you have it. File formats in a nutshell. I hope these descriptions help you understand them better and help you decide which format will work best for you. Happy scrapping!

PDF Version: https://bit.ly/3lpO22x

Tutorial Tuesday (Photoshop Elements)

More Fun with Blend Modes

When I started playing with Blend Modes for my Memory Mix It Up challenge layout, I wasn’t sure it would be worthy of a tutorial, but the comments in the Gallery soon changed my mind. Before I start the step-by-step, I want to assure you all that although this layout took me two days to complete, it wasn’t because the technical aspects were time-consuming. I was under the weather – literally AND figuratively – so I took my time. When you see the process, start to finish, you’ll see it’s really a quick but dramatic effect. I must also give credit where credit is due: I modified a technique presented by Nancy Adams, who is a creative team member for Anna Aspnes. Let’s dig in!

First, let’s talk about Blend Modes for a minute. New-to-digiscrapping readers are feeling a little overwhelmed, I can tell. In short, Blend Modes can lighten, darken, or alter the transparency of a layer without changing that layer’s Opacity. To change the Blend Mode, click on the bar at the upper left corner of the Layers panel where it says “Normal” and find the mode you’re seeking. We looked at all the options in this tutorial: Blend Modes? Say What? 

I’m so fortunate to have these professional photos of my great-grandfather Will and his siblings. They were taken shortly after the youngest, Geoff, was inducted into the British Army just after his 18th birthday. I’ve wanted to create a layout with them for awhile, and this challenge template was just perfect for the job. In order to recreate my workflow for this tutorial, I deconstructed my layout, stripping it down to just the layers that create the arty effect. The background paper is a simple “solid” gray from Jumpstart DesignsNo Ordinary Love collection. Other than the alpha I used for my title, all the elements of this layout are from that collection (because I liked the title!). My title alpha is from the GingerBread Ladies collab Spice of Life. The screenshot shows that all the other layers have been turned off, and I’ll turn them back on one layer at a time, working from the paper layer up.

In the Gallery comments, Jill pondered whether I’d done any (labour-intensive) extractions or other witchery to obtain my results, but I didn’t. I used the mask exactly how Juli (Miss Fish) designed it, in the exact spot she’d put it on the template. The Blend Mode was left at Normal, Opacity at 100%.


I positioned my large photo of Will and George over the mask layer, resized it to be sure it completely covered the mask and repositioned it so their faces were clearly visible. Then I clipped it to the mask. [Right-click on the photo layer and select Create Clipping Mask or CTRL/CMD>G for versions prior to PSE 15 or CTRL/CMD>ALT>G for later versions.] The first photo layer is Normal at 100%.

Next, I dropped a gray paint splatter on top of the photo layer, clipped to it. I left this layer’s Blend Mode and Opacity at the default, Normal and 100% as well.

I made a Copy [CTRL/CMD>J] of the photo layer, ensuring it was clipped to the mask as well. This time I changed the Blend Mode to Hard Light and left the Opacity at 100%. It makes the sepia tone even more vivid. Also, see how this layer brings more of the variations in the background paper into view.

I wanted to add some green hints to the layout, but not bash-you-over-the-head-visible. The uniforms in the photos were a khaki colour, not really brown, not really green. I added a green paint blotch on top of the second photo layer, but not clipped. I wanted it to extend onto the background paper too. Then I changed the Blend Mode to Screen (which lightens) and dropped the Opacity to 40%. Now the green looks more khaki, and it’s transparent so the detail in the photo shows through beautifully.

Adding a pink paint blotch layer on top of both the photo layer and the green paint layer without resizing, I changed the Blend Mode to Overlay (which lightens and increases transparency) and decreased the Opacity to 46%. See how the tonal changes make the photo more visually interesting? If the changes I make seem random, it’s because this is a very experimental process. I tried more than one Blend Mode and tweaked layer Opacity until I liked the way it looked. So it IS random! Don’t be afraid to play with your software. It’s how you figure out what you like and how to achieve it!

I made a Copy [CTRL/CMD>J] of the pink paint blotch layer and repositioned it. I made it quite a bit smaller than the first pink blotch, left the Blend Mode at Overlay and really decreased the Opacity to 21%. There’s a hint of colour, and the two other paint layers blend into the whole.

I was satisfied with the way the masked photo was looking so it was time to add in the second photo of Will’s siblings. I left the photo spot in precisely the place Juli put it, made no changes to it at all.

I clipped the photo to the spot and adjusted it to fit. I wish I could’ve gotten a bit more of Lily’s shoulders in there, but it wasn’t a big deal. For this layer, the Blend Mode is Darken and the Opacity is 61%. I played with the order of the layers a little; this one originally was the top photo layer, but it looked better as the bottom one.

This Copy layer of the second photo ended up with the same tonal quality as my large photo totally because of the Blend Mode change to Hard Light. With the Opacity at 100%, it’s tack-sharp and the sepia in the photo’s backdrop pops. From there, I finished my layout, adding in the other elements and applying custom shadows to each layer.

This is my finished layout. I LOVE how it turned out. The title reflects how although the three older brothers enlisted in the Canadian Expeditionary Force, Canada’s involvement in WWI was automatic when Britain declared war on Germany on August 4, 1914; George V was the titular head of Canada at the time. They all spent a significant part of their time overseas in Britain, which made their parents – who were still living there – ecstatic. Lily and Geoff served with the British Army; Lily became a nurse and Geoff was part of the Short-Service branch. Geoff enlisted at 17 1/2 and was forced to wait until after he turned 18 to be inducted. He looks like a baby to me… Okay, enough with the history lesson!

There may not be a tutorial next week; my dad is unwell again and is undergoing a procedure on Monday. I may be tied up for a few days… and I know all of you won’t mind if I’m MIA. Have a good week, stay safe and stay healthy!

PDF Version: https://bit.ly/3x0382c


Tutorial Tuesday (Photoshop Elements)

Jan’s Like a Broken Record… or “Everything on its Own Layer”

Those of you who read these tutorials regularly will know what I’m talking about. I really flog the “everything on its own layer” as a Work Smart Not Hard tip. It recently occurred to me that I should explain that mantra a little more clearly. So that’s what I’m going to do.

Let’s start with Brushes. Brushes are fantastic tools and can really take your layouts to the next level. There are so many ways to to customize them and make them work for you. But if you don’t put them on their own layer, whatever you do to them – adding a style, changing colour, resizing them, rotating them or even repositioning them, for example – you will also do to the other thing(s) on that layer. Let’s say you want a paint splatter behind your photo(s). If you splatter that paint right on your background paper layer, then decide you need to move it so it peeks out more from behind your photo(s) your paper is going with it. Then you’ll need to UndoUndoUndo until you’re back at the beginning.

By creating a new blank layer and dropping your paint splatter on it, you can move it around to your heart’s content.

For border Brushes, you may want to flip that brush horizontally to make a top-and-bottom border. If it’s on the same layer as a button, you’re bringing the button along too.

If that border Brush is by itself, it’s easy enough to Copy that layer then flip it.


Another example: this month’s Challenge brush from Alexis Design Studio has two starbursts and they’d look stunning in different colours. But if you add your brush to a layer that has a flower on it, you won’t be able to Copy just the brush to change the colour of one of the starbursts, because the flower will be Copied as well.

And you couldn’t apply a glitter Style to the starbursts either, because the flower would get glittered up too. Do that a few times and you’ll be a convert!

While we’re talking about Styles, the benefit of applying a Style to an element on a separate layer let’s you pile Styles on top of each other. In this instance, you’d be Copying the layer you want to alter, then adding the Style to the Copy layer. Imagine I created a Custom Shape of a flower.

By making a Copy layer, I can add an acrylic gel Style to the petals and a glitter Style to the centre, removing the parts of each layer that conflict with each other.

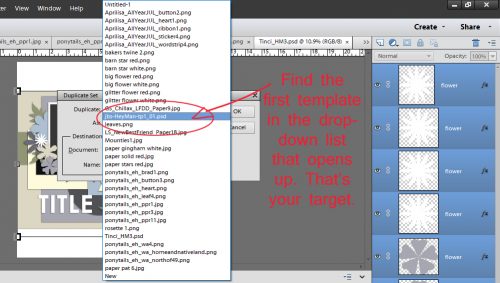
A slight variation of putting things on their own layer is one I use for titles, whether I use a font or an alpha. I create an new document where only the title will be manipulated. Sometimes it takes a little imagination to decide how to align the letters or the words, but the advantage of the new document method is that when I like how the title looks, I’ll Merge each word. Then I can select all the layers and Duplicate them onto my layout, where each layer is still intact but can be nudged into the most appropriate spot. To Duplicate those layers, click on the first layer in the stack, hold down the Shift key and click on the top layer. That “selects” all the layers. Then right-click and choose Duplicate Layers.

Look for whatever you’ve named (or not named!) your layout and choose it from the menu and click OK.

There, all three of my title layers are there and I can move them around individually, resize them, rotate them or whatever I think they need.

I couldn’t resist. I had to apply some styles to my title so you can see how easy it is to turn a font into an alpha.

Essentially, you want to have as much control over the things that make up your layout as you possibly can. These tricks have streamlined my creative process quite a bit – in addition to using all those keyboard shortcuts I show you each week. When I’m squeezing a little bit of time out of an otherwise busy day because the creative bug just won’t stop biting me, whatever will help me move things along is vital!

I hope this has helped with understanding ObiJan’s Golden Rule!

PDF Version: https://bit.ly/36C3YaN

Tutorial Tuesday (Photoshop Elements)

Torn Paper: A Review

Last week, Glee asked if I could run another tutorial on digital paper tearing, and I’m only too happy to oblige. Since I wrote my first version of this tutorial I’ve streamlined the workflow a bit, which is always a good thing! Work Smart, Not Hard!! This technique uses only tools already embedded in the software and it’s easily achievable by even the very new learner.

Let’s think about scrapbooking paper – the physical properties of actual paper. The best-quality paper is weighty and has a white (or sometimes black) core. It might have a pattern on one side and a solid on the other. It may be smooth as satin or have a lovely texture. When I work with digital papers, my mind sees them as the very highest quality physical paper there is. So this technique will take that into consideration. The patterned paper I’ve used is from ADB DesignsCoastal Cottage kit. (It’s no secret that I LOVE Diane‘s papers.)

In past tutorials I’ve talked about “destructive” and “non-destructive” methods of altering digital images. With “destructive” methods, pixels are removed from the image and can only be replaced by CTRL/CMD>Z-ing back a bunch of steps. “Non-destructive” methods only hide those pixels by using a mask. They’re out of sight, not gone; they can be easily revealed again if needed. This technique is “destructive” but so is tearing paper! I’ll be using the Eraser tool with a hard, round Brush of a moderate (250 pixel diameter) size at 100% Opacity.

I don’t know about you but I can’t tear paper in a straight line without folding, creasing and using a straight-edge to tear it against. Good thing for this technique, perfect isn’t the goal. Since my imagination has told me this paper is thick and stiff, I already know the tear is going to be jagged and will expose some of the white core. With the Eraser tool, I just chewed off some of the paper.

I think I need a higher contrast between my paper and the transparent background layer, so I’m going to add a Fill Layer in black to help me see what I’m doing. You might not need this step. There are a couple of ways to Fill space: by clicking Layer>New Fill Layer>Solid Color or just by using the Paint Bucket tool.

If you choose the Fill Layer method, make sure that box I’ve indicated is NOT ticked. It’s not a big issue when you’re creating your torn paper as a separate project and then adding it to your layout, but if you decide to tear your paper within your layout, it will matter. Here, I want to fill the whole background with black for contrast. The layer is only temporary, but why make it harder for myself?

There. Now I can see that torn edge much better!

Now for the really creative part! Let’s add in the white core. To do that, I’m going to make a Copy layer of my torn paper. Again, there are a couple of ways of accomplishing that: Right-click on the layer and choose Duplicate Layer and then follow the prompts (I rarely use this method) or CTRL/CMD>J. [If you develop a habit of using keyboard shortcuts you’ll be amazed at how much time and how many keystrokes it saves you.]

Yes, we did JUST do this, but we’re going to do it again. Only this time I WILL use the Clipping Mask box. I want to Fill the original torn paper layer with white, but JUST the torn paper, not the entire layer. It’s easiest to just use the Paint Bucket tool, but I want to show you the options.

Yep, tick the box!

Then I want to Merge the Fill Layer with the torn paper layer (a step that’s eliminated when using the Paint Bucket… WSNH!) so I CTRL/CMD>clicked on each layer then right-clicked to open the layers menu so I could select Merge Layers. The keyboard shortcut for this step is CTRL/CMD>E.

The white core has to be visible (otherwise why have it in the first place!) so I nudged it up a bit with the Move tool. It’s a little too perfect, but we’ll fix that.

When a real sheet of heavy scrapbooking paper is torn, the white core will be exposed to varying degrees, with some wider bits and some much narrower bits. To emulate that look, I went back to my Eraser tool and nibbled away some of the white layer and some of the patterned layer too.

Okay, that’s more like it!

This step is entirely optional. Torn paper isn’t perfectly smooth, and I like to go for as much realism (with the fewest hassles) that I can achieve.  So I’ll show you how to add some texture to the white core layer using Filter>Texture>Texturizer.

There isn’t a perfect texture Filter in the toolbox, so I use Canvas. I just want a hint of irregularity on my white core and this’ll do it.

There are some decisions to be made when using Filters. Light Source is a big one. I tend to use Top Left more than anything, so that’s what I’ve chosen here. I Inverted as well, which isn’t as visible as it would be with the Burlap or Brick Textures. Scaling refers to the overall size of the deflections and Relief is how much of a vertical deviation the Filter provides.

On a computer screen this effect isn’t in-your-face-obvious, but trust me, it pops when you print your layout.

AGAIN? Why?? That torn edge of the patterned paper will cast a hint of shadow. The easiest way to add a new Layer is to click on the sheet-of-paper icon. To add a new layer this way UNDER the currently active layer, hold down the CTRL/CMD key when you click it and it’s done. Otherwise, Layer>New Layer or CTRL/CMD>SHIFT>N will add a new layer above the currently active layer, but it’ll then have to be moved under the torn paper layer.

I’m telling you, the Paint Bucket tool is such a nice shortcut! But make sure you’ve Selected the edge of the torn paper by CTRL/CMD>clicking inside the layer’s thumbnail (that little “photo”) before you dump your paint.

Just as I did for the white core layer, I used the Move tool to nudge the shadow layer up and out from under the torn paper layer. It’s pretty obvious in the image below, but I’ll Blur it a tiny bit and it’ll look much more natural.

Filter>Blur>Gaussian Blur… is the ticket.

If the shadow layer is Blurred too much, it’ll just make the area where the paper and the core meet look dirty. So don’t go too far!

Now all that’s left before I’m finished is to Delete the black contrast layer and Merge the three paper layers together.

And now my torn paper is ready for use on my layout! It’s literally a 10-minute technique that really adds some interest to the image.

Thankfully the heatdome has moved on and we’re only worried about wildfires out here in the west part of North America. The eastern part is having the opposite problem, with a tropical storm dumping water and creating tornadoes. And still… COVID. I had my first vaccine last Wednesday and knew I was going to react – having had the virus I had antibodies already. I felt pretty awful for about 36 hours, and then magically felt better. The vaccine is proving its worth; 99% of the people who have died from COVID since May have been unvaccinated. Pretty good stats!

See you next time!

PDF Version: https://bit.ly/3xrgE06