Tutorial Tuesday (Potpourri)
UNZIP Me Dahling! Updated 

PDF Version : https://bit.ly/3dRjg2U

It’s been a bit of a gong show at our house recently (my parents and 2 of my siblings have been down with COVID) and I’m running about 3 days behind. So rather than give you a nothing-burger tutorial, I’m going to update an older one that might come in handy in the very near future.
I don’t know about you but I will never have too many digikits!! But being a digikit hoarder has its downside… All those kits have to be unzipped and organized. Who has time for that? And then there’s Digital Scrapbooking Day (well, more like DSWeek!) coming up in no time, with all the fantastic new products it brings with it. That you’re going to want to play with right away. What to do, what to do?


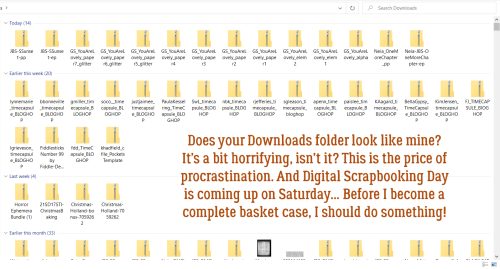
I’ll be the first to admit that my downloads folder is a mess.

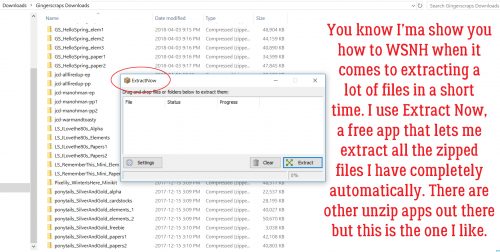
I’m trying to develop some better work habits, and keeping on top of unzipping is one thing that would really make a difference. So I’m going to show you a terrific app I found that lets me unzip multiple files with only a few keystrokes. It’s called Extract Now (clickable link) and it’s FREE! I work in Windows, but there’s a Mac version too. I’m guessing it’s similar in layout and behaviour, but I can’t say that for sure. I’ve tried a few others, one of which carried a virus… and this is the one I liked best for its ease of use. It’s on my taskbar now for ease of access. The menu looks like the image below. (For newer readers, WSNH is code for Work Smart, Not Hard!)

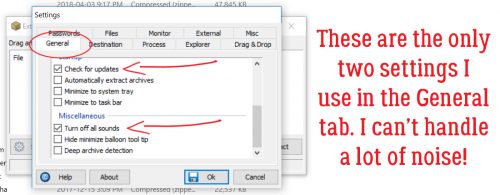
There are several ways you can customize the performance of the app. I don’t use a lot of them, but the ones I do use include letting it check for its own updates and turning off the sounds. I’m surrounded by noise all day every day (if you’ve ever lived in a housing development under construction, you’ll know what I mean), so I don’t want a bunch of added noise in my environment if I can turn it off.

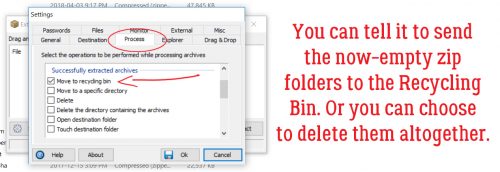
In the Process tab, you can tell it what to do with the zip folders after they’ve been extracted. At first I had the app delete them as soon as they were extracted, but I had to retrieve some stuff and now I manually delete them.

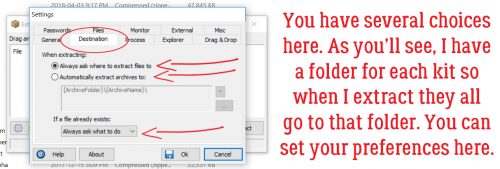
This is where Extract Now really shines. You can designate exactly where your unzipped files are sent by using the Destination tab. I had it set up to extract everything into a Downloads subfolder, but found I left things in there forever and eventually forgot about them. The Help button is really useful at showing you how to customize the app for your purposes.

I create a new folder for each kit I’ve downloaded. If you’re into keyboard shortcuts, hit CTRL/CMD>Shift>N  and you’ll have a new folder you can call whatever you want.

Over the years I’ve refined how I manage my digikits. They all go into their own folder, which later becomes a subfolder within my store folders. I name them all with the same format, designer’s name and kit name spelled out in full. That makes it so much easier to find what I’m looking for later, and it helps too with credits when I post my layouts to various galleries.

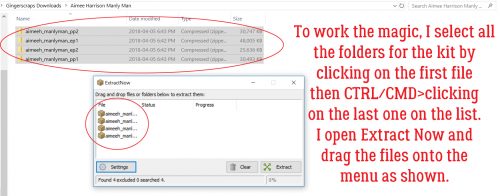
I select all the zipped folders for each kit by clicking on the first one on the list, CTRL/CMD>clicking on the last one and voilà!! Then I can open up Extract Now and drag them onto the menu.

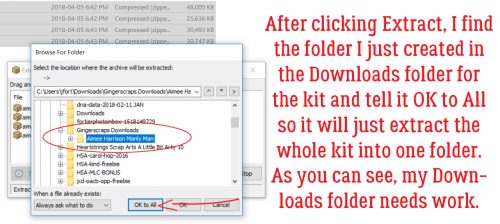
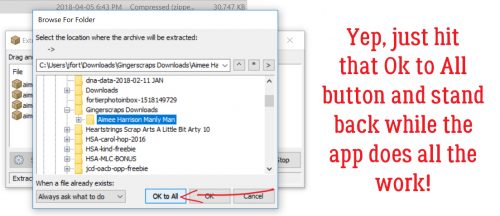
When I click on Extract, a submenu opens asking me where I want the files to go. This is when I find the new folder I’ve created for the kit in my Downloads folder and click on it.

Click on OK to All and the app goes to work.

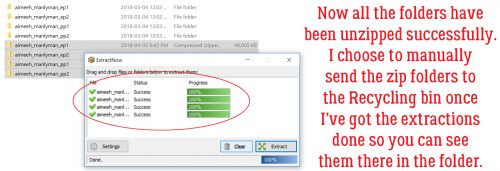
You can watch the progress as your files are extracted. When all the files are successfully unzipped, you’ll see green check-marks next to each one and there’s a new button activated at the bottom right. Click on Clear and all the files are removed from your app workspace. I can extract several dozen files in a matter of a couple of minutes with this useful tool.

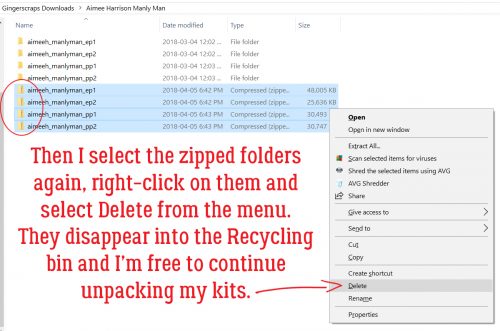
Like I said, I choose to manually delete the zipped folders from my kit folder, which is super-simple because they’re all still selected. After I minimize or close Extract Now, I only have to right-click on the selected files and choose Delete from the menu.

We all have much better things to do with our time than extract one file at a time, right?! Give it a try and see what you think. (You can always remove the app if it doesn’t work out for you.) October 1 will be here before we know it. Now go get your scrap on!

PDF Version : https://bit.ly/3dRjg2U

Tutorial Tuesday (Windows)

Taming the Wild Template


I know there are many of you out there facing serious challenges with from fire or hurricane, so I want to thank you for popping by to read this Blog post. We’re a long way from the nearest fire in the western part of the continent, but due to an air inversion happening high above the Earth, we’ve been socked in with smoke for three days straight. My throat is sore, I’m coughing, my eyes are burning and I have a headache… and can only imagine how much worse it is for those in much closer proximity. I just saw a news report from Pensacola and am praying hard that those in the path of this storm are safe and dry. As if 202o hasn’t been bad enough…

Onward. After last week’s tutorial went live, DebS posted a comment that I’d like to share with you. “I have a question I’ve been hesitant to share as it isn’t a creative question, but one of organization, that I’d LOVE to see some input on. I’ve always created my own pages from scratch… at the same time, I have collected a rather substantial body of templates over the years (hundreds, in fact!) but not used them… sad, I know!! Some are clearly labeled — such as 2 pagers, some are just a date — Sept 2019 template. Many are completely nondescript — jbrt.08… all stashed in a folder called templates, and many, many others are attached to the bundles they came with, filed by designer or topic. My biggest issue is that if I have a page I want to place say 5 photos on, I can spend more time rifling through templates than I might spend simply creating the page myself from a blank slate, and so I continue to stash templates while creating pages myself. I’m an incredibly organized, detailed person, who is running out of time to create pages myself, and whose lack of a good system for organizing templates for easy access is driving me nuts. I’ve never seen input on this topic, but would love some help!

Before I launch into a step-by-step guide to my system for organizing templates, I’d just like to say a couple of things. First, there is no such thing as a “dumb” question. Asking questions is how we all learn new things. Asking questions is so much better in a lot of situations than guessing and being really wrong (looking at you, nursing!). Digital scrapbooking is more than just pretty layouts, as her comments show. If we never talk about the logistics, the mundane aspects of it, we might miss out on some good tips for making it more fun and less work. DebS’s problem is one I struggled with too, and led to me looking for solutions. The method I’m going to expand on below is what I came up with; it works really well for me but you might have your own, much better methods. So my disclaimer is this: if you have a system for organizing your templates that works for you, don’t reinvent the wheel! Second disclaimer: I work on a PC, and have ZERO Mac knowledge, so if you’re an Apple fan, this tutorial isn’t for you.

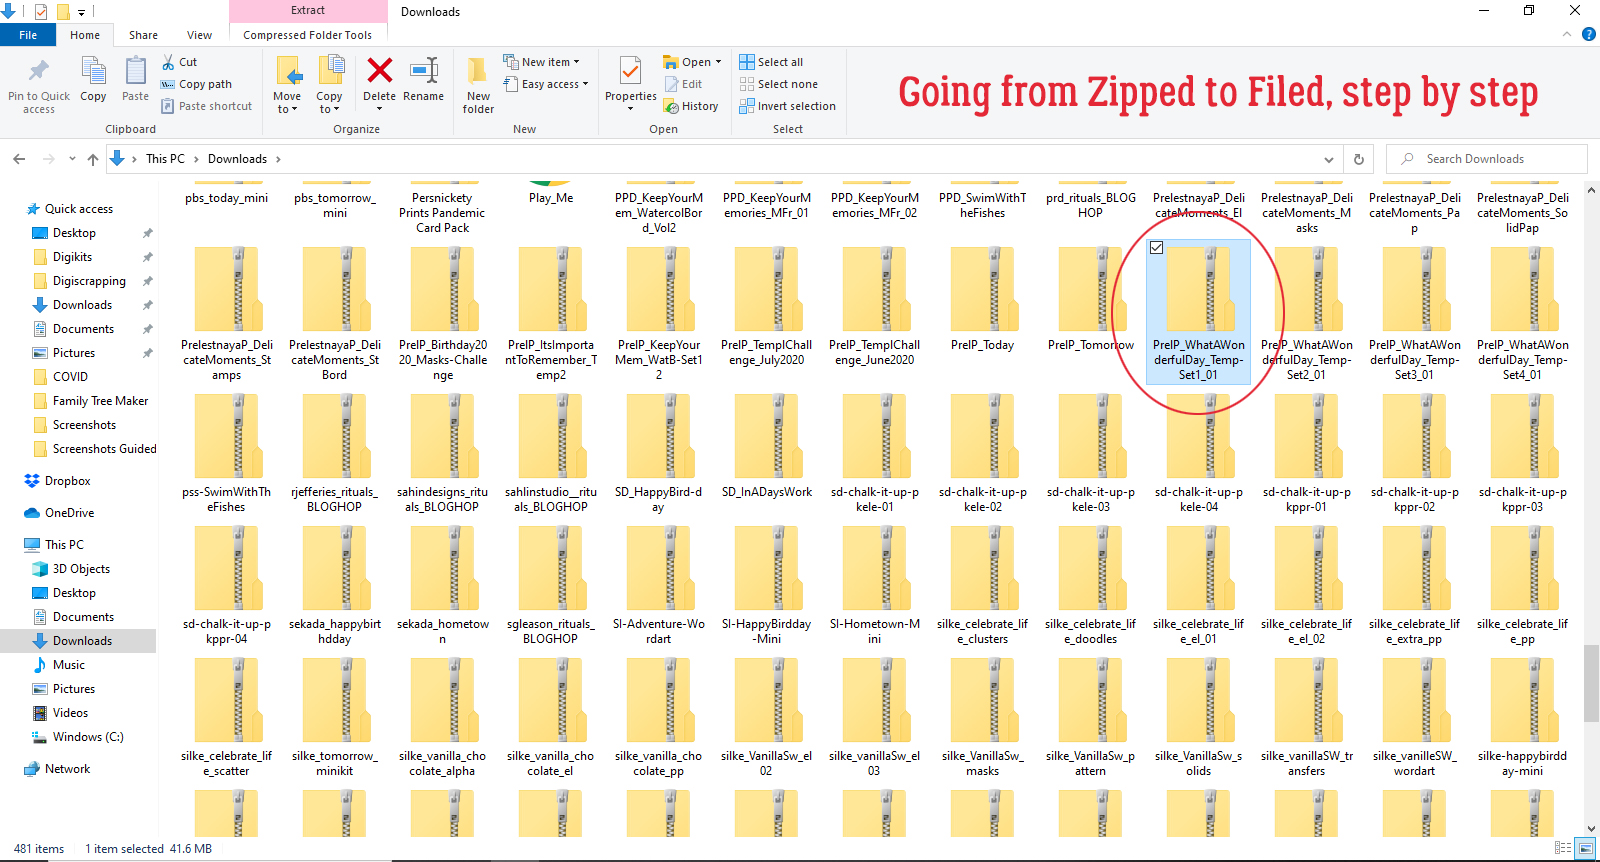
Let’s go! As usual, I’m going to show all the steps, in case there are readers who are very new to our wonderful hobby. Feel free to fly by the stuff you already know/do. I’m going to start with the very basic unzip/extract of downloaded content. (Please ignore the huge collection of zipped folders I have on my laptop… I’ve been busy setting up house. I’ll get all this stuff sorted out soon! 😉 ) The highlighted folder below is one containing templates from the lovely Irina, also known as PrelestnayaP Design. They’re part of her What a Wonderful Day template bundle.

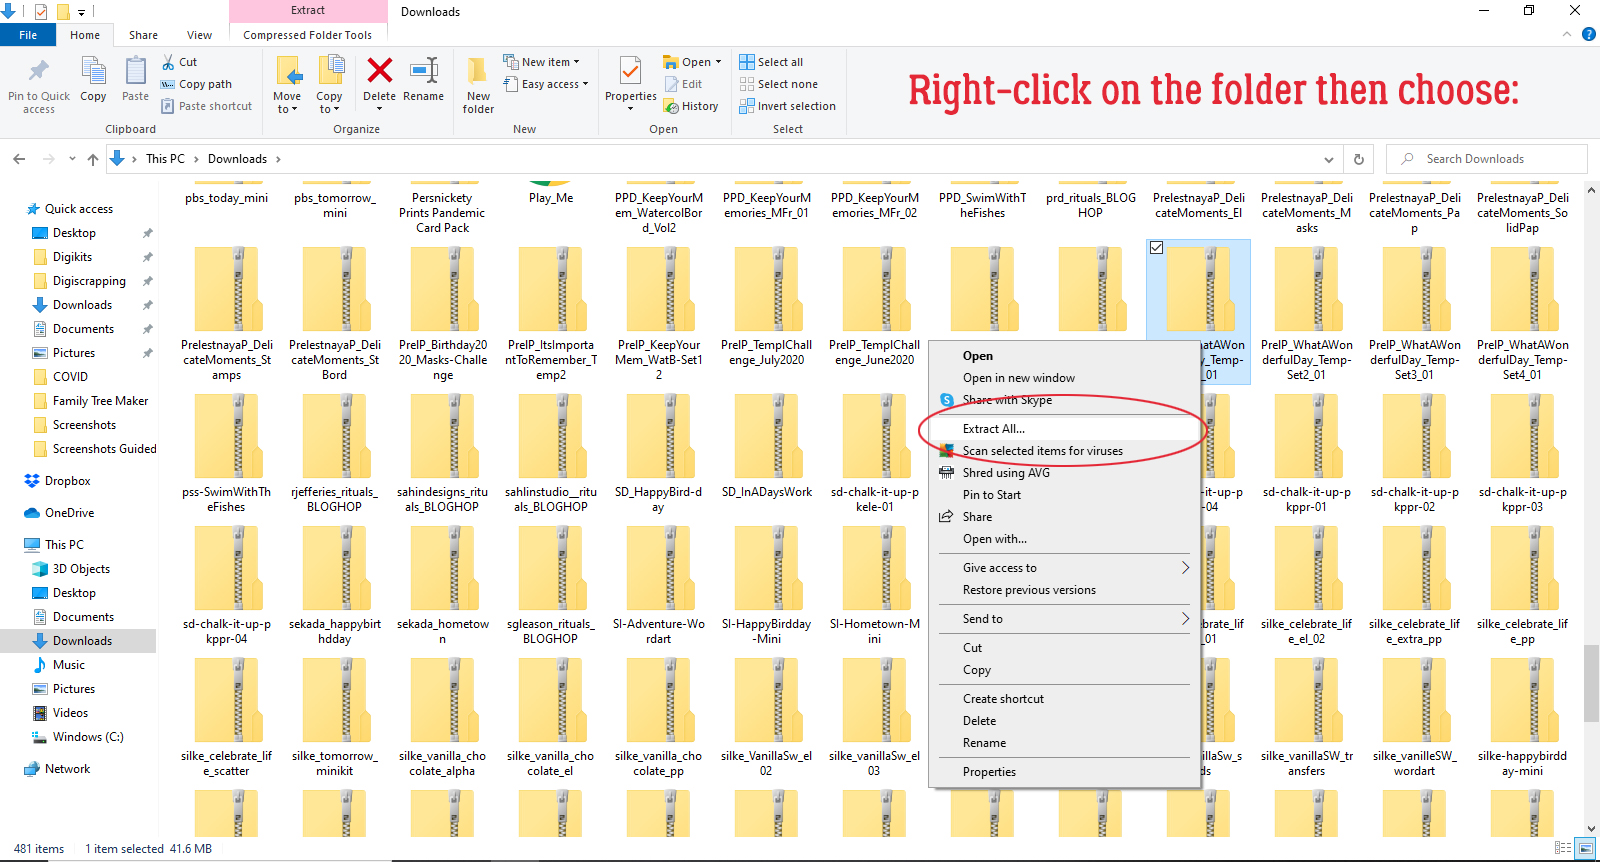
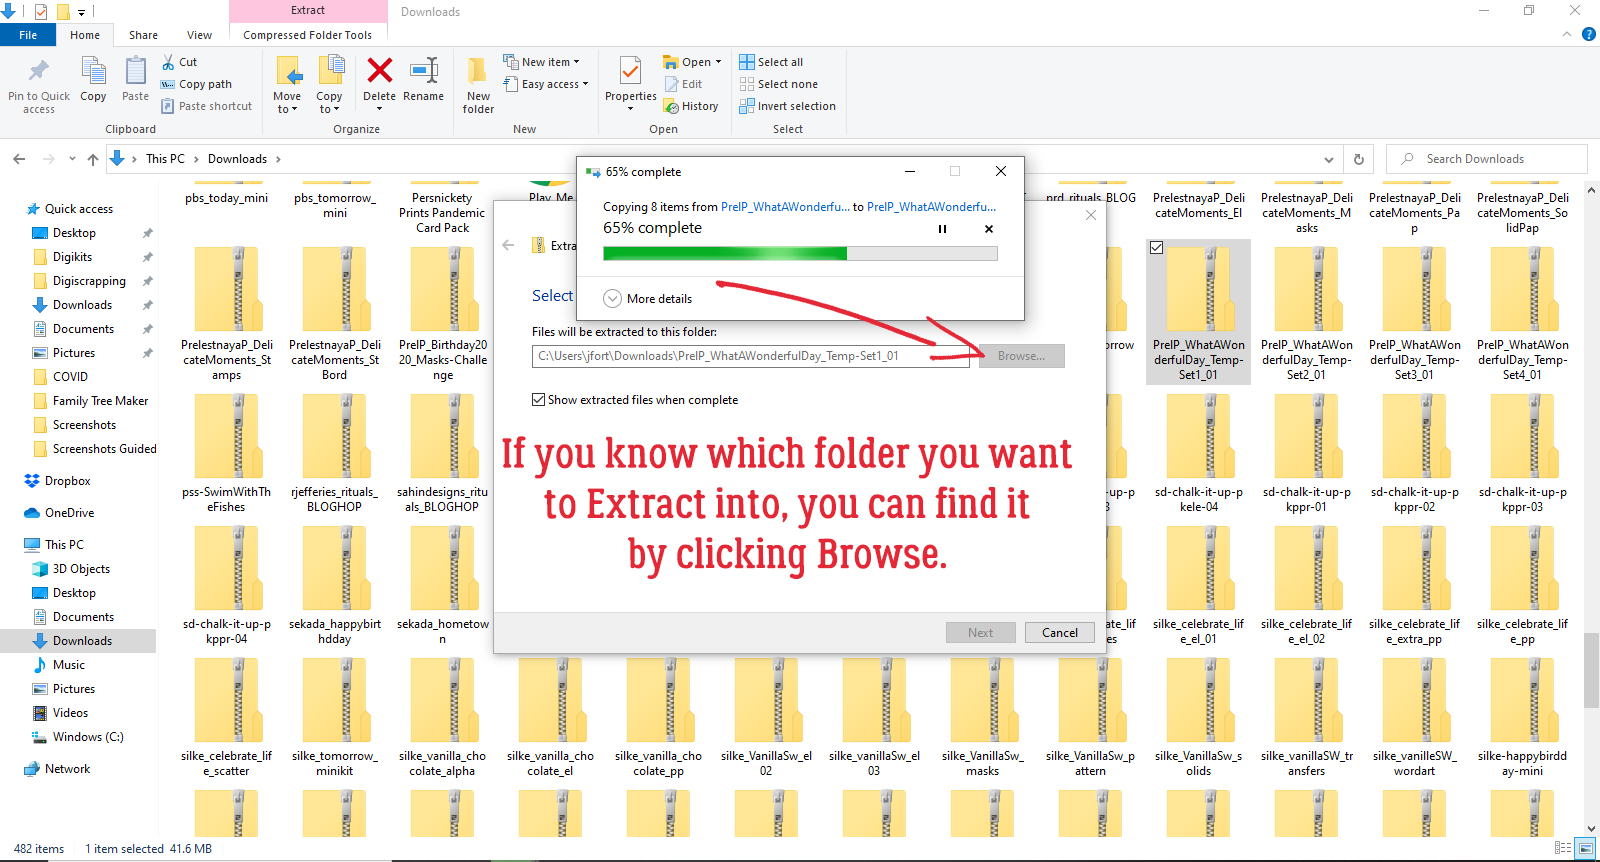
The easiest way to unzip a file in Windows is to right-click on the folder and select Extract All from the pop-up menu. We’ve looked at some software apps that unzip multiple files in a previous tutorial; for the sake of brevity we’re just doing a single folder so we’re using the easiest method.

There are so many ways you can make your software do some of the work for you. If you’ve already got a folder ready for the contents of your zipped folder, you can tell Windows to find it for you by clicking on that Browse button. Then you can transfer the contents of that folder right into the target folder. I use this trick all the time when I’ve downloaded brushes, word arts and mini-kits for the GingerScraps challenges. I just make a bunch of folders in my GS Challenges master file and move them into their new homes in one step.

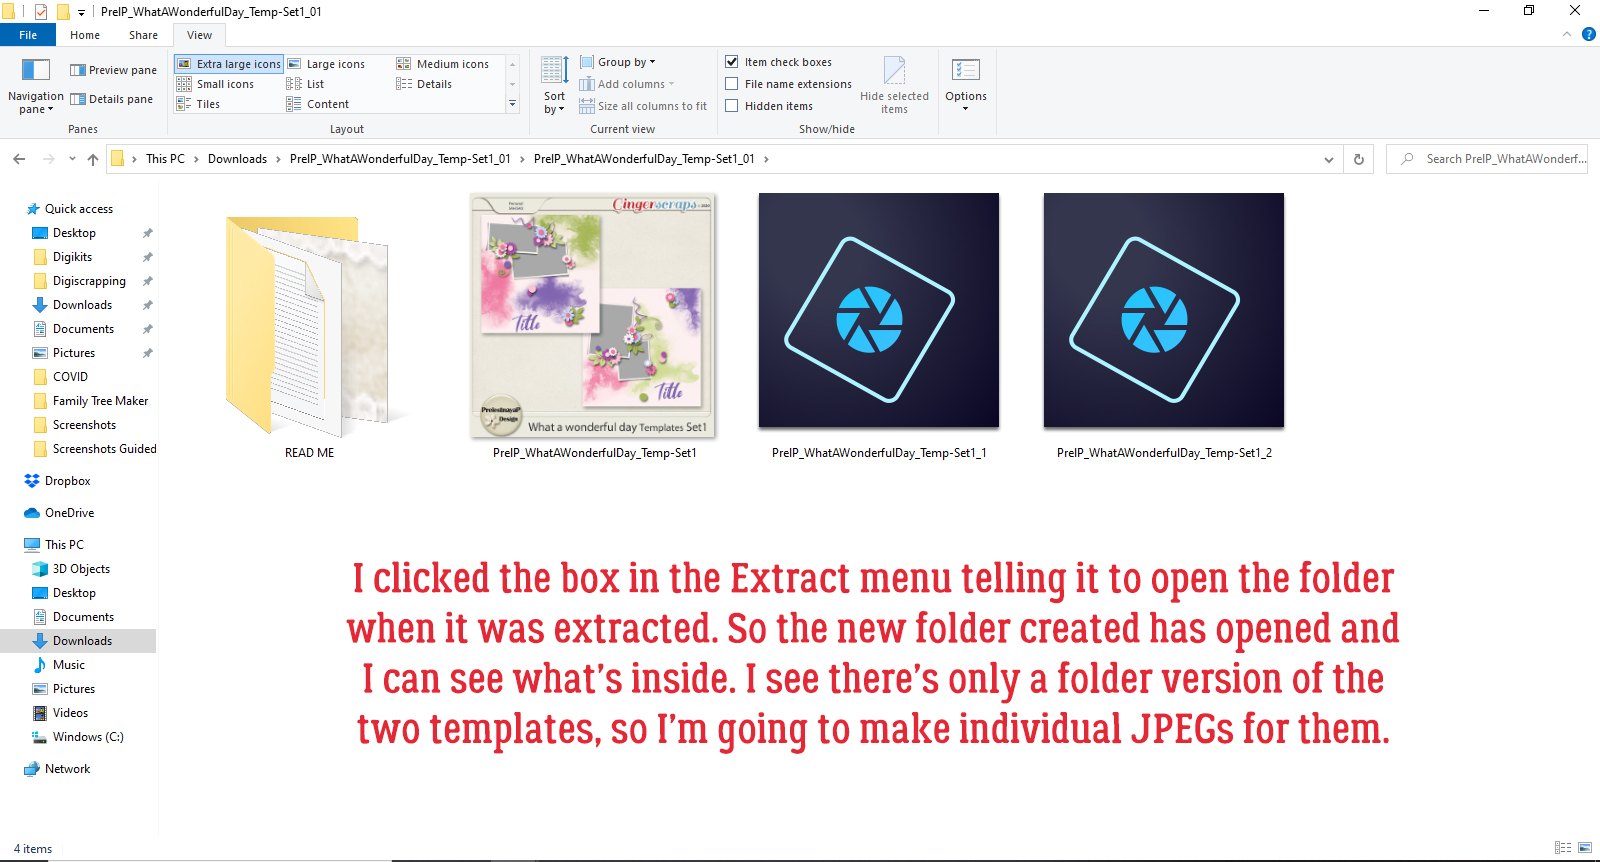
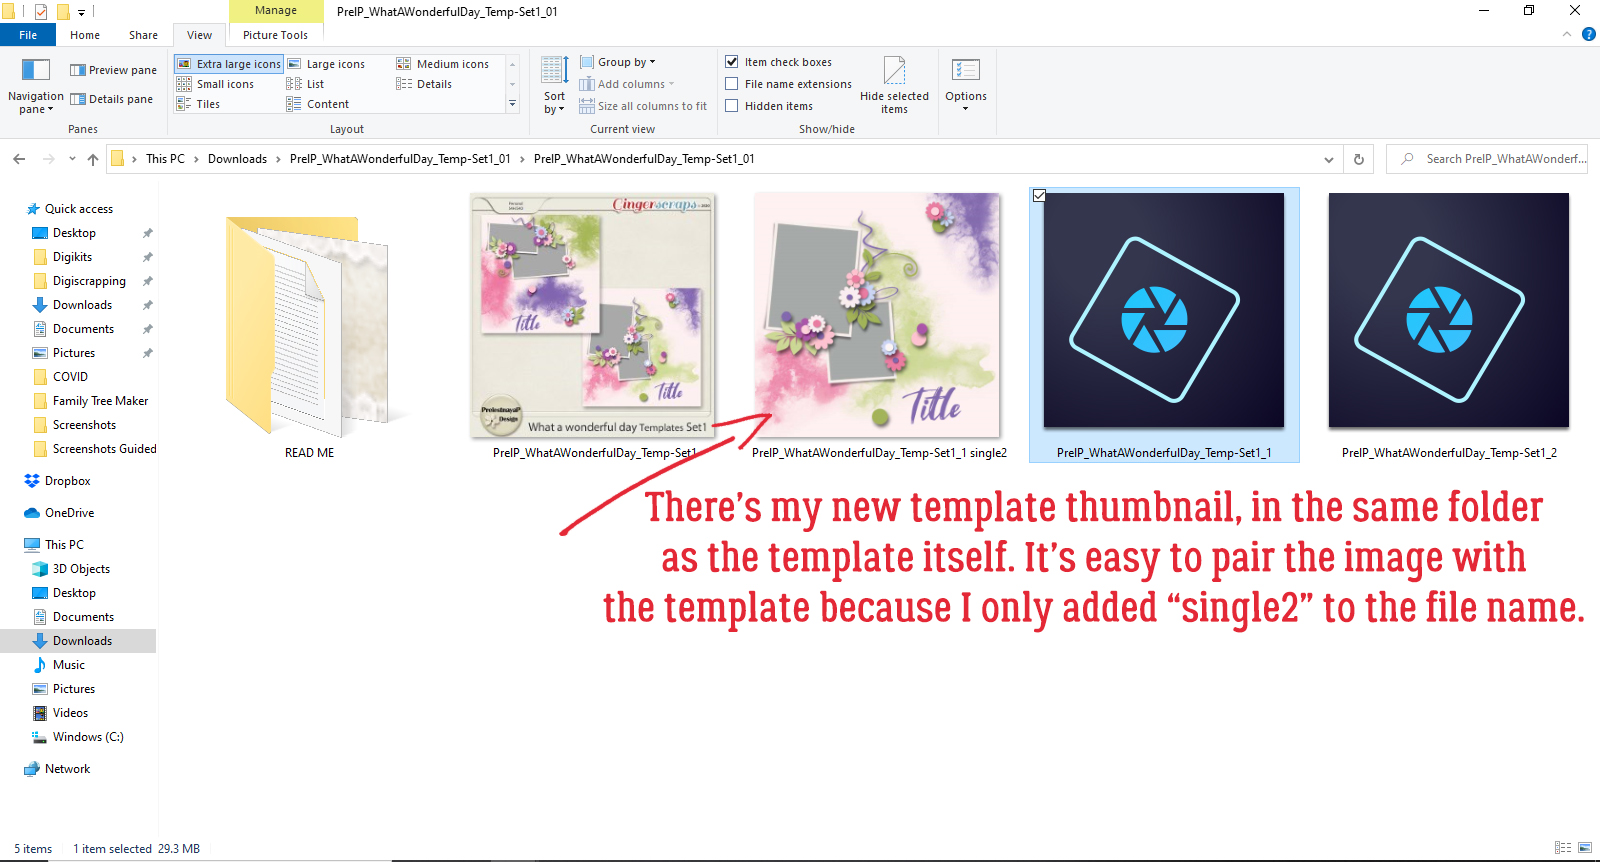
In the Extract menu there’s a box just under the destination folder block that says “Show Extracted File When Complete“. This command opens your newly-extracted folder right after it’s unzipped. I usually leave this box checked all the time, but there are times when you might not want to to that. For example, if you’re manually extracting a bunch of subfolders inside a folder and want it to be done quickly, unclick it. But for this exercise, I WANT the folder to open so I can see what’s in it, since I’m in an organizing mood. This is what was inside my extracted folder. Some template designers create 600×600 pixel preview JPEGs of their templates and some do what Irina‘s done, creating only a folder preview. With time you’ll know which designers have the JPEG previews and which don’t. For my method to work for me, I need to have a thumbnail image, so I’m going to create some.

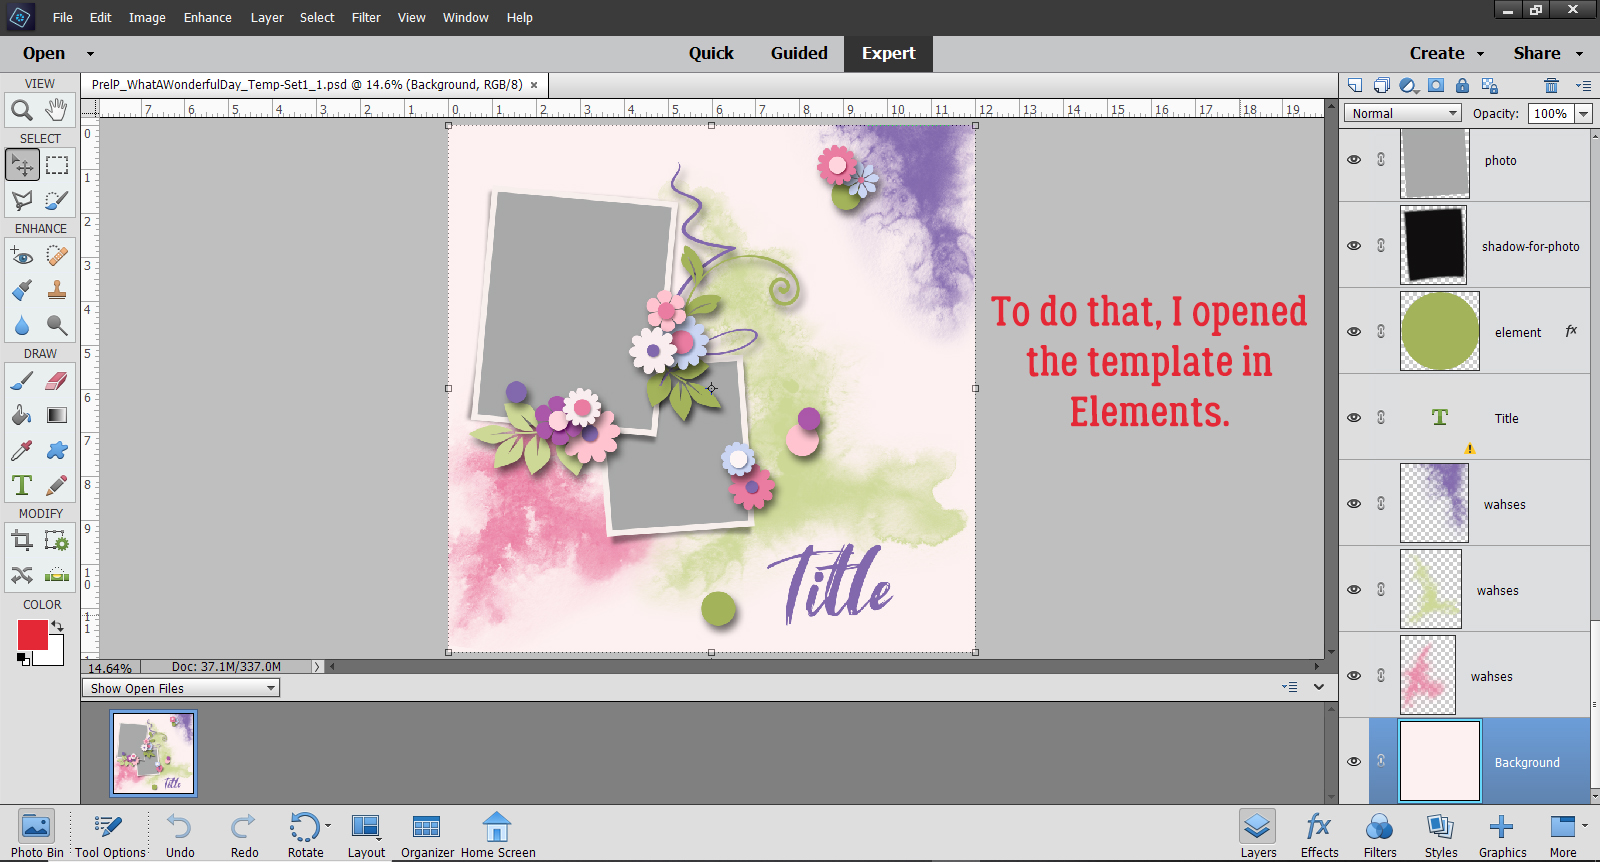
I opened the template in Photoshop Elements so I could create my preview JPEG.

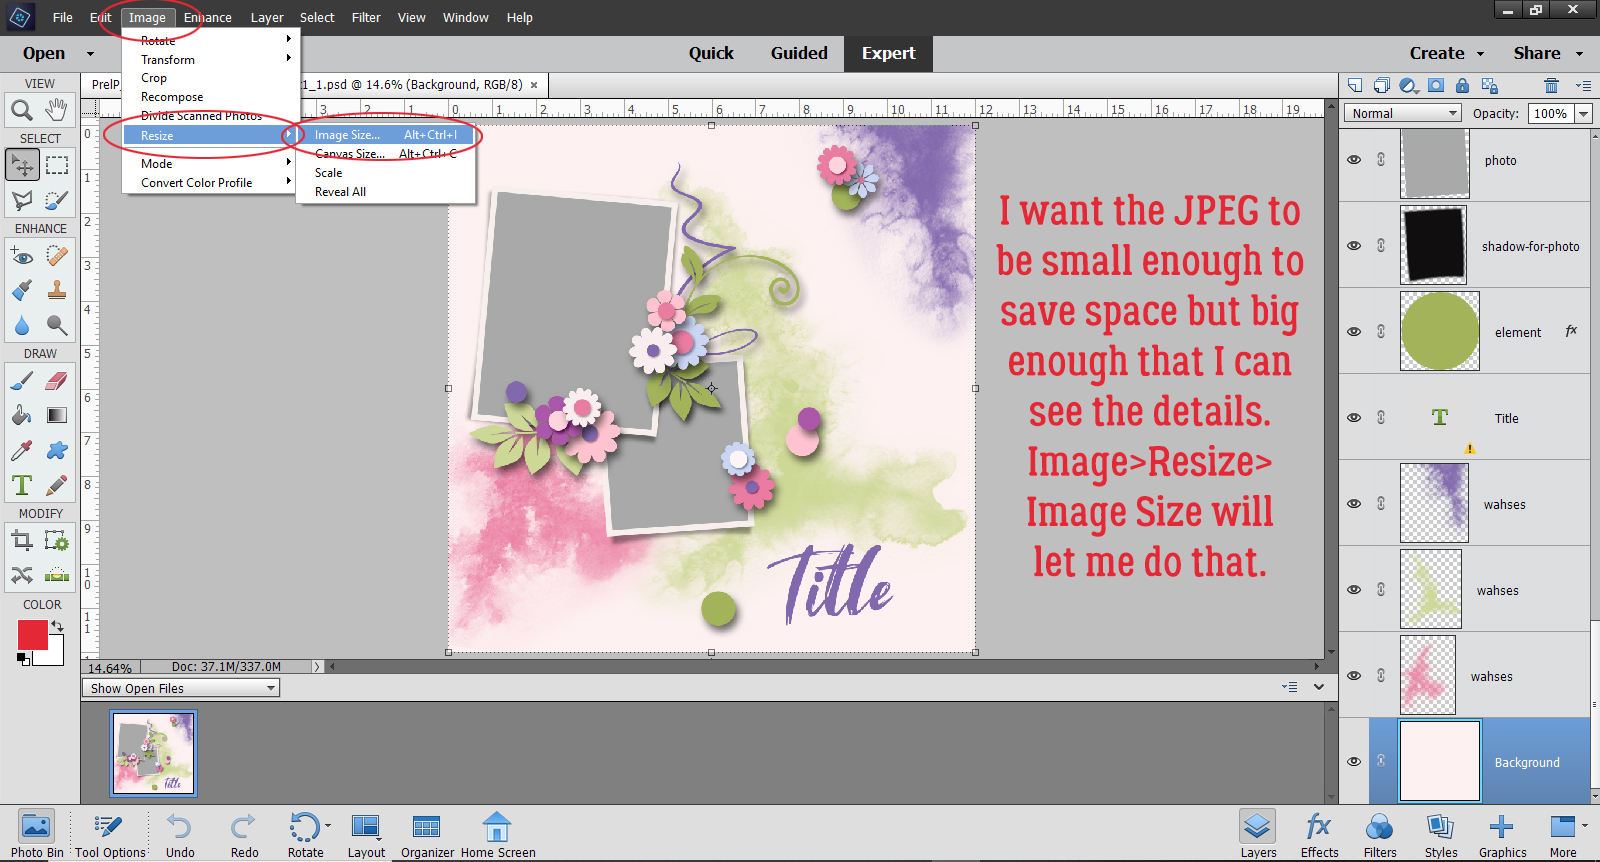
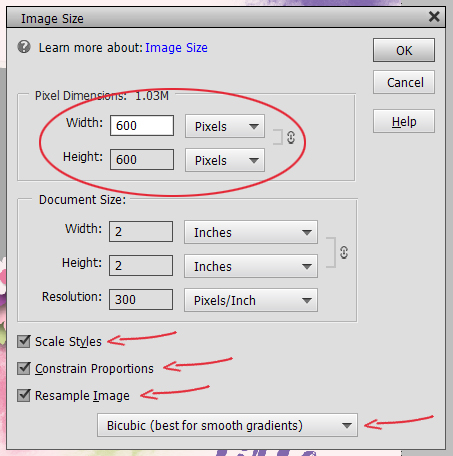
There are a few criteria for these previews. They should be small enough so they don’t eat up hard drive space, but sharp enough that you can easily assess the template’s suitability for your layout. When I’m creating a preview I just resize the whole template to 600×600 pixels, either by clicking Image>Resize>Image Size or by using the keyboard shortcut CTRL/CMD>Shift>I. (Trust me, you’ll get really good at using keyboard shortcuts once you start. For me they’re almost automatic now!)

This is the Image Size menu. The boxes at the bottom are always selected for me, as presets. Having presets makes everything so much less work! I can just change the size of the image from 3600×3600 to 600×600 by typing the digits in. This is exactly how I save my finished layouts for Gallery posting. It’s important to Scale Styles so your shadows and other styles retain the appearance they have on your original layout. But I digress!

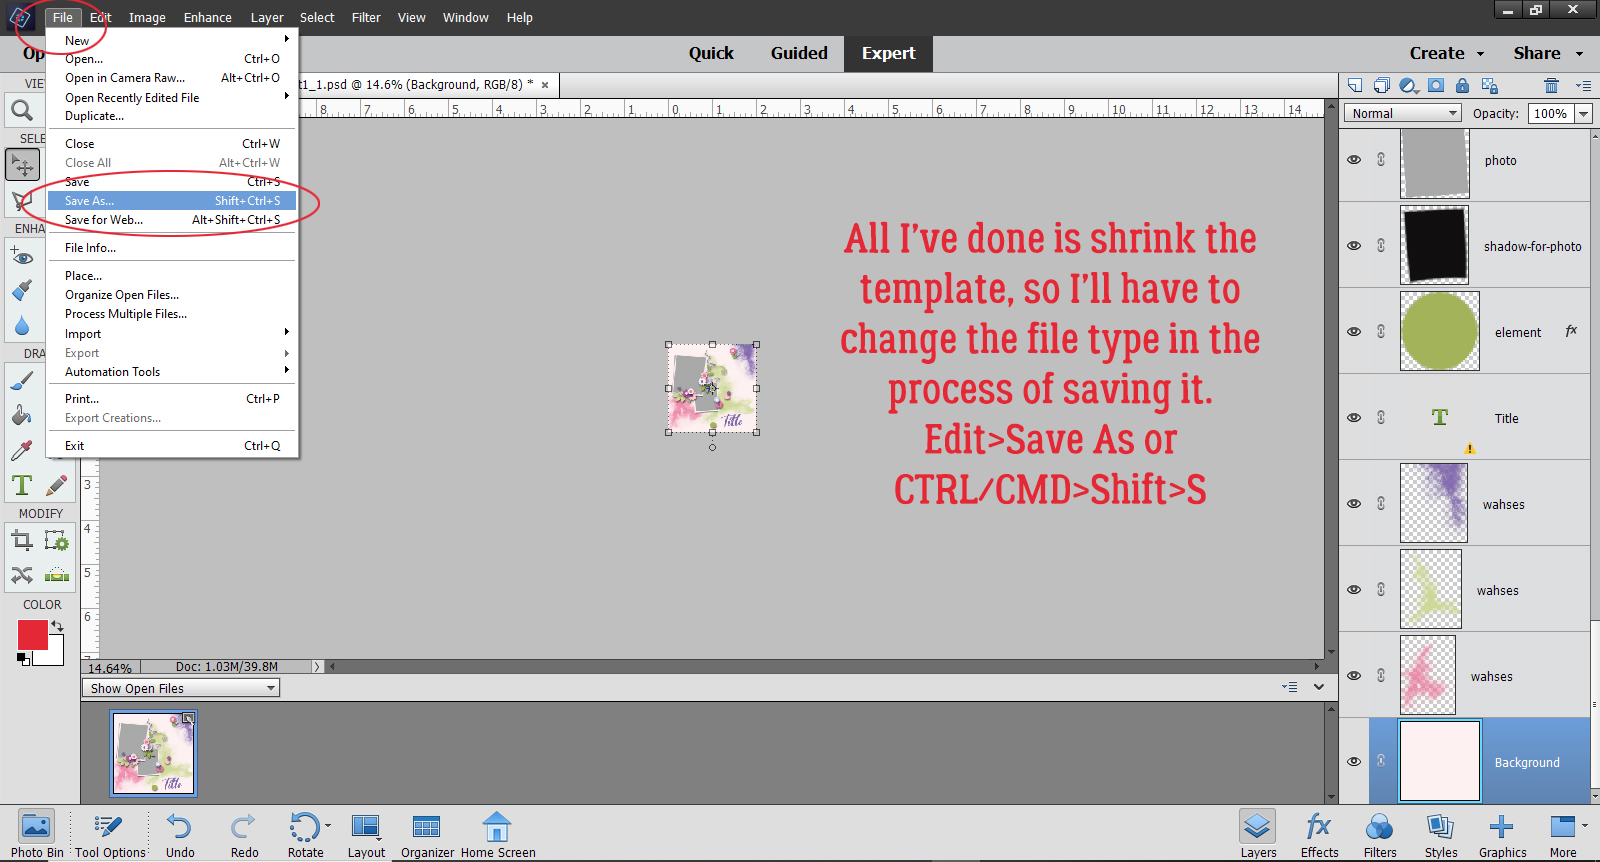
Because all I’ve done to this template is to shrink it, I’ll need to change the file format from PSD to JPEG as I’m saving it. So I’m using Save As, which prompts me. There are two ways to reach this function, either by clicking on Edit>Save As or by CTRL/CMD>Shift>S.

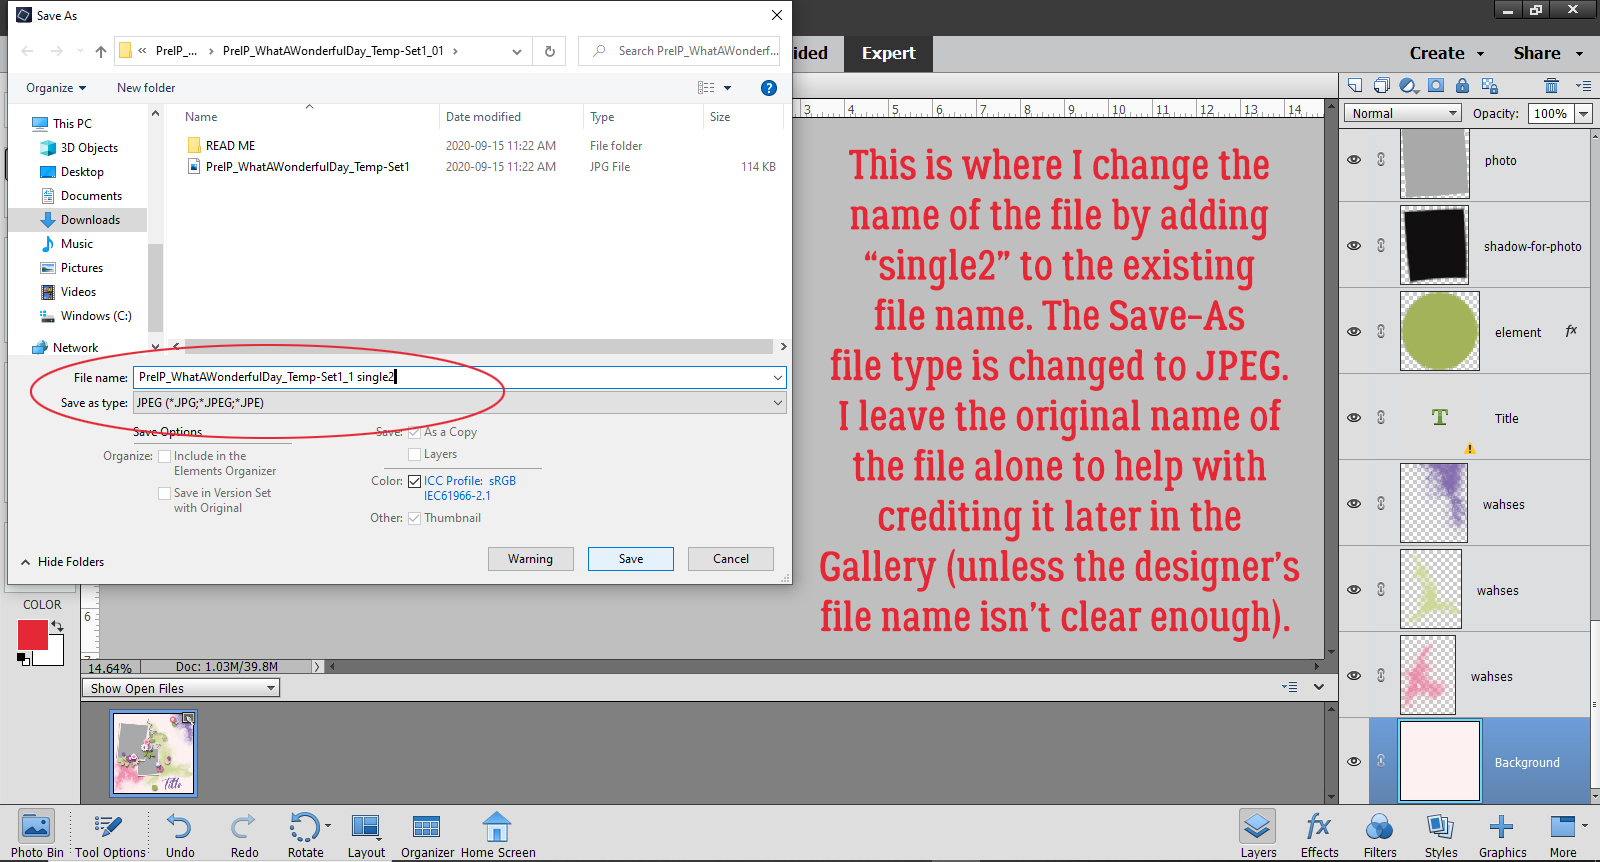
Here is where I change the file format to JPEG. But I also change the FILE NAME. I leave the name the designer gave the template alone, but I add a descriptor to it. This template has 2 photo spots and it stands alone, so it now becomes “PrelP_WhatAWonderfulDay_Temp-Set1_1 single2“. There are other descriptors I sometimes use: if the photo spots are square, for example, or round, or if they’re masked spots. You are welcome to choose whatever descriptors work with your brain.

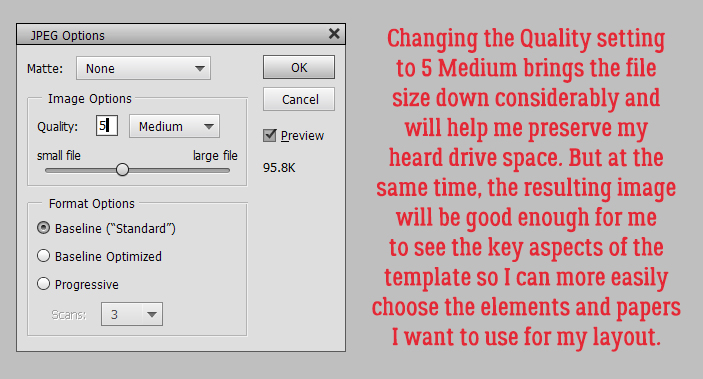
Once I click Save, this menu pops up. Remember, I don’t want my previews to gobble up my hard drive space, so I drop the Quality of this image down to 5. (I usually edit a whole bunch of template folders at a time so I just leave all the settings until I’m done.)

I Saved the preview to the same folder as the template, and there it is!

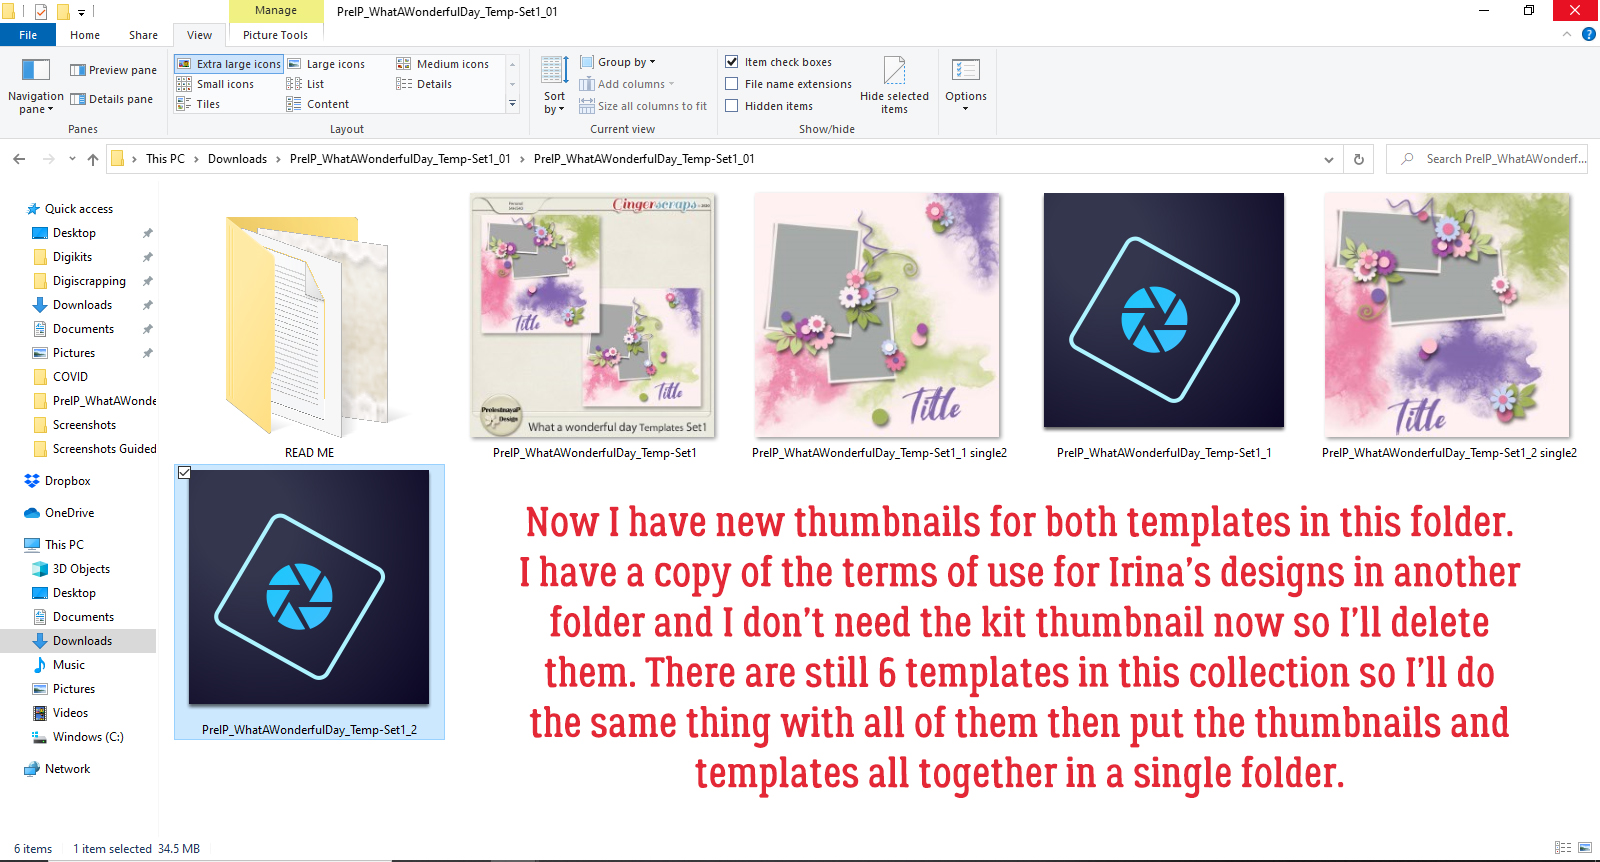
I went through the same process to shrink, rename and save a preview of the second template in the folder. Now both preview thumbnails are in the folder. I don’t save the terms of use more than once, and I have no need for the folder preview that was already in there, so I just delete both.

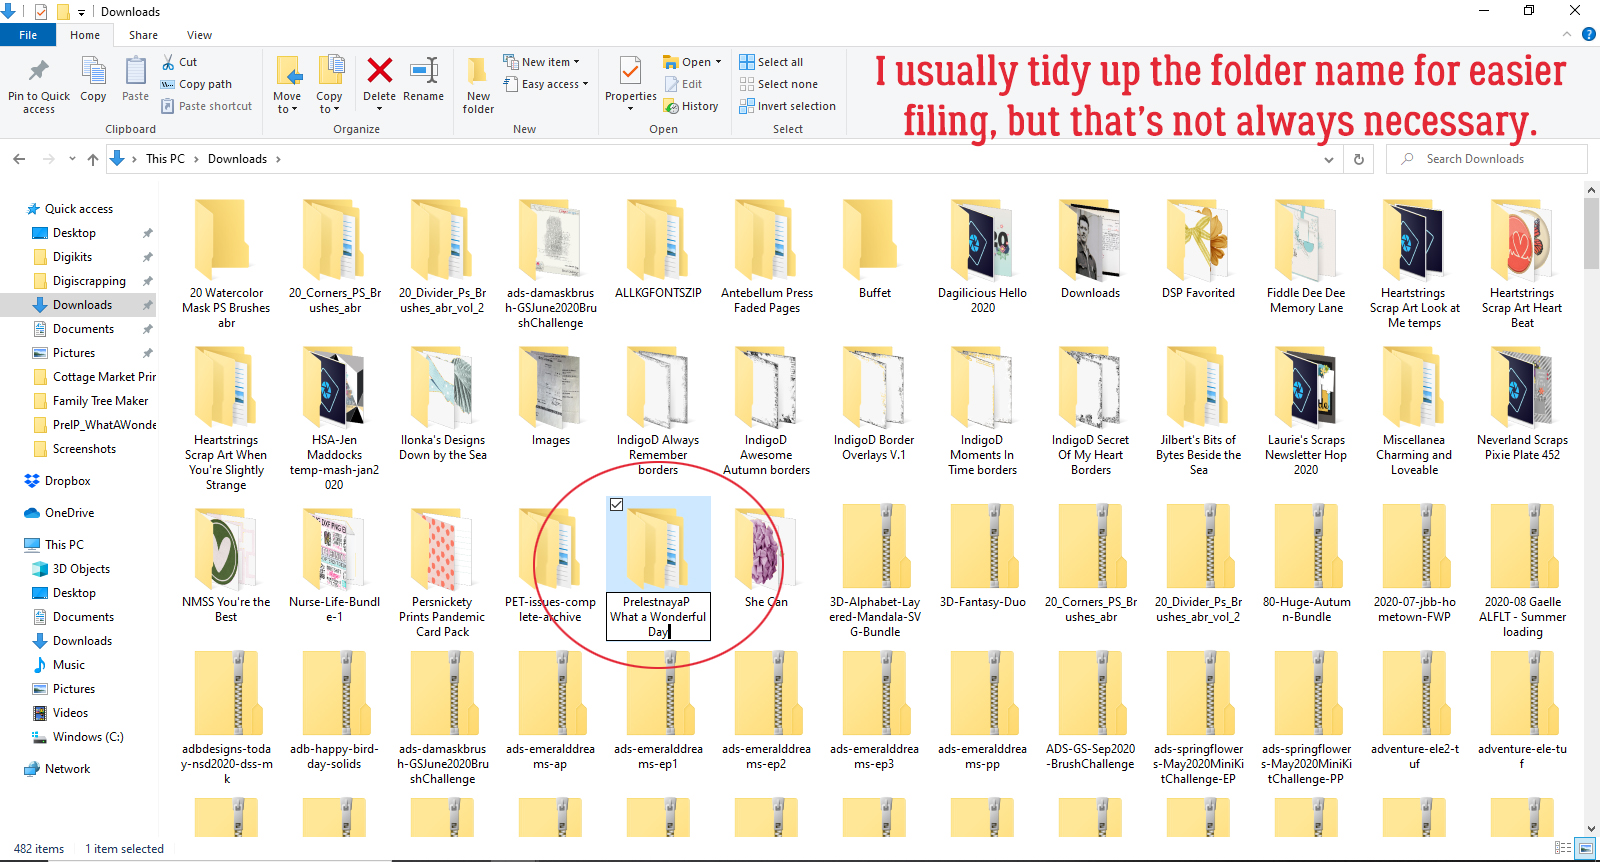
Then I usually tidy up the name on the folder itself before moving it to its permanent home. It isn’t always necessary, but I want to know who the designer is, which store it belongs to and what the kit’s name is. This step is optional – you do you!

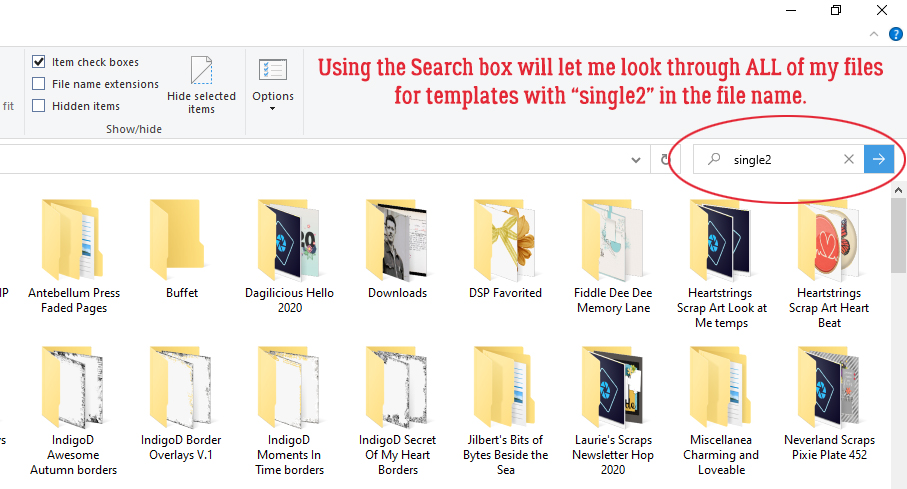
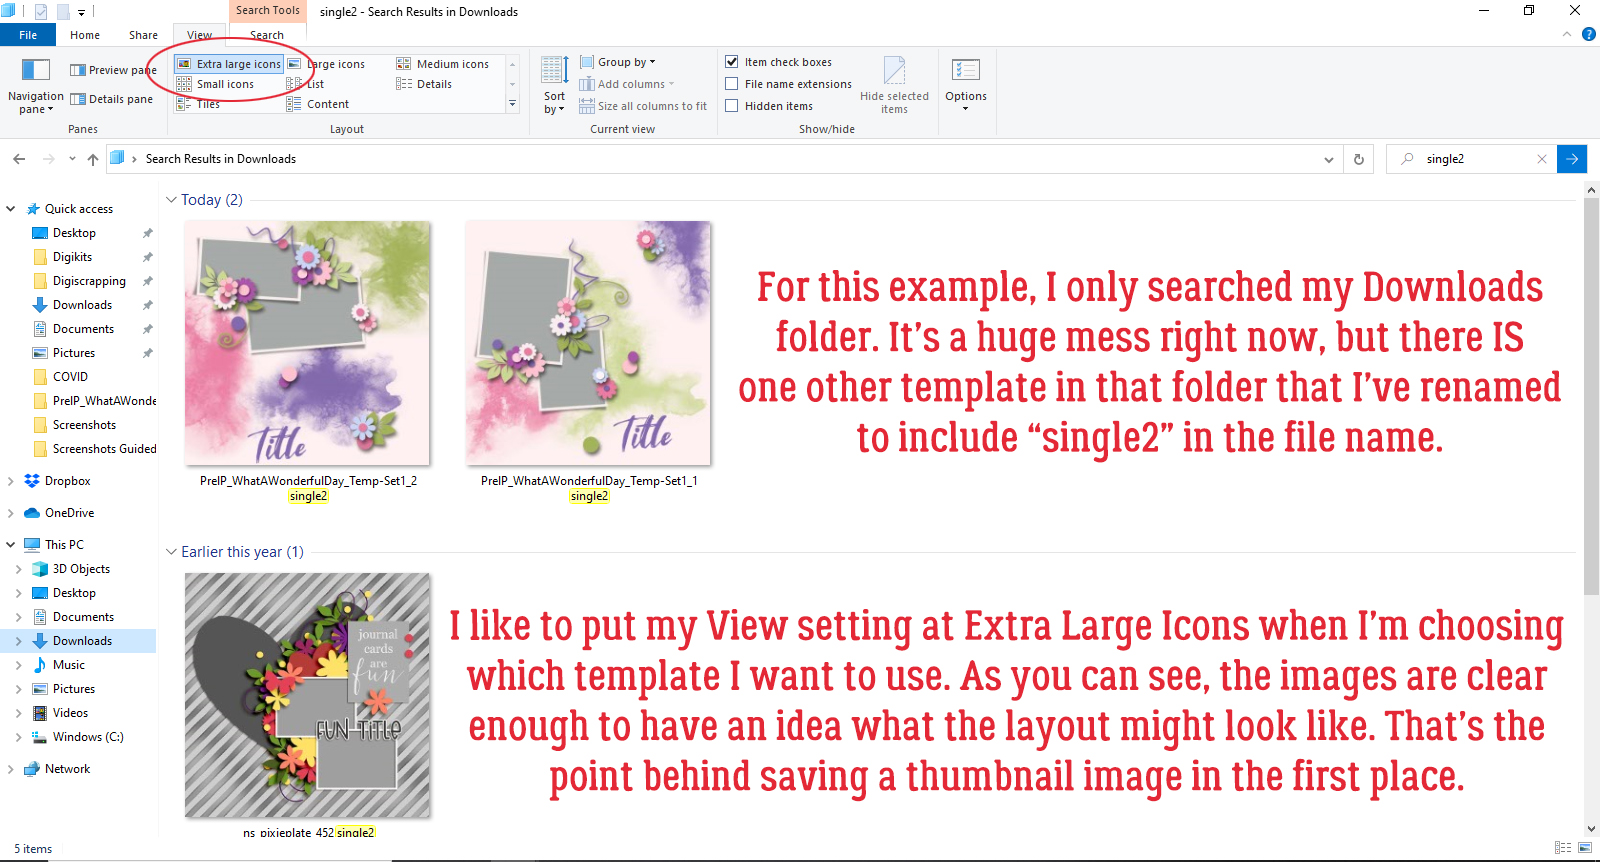
Now to show you how my method works to speed up workflow on top of organizing my stash. I’m going to let Windows Explorer find the templates I just previewed. Over on the right side of the screen there’s a search box. (I’m still in my Downloads folder here, but it works globally too.) I type “single2” into the search box and click the blue arrow.

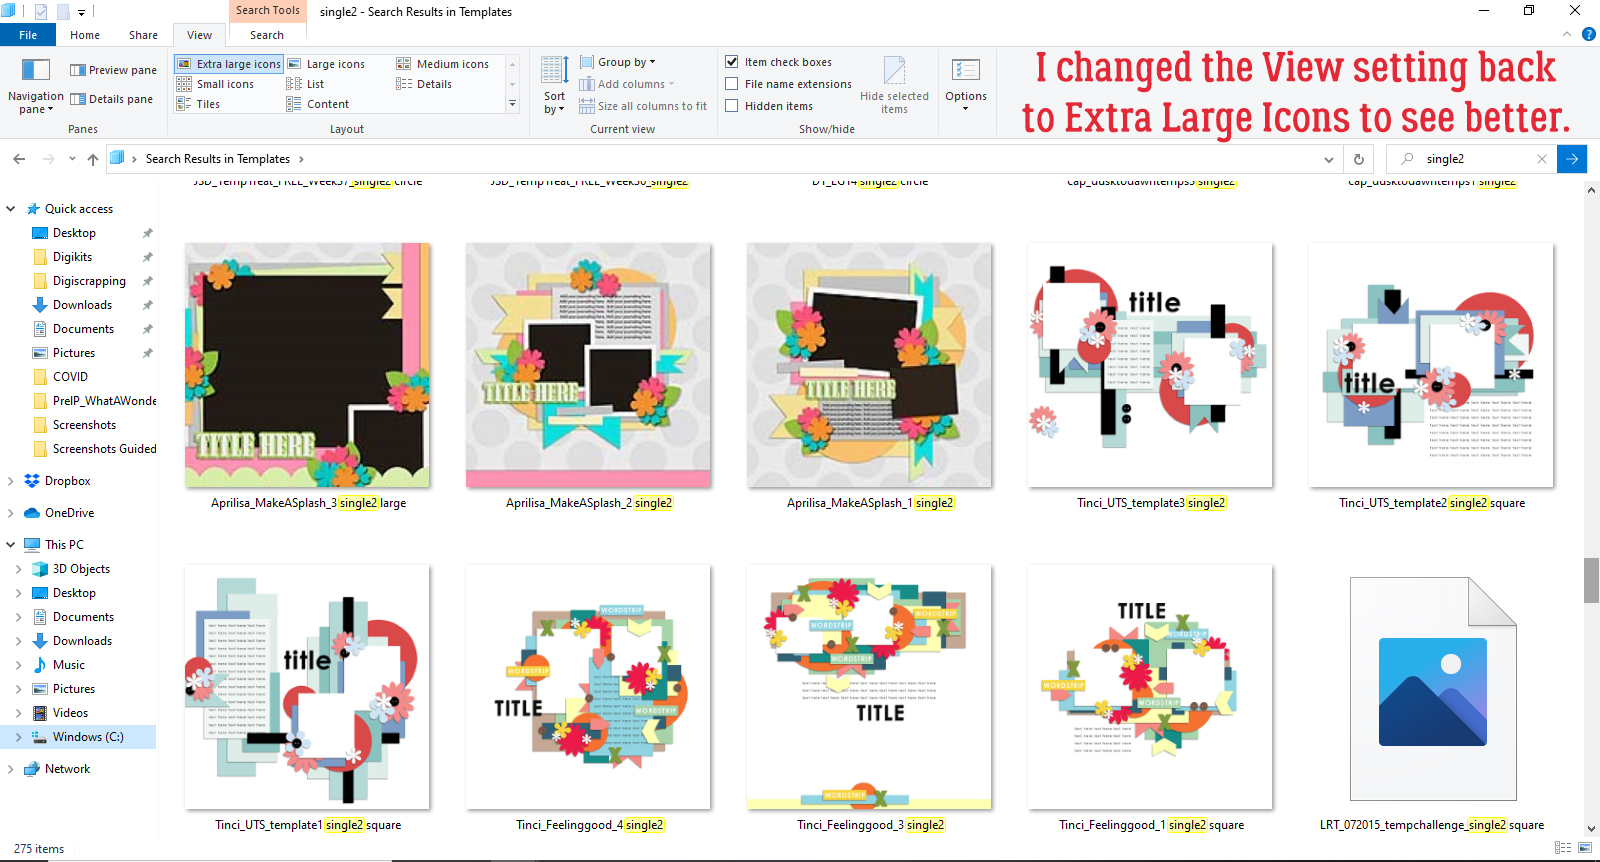
Windows takes a deep breath and goes hunting. Because I’ve only unzipped a handful of zipped files in my Downloads, it didn’t take long to turn up the three previews with that tag on them. With my view setting at Extra Large Icons, I can easily see the basic details of the templates I’ve located.  Then I can choose the one I think will work best for the layout I have in mind.

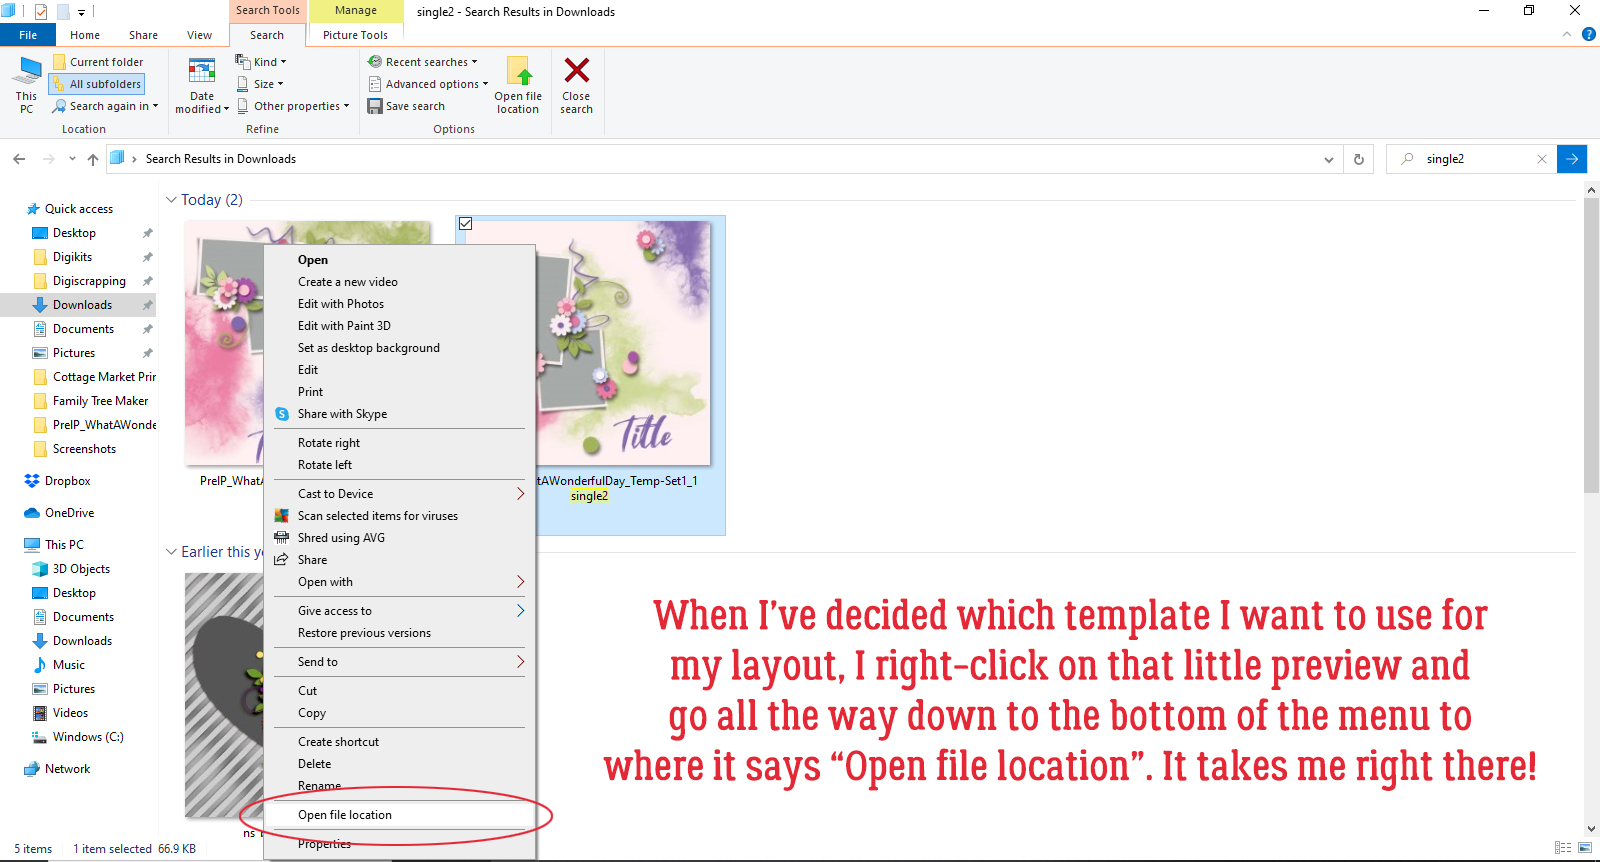
Getting back to the folder with the template I want to use is easy too. I right-click on the thumbnail and roll down almost to the end of the menu to where it says Open file location. Windows will take me right to it! It’s literally that simple.

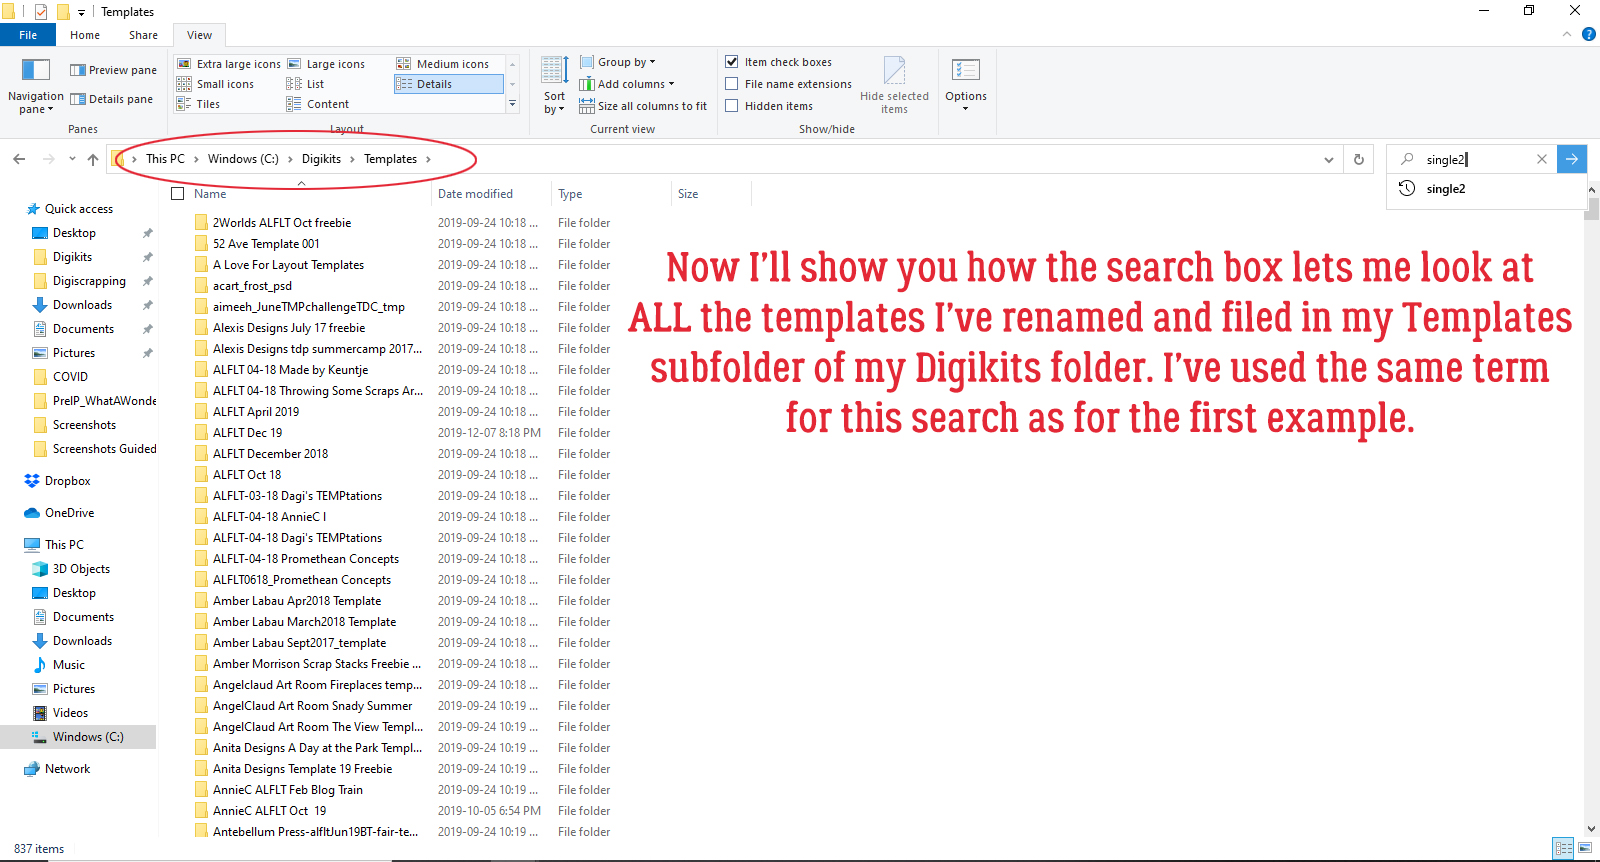
Just so you don’t think I’ve led you down the garden path, I’ll show you a search in my Digikits>Templates folder, which has thousands of files in it. (I’ve used this search feature to find files anywhere on my 2TB computer.) I used the same search term, “single2” and turned Windows loose.

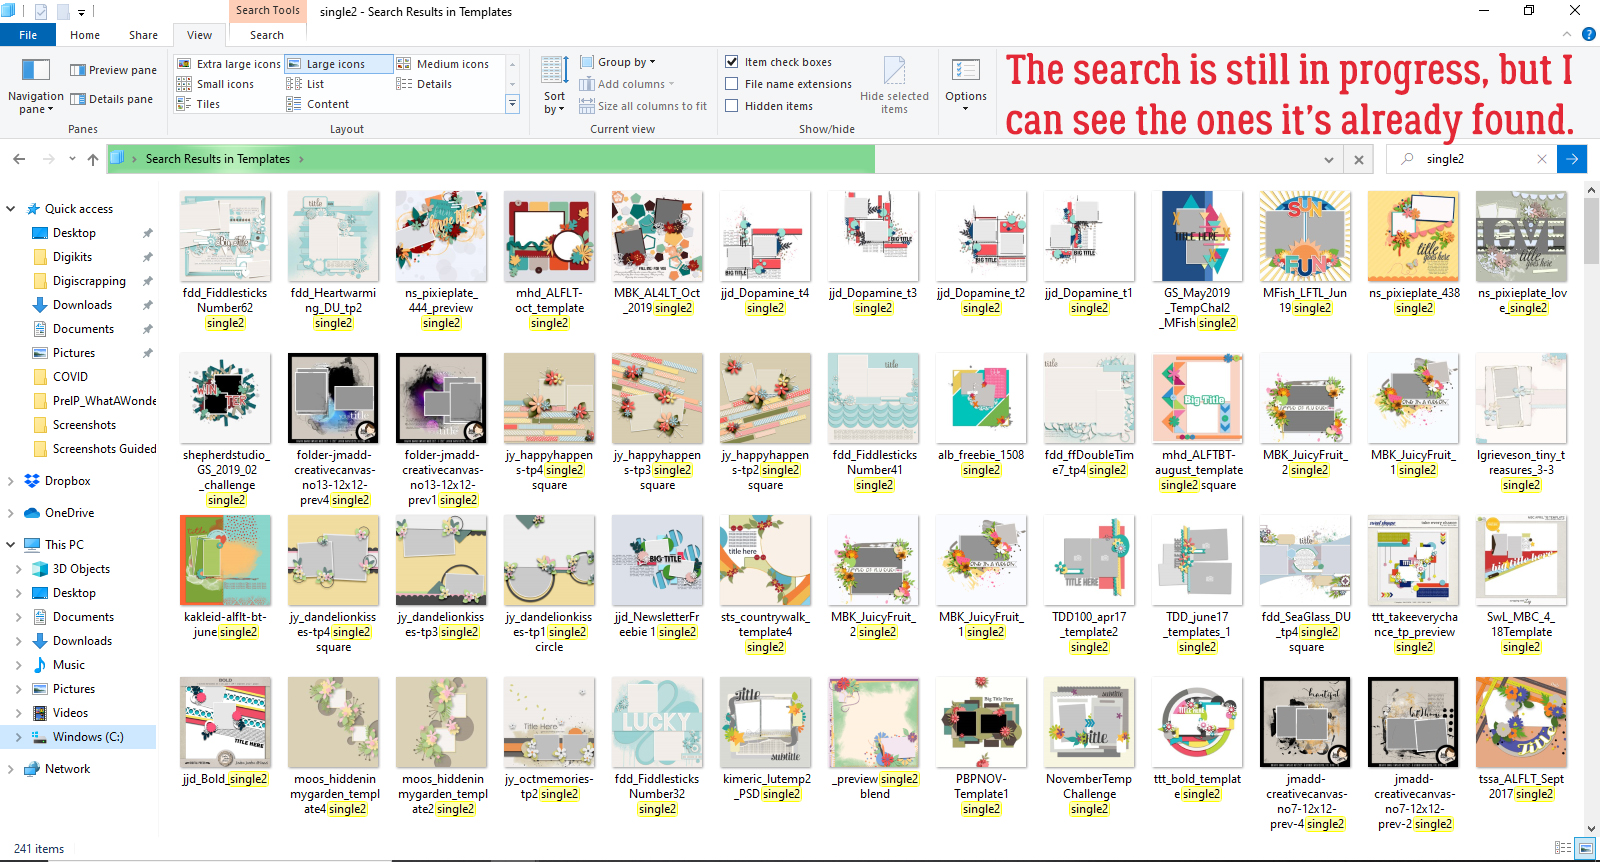
Explorer is still going, but it’s already turned up all these files!

Here are just a few of the “single2” templates I have. Guess I should get some layouts done, eh?

Do YOU have a good way of organizing and finding your templates? When I talked about the topic for this tutorial with Resident IT Guy, he asked why I don’t use a spreadsheet. Humph! I’m not great with Excel or any other spreadsheet software either, for that matter. For me it would be way more work than it would be worth. But maybe somebody out there has one they might share with the class. Please tell us how you manage your templates!

Tutorial Tuesday (Photoshop Elements+)

The Key to Painless Extractions!

Greetings GingerScrappers! It’s Tuesday again… the weeks are just flying by for me. Hubby and I have started working on the “non-essential” area of the house, what I’m calling #jansworld… the huge room in our downstairs that will be my hobby space. The movers dismantled all of our storage shelves and two of my desks. They also just loaded the room with every box that had “office”, “Jan” or “craft room” on them, piling them up 5 or 6 high with no rhyme or reason. So it’s a monumental job to get that space sorted out. We’ve made a good start but when I told him today I had a tutorial to write and we weren’t going to spend any time in there… he went ahead and did some things without me and then had to interrupt me twice to ask for guidance. Grrrrrrrrrrrr. So I know I’m going to miss my usual post time. Sorry… Thankfully my boss (the amazingly generous Ginger!) isn’t too much of a stickler.

On to the tutorial. I’m feeling like I should be able to get some scrapping done this month so I looked at the July Challenges and decided which ones I might be interested in taking up. The Inspiration Challenge Lina of LDragDesigns has tossed out is to use an extraction on a layout. I like extractions but find them very time consuming. What to do, what to do… How about checking to see if Elements+ has a quick mode?! Why yes, yes it does!

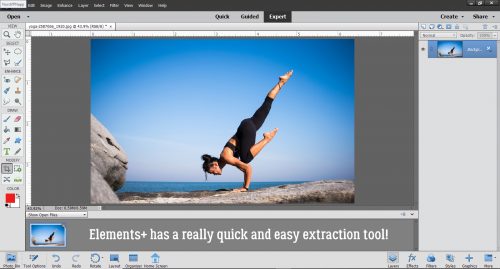
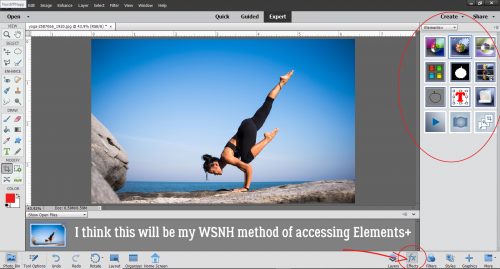
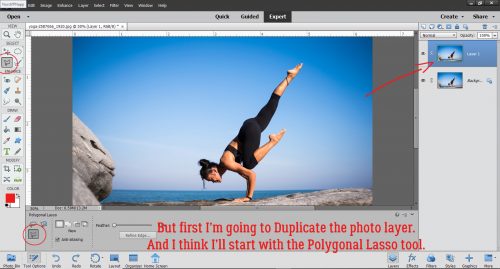
I’m intrinsically lazy, so if I’m going to do something as fiddly as an extraction, you know I’m going to choose carefully. I’m going for a clean cut and as little work as I can get away with. This photo from Pixabay ticks all my boxes. The Elements+ feature I’m going to show you is in the Selections menu, which makes perfect sense because that’s what an extraction is. I think for the sake of Working Smart, Not Hard, I’ll be using the Effects button at the bottom of the Layers panel and choosing Elements+ from the drop-down.

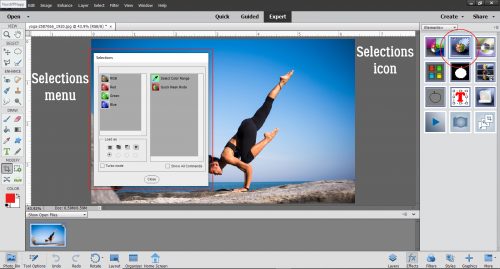
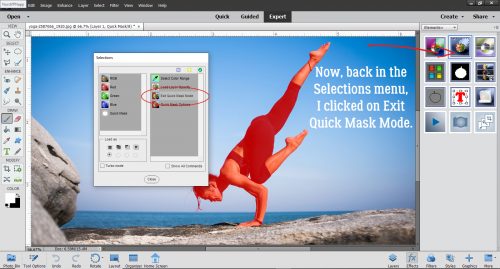
You can see what each of those Elements+ icons is for by holding your cursor over them and letting the name pop up. The Selections icon is at the centre of the top row. The Selections menu appears on the left of the workspace as shown.

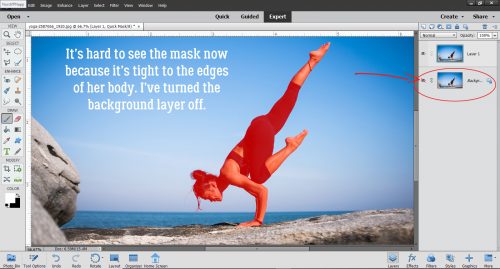
But first, before we go down the rabbit hole, I made a Duplicate photo layer… just in case I do something I can’t undo. I’m going to start off with the Polygonal Lasso Tool. It’s the one that looks like a Greek symbol with a tail. I also turned off visibility for the background layer.

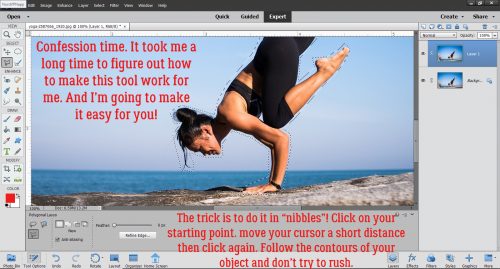
You’re not going to believe how long it took me to figure out how to use the Polygonal Lasso tool. Let’s just say it took a LONG time – I hated it because it didn’t do what I wanted it to do – and leave it at that. But now that I know how to use it, I quite like it! The trick with it is to make small nibbles, and to get as close to your subject as you can. It might sound like a slow process but it isn’t. As my mother used to say, less haste and more speed! Click on a spot where it makes sense to start out. Then move your cursor to a natural spot to change course. I started at the left of her hands, just below them. I went over to the area just below where the heel of her hand starts to lift off the rock and clicked there as my next reference point. Then I went to the bottom of her bracelet, clicked and moved to just past the bead on her bracelet. By taking a little bit of extra time with this step, it sped up the subsequent steps. I kept making small (and a few not so small) runs, clicking at the end of each, all the way around her. When I got back to my original starting point I double-clicked and I had a nice, free-form selection!

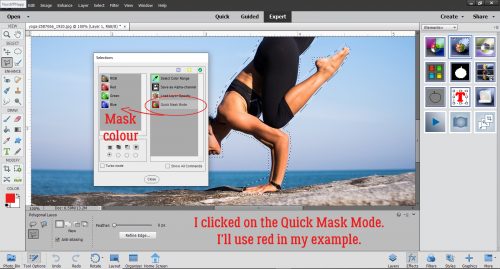
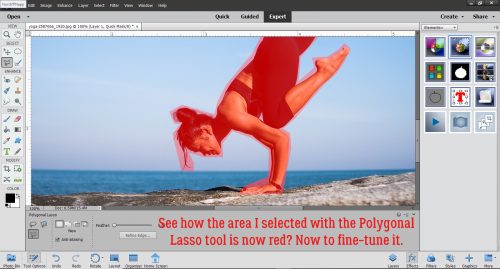
In this screenshot you can almost see the outline of my Lasso’d area. Now I went back to the Selections menu and clicked on Quick Mask Mode. Red is the default colour, but if I was trying to extract something from a red background, I could easily change the mask colour to blue, green or a chosen colour.

And that was all I had to do to create a mask on my image! Now I can fine-tune the edges.

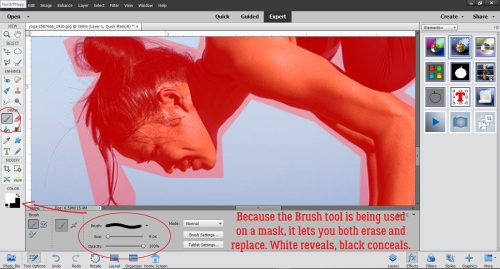
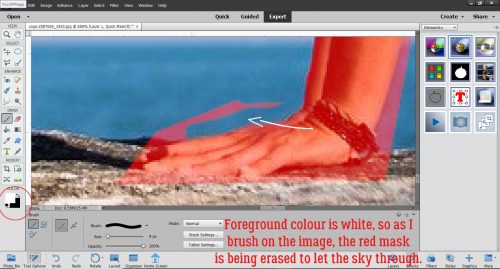
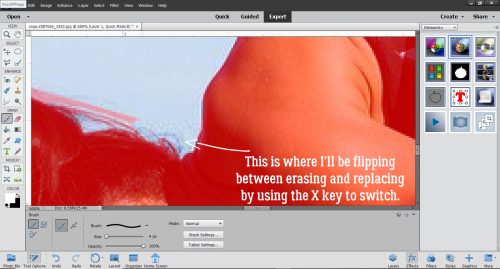
Next I went to the Brush tool to clean up my extraction. Because I’ve put a layer mask on the active layer, the Brush tool automatically sets up for concealing and revealing – the colours in the picker are black (which CONCEALS) and white (which REVEALS). I flip back and forth between erasing and replacing by clicking on the “X” key. (JUST the X key… I don’t want to go to another keyboard shortcut accidentally!) I was able to get pretty close to the outline of her body with my Lasso so I can go with a fairly small brush size – 9 pixels – and I can adjust the size up or down by using my square brackets keys. The Left bracket makes it smaller, the Right makes it larger in the same way using them with the CTRL/CMD key zooms in and out.

I just started brushing away the mask with the foreground colour set to white. I zoomed in quite a lot to see clearly where my edges are.

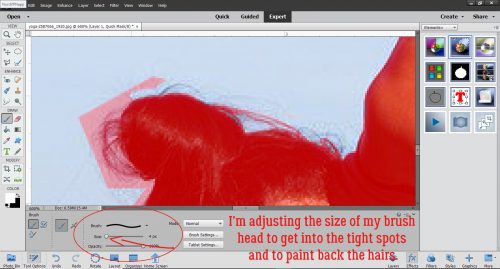
There is a bit of very minute detail in her hair that I’ll have to brush back in, so I can switch the foreground colour to black, make my brush smaller and paint it back. Before I forget… If I didn’t manage to include an important area of my image, I can add it in during this step really easily. Brush it in with black!

My brush size ranges from 1 pixel for the really tight spots, to 12 pixels for the straightaways.

Now that I’ve finished with the clean-up, I went back to the Layers panel. This step tells Elements+ that I’m moving on to a new operation.

To get Elements+ to finish the job, I clicked again on the Selections icon then told it to Exit Quick Mask Mode.

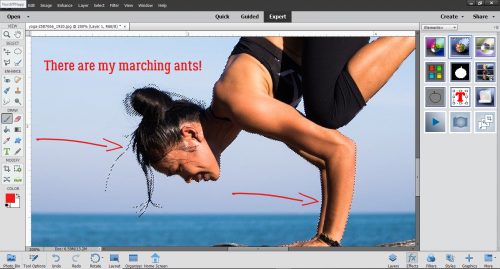
The red mask is gone, and now I have marching ants instead. I just need to…

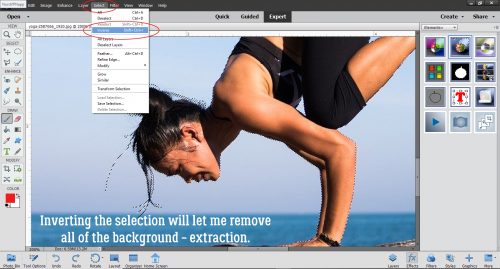
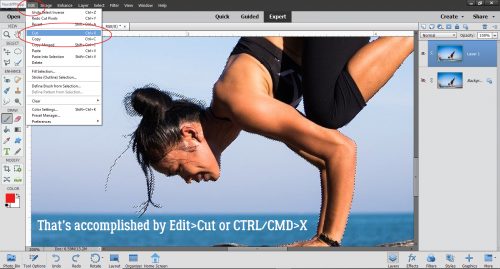
Invert the Selection (Select>Inverse or CTRL/CMD/Shift>I) and then I can eliminate the sky, the water and the rocks.

Two ways as usual, Edit>Cut or CTRL/CMD>X.

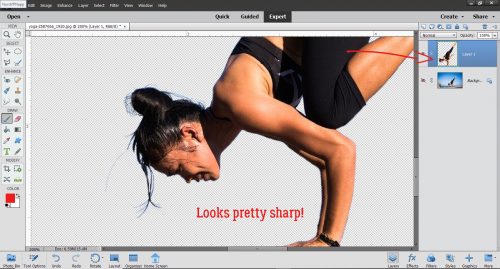
Boom! It looks pretty sharp to me.

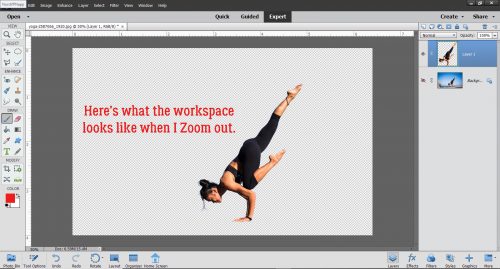
Here’s what the whole workspace looks like when I Zoom back out.

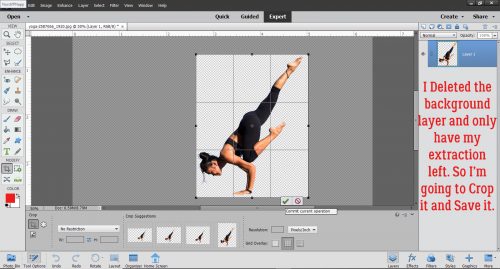
So before I Save it, I’m going to Crop it down to a more useable size.

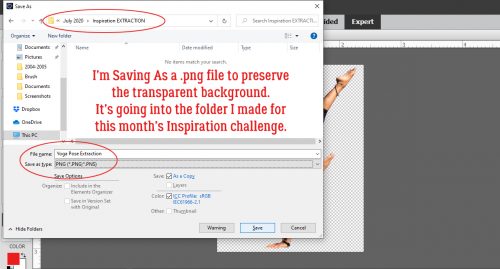
I want to keep the background transparent so I’m going to Save As a .png. The keyboard shortcut for Save As is CTRL/CMD>Shift>S.

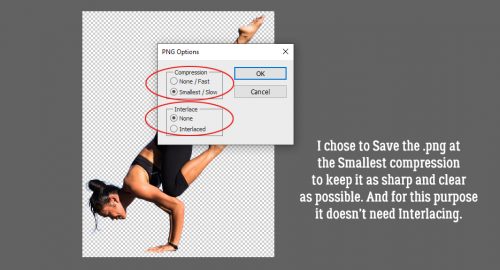
To keep as much sharpness as possible I’ll save it at the Smallest compression but it doesn’t need to be interlaced.

Now I can put this yoga queen on just about anything! I’ll have to figure that part out later.


Tutorial Tuesday (Photoshop Elements+)

Unlocking the Photoshop Elements Easter Eggs

The other day I was scrolling through Google News on my phone looking for celebrity stories and horoscopes… who doesn’t? I’d at one time done a Google search for tutorial ideas and obviously Google stores away all that information to use against me at a later date. Because there in front of me was a video extolling the virtues of Photoshop Elements+. I’d heard of Elements+ in passing before but never actually looked at it. I mean, who wants to spend more money than we have to for hobbies, right? But I watched the video anyway. Then I went over to the Elements+ website and bought it! My first pleasant surprise was the cost – $12 US ($17.87 CDN at today’s exchange rate, but still a steal!). They have a free demo option which is a much-abbreviated set of features, and if you aren’t sure you want to spend the cash, maybe give it a look first before you decide. What do you get for the cost of a couple of gourmet coffees? A TON!!

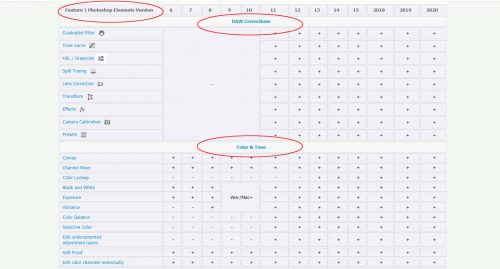
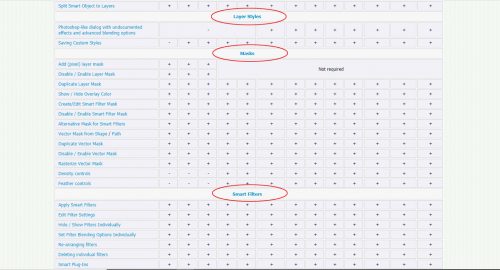
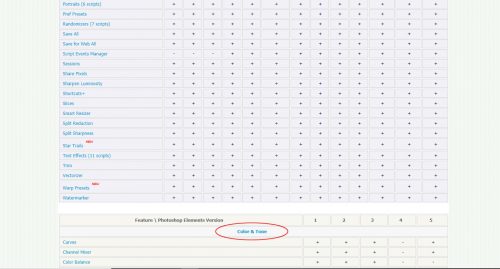
This first screenshot shows the key to the (very lengthy) list of features and which version they’re part of. The type is quite tiny but if you go to the website you can see the list full-sized. There is an Elements + version for every release of Elements from 1 through 2020, and the patch (that’s what the developer is calling it) unlocks all the hidden potential of the Elements software that turn it into so much more of a powerhouse. There are a lot of features in here that won’t appeal to the average scrapper, but don’t let that hold you back! The first block of features are RAW corrections. You may remember quite some time ago I gave you a tutorial on editing in Camera RAW, which is super for taking a so-so photo into the amazing realm. Elements + adds several functions not present in the basic software.

The second block of features in the screenshot are for Color and Tone. They’re pretty complex edits, and only the real photography snob or the wedding photographer might use them. But handy to have, no? Of note, there are some features that are only in the Windows version, or the Mac version, but not both, and the chart shows you which.

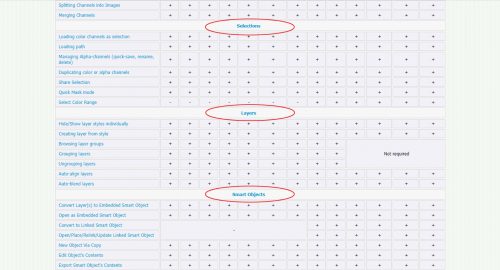
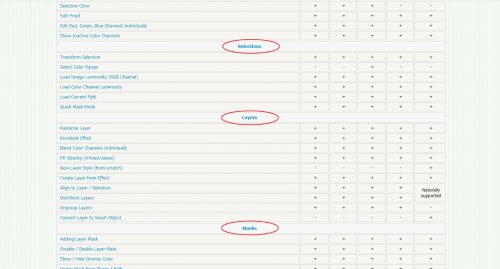
The list continues with Selections, a group of edits that make extracting much more precise and with fewer steps. They’ll take a bit of a learning curve, I think.

Next is a section on Layers. What caught my eye is the one called “Creating layer from style” and it’s making me giddy! I can’t wait to put my styles on their own layers so I can bend them to my will.

Then comes Smart Objects. I’ll confess, after using Elements 17 and being frustrated by Smart Objects, I think I need to learn how to make them work for me, so I’ll be exploring these functions.

Layer Styles options look pretty interesting. “Photoshop-like dialog with undocumented effects and advanced blending options” sounds like something I need to know! “Saving custom styles” is also something that might be fun to learn.

Masks refers to layer masks, not the sort we’d use for clipping photos or papers to, but for making adjustments to individual layers. I’ll need to do some playing to understand how they work.

Smart Filters sounds like Instagram went to college. But I suspect there are some really useful edits to be found in there.

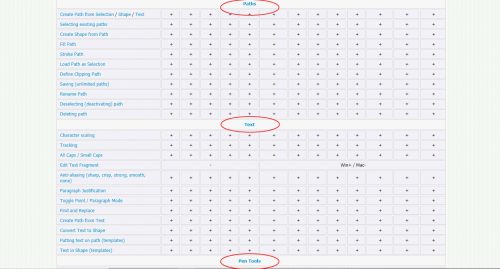
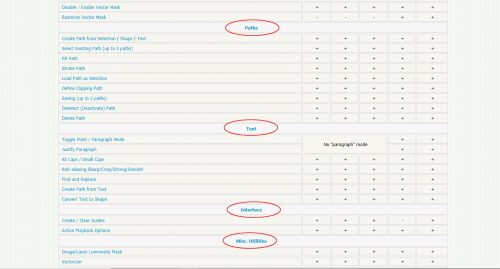
In Elements‘ later versions there’s a text option for putting words on a path. You know, putting test around the outside of a box, a heart, a star or some other shape. These options under Paths expand and extend that to so many applications, from creating paths to creating shapes from a path to using a path as a selection, there’s a lot to unpack there.

Text options to allow scaling of individual characters, the ability to edit only a fragment of text (not for Mac), text inside a shape and paragraph justification will make journaling much more interesting.

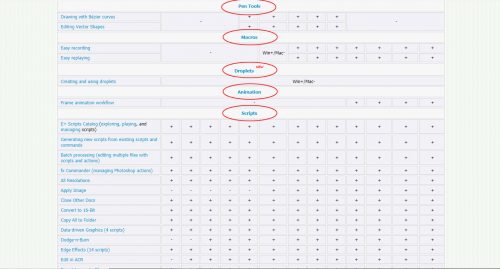
Pen Tools are only available in Versions 10-14. Bézier curves are a bit beyond my limited geometry, algebra and trigonometry education so I can’t explain that one. Anyone smarter than me care to dumb it down?

Macros are little bits of code that define a specific process. The two entries in this category relate to recording and replaying macros you create yourself. Let’s say you have several edits you do to every one of your photos or layouts and you wish you had a way to automate that. This is it! But. It needs something called Scripting Listener to be installed and functional within PSE. Let me look into that further…

Droplets could be a game-changer! The website says this: ““Droplets” provide a quick and intuitive way to apply scripts to pictures. You just drag one or more image files onto the droplet icon and… it’s done! ” The example they show is resizing a whole batch of photos to a defined size. (I might be interested in this for my tutorial screenshots…) I think this particular feature will be really handy for scrapbookers, because you can create a Droplet of your favourite script (I’m going to talk about Scripts next) and apply it to multiple objects. Once I’ve played with this, if there’s interest from my faithful readers, I’ll put it all into a tut.

Let’s talk about Scripts. These are just what they sound like – series of instructions to be followed in order. I’ve used some of the scripts and will show you what I did with them in a bit. These Scripts let you do so many things it’ll make your head spin! The ones I think will be the most useful for scrapbooking are the Edge Effects scripts. Burnt Edges!! There’s one that turns your photo into a piece of Film, and another one that turns a series of photos into a Filmstrip. Another one applies Hand-stitching to the edges of whatever you want. The script varies the length and angle of each stitch so it’s completely random, and won’t be exactly the same twice. The colour of the stitches and the background texture are customizable. Page Curl rolls the corner of your photo or paper, putting the perfect shadow on it. Photo Corners, Rough Bounds, Rounded Corners, Stamp Edges, Torn Edges, Wavy Edges, Yellowed Margins and Zig-Zag complete the list. Then there are the Photo Effects scripts that expand significantly on the basic effects already in Elements. Randomize is something I want to get deeper into to see if I can make my own fabulous scatters. That’s just a sampling of what’s in the Scripts treasure chest.

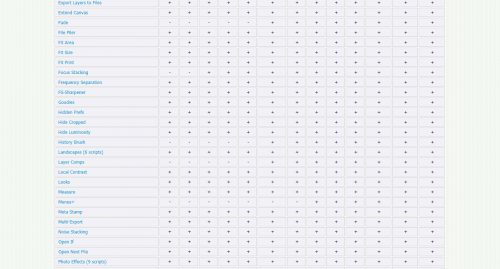
This screenshot just continues the list of Scripts. More POWER!

This too is a continuation of the Scripts list. At the very bottom they show the functions available in Versions 1-5. Of course they’re much more limited because Elements has evolved so much over the years.

Still with Versions 1-5

Notice how the lists are much shorter…

Okay! On to my experiment from earlier today. I downloaded the software and installed it. Then I opened up Elements and let it absorb all the new goodness. This will take several minutes, so if you decide you want to try it out make sure you have time to let it get set up.

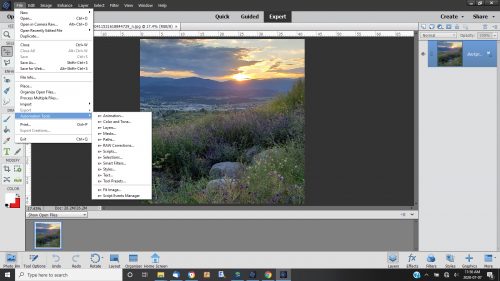
How do you find your Easter eggs? There are two ways to do it. You can click on File>Automation Tools (which would have been greyed out before) and the category menu opens.

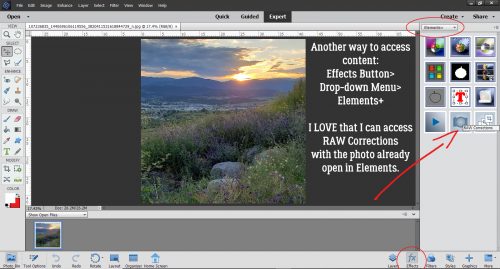
Or you can click on the Effects button at the bottom of the layers palette and select Elements+ from the drop-down menu. Then you have all these thumbnails to give you an idea of what they hold.

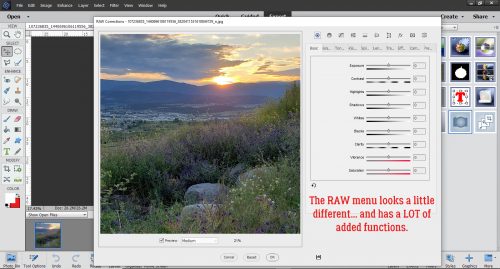
I had this Instagram photo I downloaded from my phone that was okay, but not really what my eyes were seeing when I shot it. So I thought, why not give it the RAW treatment? And I can get to it with the photo already open in Elements, which is fantastic! I’m going to tell you that, start to finish, this edit took me all of 2 minutes. And I’m impressed! The RAW menu looks a little different and offers a few options that aren’t found in the Open in Camera RAW menu. But the preview screen is still the same and lets you see what you’re doing as you do it.

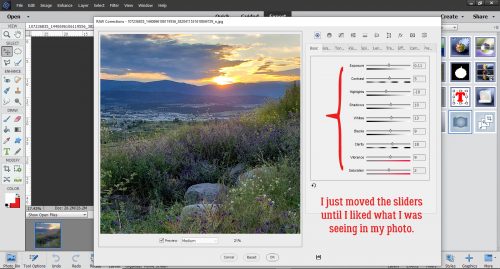
I did some basic editing to see if I could pull a bit more detail from the foreground, which was pretty underexposed. Of course, that washes out the sky a bit… but okay, onward and upward.

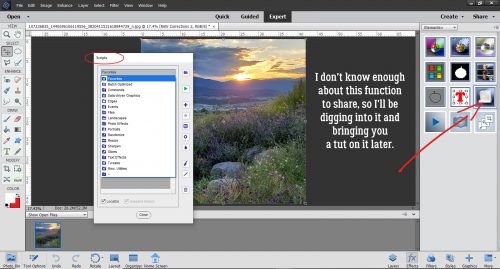
I took a look at the Scripts and was intrigued by the Favorites on the menu, but don’t know enough about it yet to do much with it. Later…

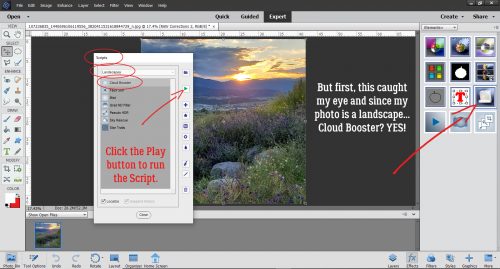
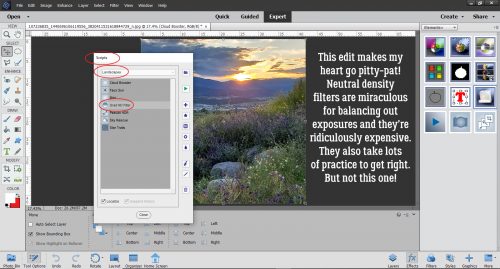
However… further down the list is Landscapes.  So I opened it. And there’s a Cloud Booster. YES! I selected it then hit the green triangle icon that represents the Play button.

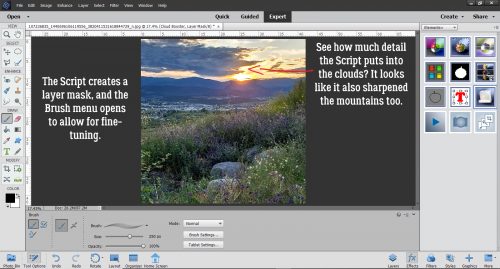
I haven’t shown it here but the Script creates a copy of the background layer and works upward. There’s a RAW layer, and then the Cloud Booster layer, which includes a layer mask. The Brush menu also opens so you can use a brush to adjust where and how much the effect changes your image. I didn’t touch the image with a brush though.

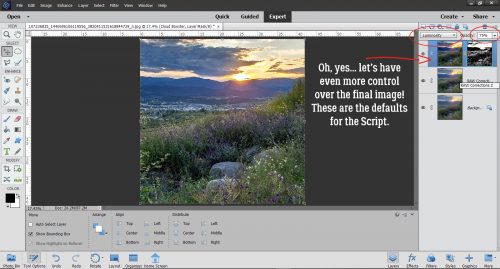
Instead, I took a look at the layers palette.

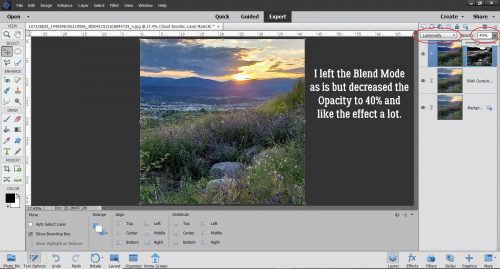
I toned down the Opacity of the layer mask, which softened up the mountains a bit, but didn’t change the Blend Mode.

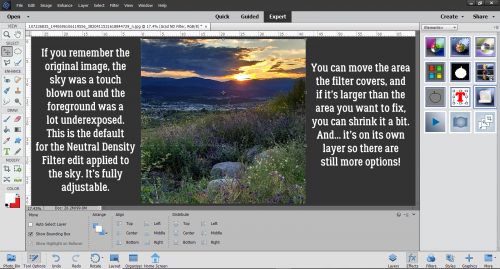
Then I spied the Neutral Density Filter script. Oh my heart! I have a neutral density filter for my DSLR, but find it cumbersome to use. To say nothing of pricey! ND filters are especially useful for landscape photos, where you know there’s going to be trouble getting the exposure just right. They come in a range of intensities from almost imperceptible to very dark. The glass is gradient-tinted; the filter needs to be positioned so that the darker part is over the lighter, brighter part of the intended photo – usually the sky. It decreases the amount of light getting through the lens in that area of the photo so it’s less exposed than the rest of the image. Using the filter takes practice, experimentation, exposure-bracketing and shooting purely in manual settings. How can Elements+ replace the on-lens filter? Let me show you!

This is my photo after I ran the ND Filter script. Notice how the sky is darker now, maybe just a bit TOO dark? But because this is completely digital, I can make adjustments to the layer and fine-tune it so it’s just right. Let’s say I was shooting a snowscape and it was the FOREGROUND that’s over-exposed. I could rotate the filtered area so it’s at the bottom of the photo. If the filtered area bleeds into the part of the photo that is already correctly exposed, I could either shrink the filter area, or slide it up so that it only touches the area of the photo where it’s needed. And then there’s the on-its-own-layer thing. Bingo, more control!

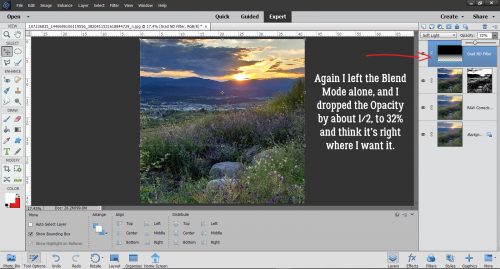
So let’s look at that. The Blend Mode is Soft Light, which works. The Opacity was about 45% at the default setting, and I just pulled it down to 32%.

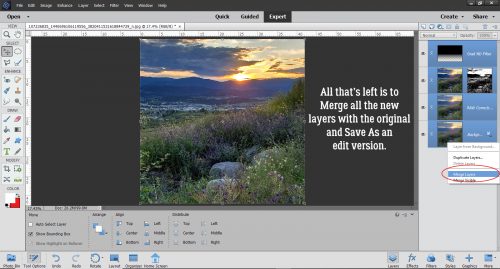
The last thing I did was to Merge all the layers and Save As an edited image.

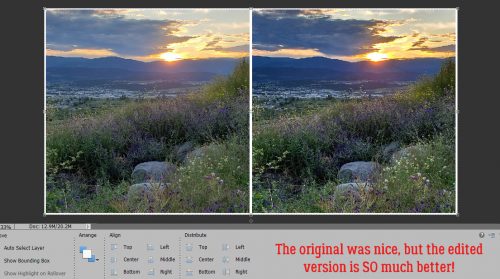
Just for you, I put the original next to the edited version. Now you see what my eyes saw on Sunday evening when I took my photo.

I think there’s a gold mine in this patch! I want to dig into how it can be leveraged for digital scrapbooking for you and then show you how to make it happen for your layouts. So much potential!!

Tutorial Tuesday (Photoshop Elements)

How Do You Know When to Upgrade?

Today’s tutorial is going to be a really wordy one. Lisa R made this comment on last week’s post: “That’s why I adore digital scrapbooking! I still have PSE 11 and since I use it mostly for photos (not scrapping), it would be interesting to hear the best things YOU like about it … I’ve been thinking of upgrading for quite some time but again, because I use it mostly for photos, I’m still on the fence.” I hope to make her decision easier by discussing some of the things that have evolved since V.11. I’ve never been one to upgrade just to stay at the front of the pack. There has to be something in the upgrade that I want… and I’m pondering whether it’s worth the money (about $120 Canadian for an upgrade, $140 for a new purchase) to jump to PSE 2019. But before I talk about that, let’s look at the changes from Lisa’s V.11 to my current V.15.

V.11 brought us some fabulous sketchy filters, and introduced automated actions to ElementsPhotoshop CS/CC has had them for a long time. If you’re not familiar with actions, they’re little scripts that automatically perform a series of adjustments to your work. They’re especially useful for photo editing and professional photographers have their favourites, which then let them develop a personal style. Photographers whose specialty is newborns, for example, will use actions that tone down jaundiced skin, hide newborn “acne”, reduce mottling and so on. There are also actions that take the work out of getting the background right. There are lots of sources for free or low-cost actions online, with demonstrations of how they work. Here’s a demo of a free action from The Coffee Shop blog. It’s called Perfect Portrait 3. It’s pretty amazing!

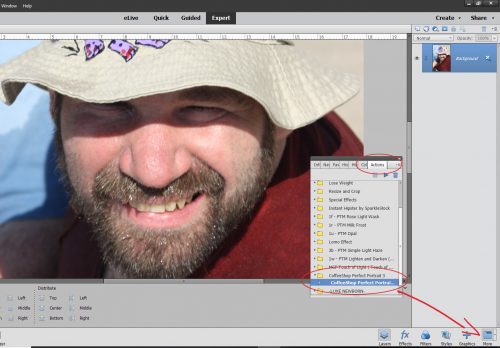
In V.15 there are two ways you can access actions, both the very basic ones that came with the software and those you’ve installed. The first is to click Window>Actions and the second is to click that More button then choose the Actions tab. If you look closely at this photo of my son, his skin is pretty gnarly-looking so let’s see how Perfect Portrait 3 fixes it.

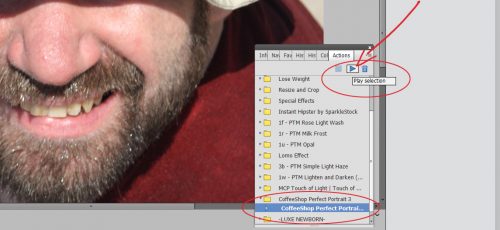
When you’ve chosen the action you want to run by clicking on the folder to the left of the title, you can either click on the dark blue triangle to the left of the folder’s contents, or the dark blue triangle circled below. That sets the action in motion.

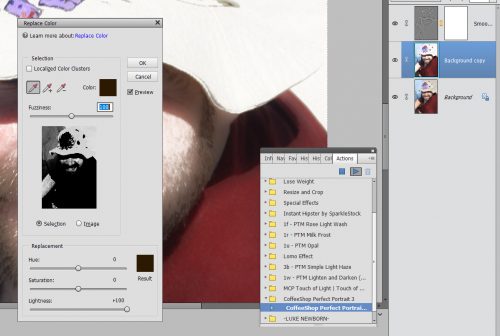
There may be some parts of the action that require your input, like this one. It’s actually the second spot where I told it what to do; the first was a Levels adjustment. In this screen I could change the source of the colour I want to replace.

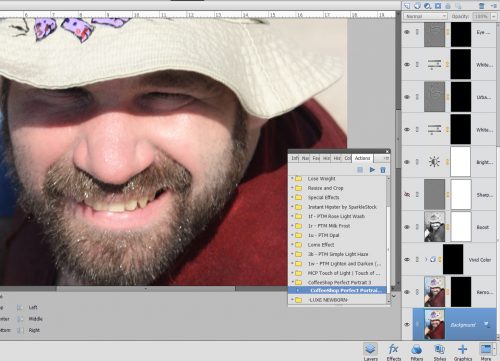
After I hit the OK button for Replacing Color, the action took off and in 30 seconds I had all these adjustment layers that I can now fine-tune. But even without any further input from me, those blemishes on Adam’s nose are gone, his skin tone is more even and his teeth are whiter. I think his crows’ feet aren’t as obvious too.

Another new feature that came with V.11 is in the Organizer. (I don’t use the Organizer because I didn’t like it with my first couple of versions, and created my own filing/organization system.) This version introduced user-determined tagging, allowing many more options for finding what you’re looking for by using your own tags. Options could be by name, by date, by location or by event, for example.

Last but not least, V.11 had the first Out-of-Bounds Guided Edit that allows cutting away the background from part of a photo but leaving things like heads, arms and legs in there. Think of those cool layouts where the photo looks 3D, like it’s bursting out of a frame.

V.12 brought a few more useful improvements. Content-Awareness allows for quicker, easier editing with the Spot Healing tool and with the Content-Aware Move tool. (I haven’t played with that tool yet, so I won’t try to explain how it works. We’ll save that for another day!) This version gave us a pet-eye correction in the Quick and Expert edit menus for the first time.

It also gave us the Zoom Burst Guided Edit that lets you add motion blur to an action photo that looks natural. That one looks like a lot of fun! Another new option in the Guided Edit menu in V.12 is Rotate and Straighten, making adjusting the horizon in photos super-simple. Here’s where the Puzzle edit and the Photomerge edit also came into play. One big drawback to V.12 was that everything was turned into a Smart Object, resizing things like buttons to the size of whatever the workspace it was moved onto was… 12×12 for example. It was a REAL pain in the butt having to then manually resize every. Single. Element. On my layouts.

V.13 got rid of that. It introduced the Refine Edge function to selections, which was a game-changer for lots of people. It allows for sharper extractions and cleaner edges. Some other benefits V.13 had include Auto-crop options – the software provides a preview of several ways to crop an image. [I turned that off eventually because I don’t want to be told what to do. ;)] They added Black and White (automatic and simple conversion to black and white), Black and White Color Pop (keeping a specific area of a photo in color while making the rest of it black and white) and Recompose (resizing your photos without losing important parts of them) to the Guided Edit menu.

And then there were these very useful additions! I haven’t actually played with these either, but I think I should!

V.14 is where there were huge changes made to Elements. Many of the techniques I’ve shared were made possible by these additions: Remove Camera Shake; Remove Haze (!); Batch Edit; one-click Whiten Teeth, frames, photo effects and textures; Photo Illustration; Paint-On Effects; select detailed edges (hair?); remixing 2 photos, improvements to the Recompose edit; RAW editing; new options in Photomerge and an opportunity to print at home came with V.14.

Compared to V.14, there weren’t a lot of changes in V.15, but improved function of some of the menus were a bonus. The Filter Gallery has been simplified and there were a few additions to the Guided Edit menu such as Photo Text (there was a tut on this one), Effects Collage (which lets you apply several effects to sections of a single photo), Painterly (there was a tut on this one too) and Speed Pan (giving a moving object a blurred background). There’s also a cool effect that lets you change a frown into a smile.

Changes to the appearance of the workspace, the location of toolboxes and buttons and other sort of housekeeping things have continued from version to version. There will always be a bit of a learning curve when you upgrade; the larger the gap between your old version and the new one, the steeper the curve.

So this is where my dilemma lies. Do I go from V.15 to Elements 2019? How hard will it be for me to learn the new stuff, and then translate it into easy-to-follow tutorials? Are there enough new things (there are 8 new Guided Edits) I can’t live without to make it worthwhile? 2019 has a powerful new function called Adobe Sensei AI, which does a lot of things automatically in both the Organizer and the Editor. It uses artificial intelligence to tag and organize your photos and videos based on image recognition, it allows for video editing, which V.15 does not, and it has several social media features. Oh and did I mention slideshows?? If you’ve ever had to create a slideshow, you’ll know how much work they are and how hard it is to get them just right. 2019 will automatically select the best photos from a selection and turn them into an animated slideshow guaranteed to impress. There’s also a more useful home screen. It looks like I have some thinking to do…

Tutorial Tuesday (Digital Scrapbooking)

8 ball, Corner Pocket!

Last week when I was struggling to find a topic to write about, I asked the GingerScraps Ad Team members for some ideas. Teresa suggested I do something about pocket scrapping. I have to tell you, I was floored. Pocket scrapping isn’t my thing and it’s really not my comfort zone either. I know it was a big part of the digi world several years ago, and I flirted with Project 52 (there’s NO WAY I could commit to Project 365 and I admit it!) but I wasn’t all that successful. So I had some learning to do before I could present myself as an expert. Ha! The EXPERT is Becky Higgins, the developer of Project Life. She has an app for that in addition to a whole paper line for pocket scrapping.

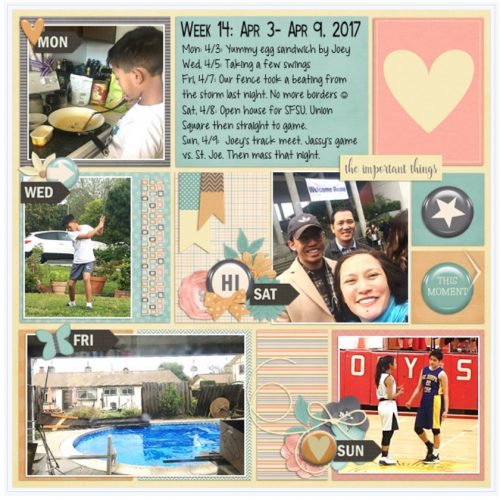
What IS pocket scrapping? Basically, it’s a clean-and-simple style of layout based mainly on a grid. It’s ideal for documenting the memorable (and the ordinary) events of our lives. Each section of the grid or block can hold a photo, a pocket/journal card, art work or a cluster of embellishments.

Why is it called pocket scrapping? It has its roots in paper scrapping, and it makes use of vinyl pockets of mainly two standard sizes, 2″x3″ and 4″x6″. Digital pocket scrapping follows the same format, and it lends itself very well to hybrid scrapping. You can create your page, print it and then attach buttons, ribbons, lace and pockets holding ephemera to the page.

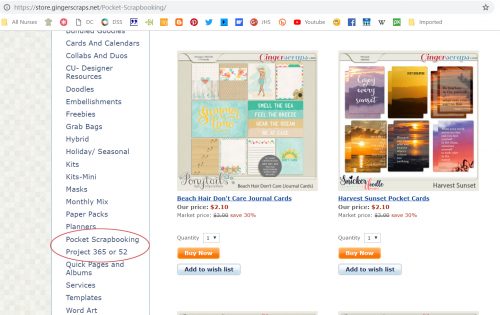
Most of the designers on the GingerBread Ladies team here create kits and templates that work beautifully for pocket scrapping. In fact there are pages and pages of kits tagged for this style of memory keeping. And it’s easy to find them, too! I thought about giving you a list of designers whose products are amazing for pocket pages, but it would be a lot faster just to show you how to see them for yourself.

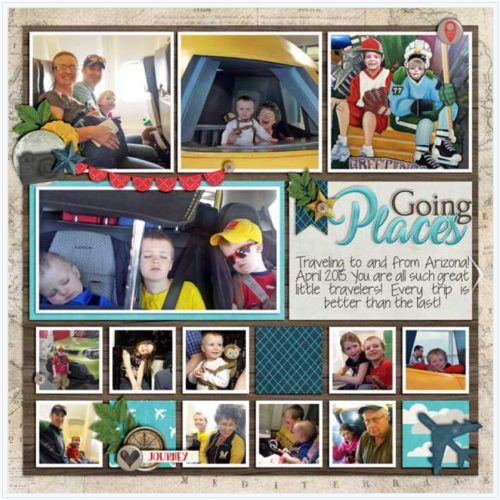
I’d love to show you some examples I found in the Gallery. This one is from trina513. I like that she’s used her Instagram photos.

minicooper452 created this one. The photos tell a story, and the journaling preserves the excitement of the day.

This one by emscraps is obviously a Project 52 layout. Em has managed to maintain her P52 for years now!

Belis2mi has documented a special day for her children with this layout.

I really like the feel this layout from amyjcaz has, with the photos of how she spent her day at the beach.

Because I live in cowboy country, this one by psychozoe caught my eye right away.

And then there’s this one from firstoscartgrouch that’s so whimsical and fun.

After looking at all these examples of pocket scrapping and seeing the individual stamps of each scrapper on her layout, I decided to give it a shot! It’s pretty amateurish, but maybe if I do a few more…

Next week there will not be a tutorial. We’re going to visit my parents and then our daughter in her new home in the mountains for a few days and I just won’t be able to squeeze in a blog post. I’ll be doing all the driving so I’ll be seeking a horizontal surface!

Tutorial Tuesday (Back to Basics)

Don’t Lose Your Cool… or Your Stash!

First off, let me thank all of you who took the time to reach out and offer your support after my husband’s accident. I won’t lie, the last couple of weeks have been very hard for us, but he’s on the mend and eventually we’ll be back to normal life. I’m finally getting into a sort of routine, but I’ve had no time for scrapping, or for playing with Elements, so I asked Ginger to give me a topic for this week. And her suggestion is a really timely one, coming so soon after the feeding frenzy of Digital Scrapbooking Day. Ginger says she gets a lot of service tickets related to lost files from crashes of some sort; we’re VERY lucky that she’s so willing to replace the download codes for our purchases because few of the online stores will do that after a certain period of time. So let’s talk about backing up files.

It’s happened to all of us at one time or another. Our computer has let us down in some way – either with a hard drive failure or a processor failure – or in my case, with a video card failure. All those lovely photos, finished layouts and digi-scrapping supplies are gone! It’s been known to cause many tears to be shed, multiple F-bombs to be dropped and more than one injury. (My photos aren’t actually gone, but they might as well be, because they’re inside a laptop that I can’t see the contents of – although my techie-nerd husband says there’s a way to retrieve them. (If only I’d left them on the SD card…) Trust me when I tell you I’m not really great at backing up my files, but I’m going to work on that!

About the easiest way to back things up is to copy your files onto a DVD/CD, flash drive or external hard drive (EHD). It’s time-consuming but it’s easy as pie. As long as the drive isn’t corrupted, or exposed to a magnet, or any other sort of calamity! I have two EHDs and I’m sure I have multiple copies of some of my older kits and photos. One of these days I’m going to go through everything and weed out the duplicates… but it won’t be today.

While I was researching this topic I found a great list of free back-up software, as vetted by Tech Radar. Why use dedicated software? Well, some of them will eliminate the duplicates, simply by only backing up what has been changed since the last run. Some of them can be set to run at regular intervals, with removes the whole OMG-I-haven’t-backed-up-my-files-in-forever panic when it looks like there might be a crash on the horizon. To read the whole article, click on the link above. Their #1 choice is EaseUS Todo Backup Free. They call it the best balance of automation and user control. It doesn’t include some of the functions the pay-to-play premium version has, but they’re more business-oriented so most of us who aren’t techie nerds won’t miss them. One thing I think sets it apart is that it allows for Cloud backup in addition to physical copies. One caveat: when you download the software it will also download a Chromium browser and Bing search engine UNLESS you uncheck the boxes for them BEFORE you say Go. Another possibility that sounds good for the averrage digi-scrapper is Paragon Backup and Recovery. It comes with a wizard that talks you through every step, you tell it what files you want it to copy and has the added advantage of a recovery script right within it.

There are a number of Cloud-based solutions to file back-ups. iPhone users may already be using the Cloud to store their photos; if, like my daughter, they’re also running a Mac, it’s not a big leap to also store copies of other sorts of files there too. Google Drive is another option for online Cloud storage., as is Dropbox. All three have a limit on how much room you can have free, with a reasonable cost for additional space. If you’re looking for something that will look after your backup needs without any reminders, you can subscribe to an online backup service for a monthly or annual fee. PCMagazine has an in-depth evaluation of several of these. Their top picks are IDrive, Acronis True Image 2018, SOS Online Backup, Backblaze, SpiderOak One and Carbonite. Each has its own pros and cons. Backblaze and Carbonite are the only two on their list with unlimited space, although neither of them offer any free space but they both only cover one computer. Before you commit to one of these services it would be a good idea to compare them head-to-head on features and subscription costs.

Make the time soon to back up all your irreplaceable stuff. Choose the method that works best for you but DO IT! And then make a commitment to maintain those backups for the future. Maybe tie it to a specific event, like (i)NSD and DSD, or to the time change to and from Daylight Savings, like you do with the batteries in your smoke detector. (Don’t ever forget to do that… The people in your life are worth so much more than photos and scrapbook layouts!) Better safe than sorry.

Tutorial Tuesday – General

UNZIP Me Dahling!

I don’t know about you but I will never have too many digikits!! But being a digikit hoarder has its downside… All those kits have to be unzipped and organized. Who has time for that? And then there’s National Scrapbooking Day (well, more like NSWeek!) coming up in no time, with all the fantastic new products it brings with it. That you’re going to want to play with right away. What to do, what to do?

I’ll be the first to admit that my downloads folder is a mess. I’m trying to develop some better work habits, and keeping on top of unzipping is one thing that would really make a difference. So I’m going to show you a terrific app I found that lets me unzip multiple files with only a few keystrokes. It’s called Extract Now (clickable link) and it’s FREE! I work in Windows, but there’s a Mac version too. I’m guessing it’s similar in layout and behaviour, but I can’t say that for sure. I’ve tried a few others, one of which carried a virus… and this is the one I liked best for its ease of use. It’s on my taskbar now for ease of access. The menu looks like the image below.

There are several ways you can customize the performance of the app. I don’t use a lot of them, but the ones I do use include letting it check for its own updates and turning off the sounds. I’m surrounded by noise all day every day (if you’ve ever been on an intensive care unit, you’ll know what I mean), so I don’t want a bunch of added noise in my environment if I can turn it off.

In the Process tab, you can tell it what to do with the zip folders after they’ve been extracted. At first I had the app delete them as soon as they were extracted, but I had to retrieve some stuff and now I manually delete them.

This is where Extract Now really shines. You can designate exactly where your unzipped files are sent by using the Destination tab. I had it set up to extract everything into a Downloads subfolder, but found I left things in there forever and eventually forgot about them. The Help button is really useful at showing you how to customize the app for your purposes.

I create a new folder for each kit I’ve downloaded. If you’re into keyboard shortcuts, hit CTRL/Shift>N (Windows) and you’ll have a new folder you can call whatever you want.

Over the years I’ve refined how I manage my digikits. They all go into their own folder, which later becomes a subfolder within my store folders. I name them all with the same format, designer’s name and kit name spelled out in full. That makes it so much easier to find what I’m looking for later, and it helps too with credits when I post my layouts to various galleries.

I select all the zipped folders for each kit by clicking on the first one on the list, CTRL/CMD>clicking on the last one and voilà!! Then I can open up Extract Now and drag them onto the menu.

When I click on Extract, a submenu opens asking me where I want the files to go. This is when I find the new folder I’ve created for the kit in my Downloads folder and click on it.

Click on OK to All and the app goes to work.

You can watch the progress as your files are extracted. When all the files are successfully unzipped, you’ll see green check-marks next to each one and there’s a new button activated at the bottom right. Click on Clear and all the files are removed from your app workspace. I can extract several dozen files in a matter of a couple of minutes with this useful tool.

Like I said, I choose to manually delete the zipped folders from my kit folder, which is super-simple because they’re all still selected. After I minimize or close Extract Now, I only have to right-click on the selected files and choose Delete from the menu.

We all have much better things to do with our time than extract one file at a time, right?! Give it a try and see what you think. (You can always remove the app if it doesn’t work out for you.) May 5 will be here before we know it. Now go get your scrap on!

There’s an App For That – Beautiful Mess

I don’t know about you, but I wish I could scrap more often. I scrap at home, while the guys are watching something I have no desire to or while everyone is sleeping. I’ve thought more than once how I wish that I could scrap on the go. While I have not been able to find an app that lets me scrap from start to finish. I have found a few that cuts out some steps and I can do on the go. Not to mention they add special touches to my layouts. I am stopping by today to talk about one of those apps!

A Beautiful Mess

What is this app you ask? A Beautiful Mess is a photo editing app. It comes with 6 photo filters, quite a few fonts, great borders, word art, and doodles. You can make in-app purchases for more of everything (except the filters). The in-app purchases are $0.99 a piece.

When using A Beautiful Mess, it crops the photo to a square. Once you are done, it saves it to your photo library. It is available in iTunes and Google play. A lot of you will have known about and used this app. However, for those who do not, let me tell and show you how this can help your digital scrapping!

I took 4 photos that I had taken while my son and I were out having our, “Me & You Day”. I edited these in about 10 minutes or less.

shawnbearscrap_a beautiful mess

shawnbearscraps_abeautiful mess

So, as you can see I took photo photos and added to them. Little word art here, a tad of color there, and fun borders. Now, how does this help with scrapping? It might have only taken me 10 minutes or less to do this in Photoshop. I think with the searching and creating though, it would have taken a bit longer. Not to mention, I can do this while waiting for an appointment, or laying in bed being lazy! I didn’t have to lug out my laptop or go sit at my desktop. How easy would these be to put in a layout?

Fun, right?! Don’t limit yourself to your computer and remember, you don’t just have to pocket scrap with these kinds of photos. Explore your phone’s apps and see what you can come up with. If you find a really cool new app, let me know! I would love to check it out and might even use it in a future post.

Made a layout using a photo from A Beautiful Mess?! Remember to upload it in the gallery and come back and link us up! We love to see what you are scrapping!

GS_footer_LaShawn


There’s an App For That | Snapbook

GS_blog_TheresAnAppForThat_Header

Have you heard of Snapbook?! I didn’t know it was around until I went into my app store and searched, “scrapbooking”. I scrolled around and the logo for this app caught my attention. (A great logo can take you places!). So, I downloaded it and played around a bit. I thought that it was perfect for scrapbooking. Especially pocket scrapbooking. I am going to tell you a little about it and show the two photos I pulled together, sitting at work, and in less 10 minutes.

2

Android | iTunes | Facebook

Snapbook is a free app. There are in-app purchasing. You can buy more ellies and kits. For the free version (at least android. I’ve not played with it on an iphone) you get 5 free kits. These kits are not like something you buy here at gingerscraps. There are a few ellies, borders, and backgrounds for each. There are 11 more kits you can buy at $0.99. Everything from “magic” (think mouse) to “Spook”. Here are an image from their page on google play. To give you an idea of what they have to offer. That says pocket scrapbooking if I ever saw it!

unnamed1

Cute, right?! Pocket scrapbooking isn’t really my thing. I can never make my pages look as good as you guys do! I tend to want to cluster too much. Here are two images that I tossed together. Like I said, it took me less than 10 minutes. I did it while sitting at work too. Who doesn’t like a bit of scrapping away from home?!

15 - 215 - 1You will see these on my layouts! I might even give pocket scrapbooking a try! I saved these to my phone and transfered them to my computer. You can do the same & then get them on your layouts! I would love to know if you have used this app. If you download it & use it, we would love to see what you create! Link us up!

You guys gave me great ideas on our last app post. I will be showcasing those in the future. So, keep it up! Got ideas, let me know. Happy Scrapping!

GS_footer_LaShawn