![]()
Hello my friends! It’s December Bake Sale time. The Bake Sale runs from the 15th-20th of each month. You will get a full kit for only $1.00. It’s a perfect time to grab a kit or template set to add to your collection.

Happy shopping and scrapping!!
![]()
![]()
Hello my friends! It’s December Bake Sale time. The Bake Sale runs from the 15th-20th of each month. You will get a full kit for only $1.00. It’s a perfect time to grab a kit or template set to add to your collection.
Happy shopping and scrapping!!
![]()
![]()
Wow… Christmas is almost here. How in the heck did that happen? And the end of the year is right after that. Who is ready for 2017? Let’s see what our designers have coming out this week.


Have a great rest of the week!!
![]()
Getting More Mileage from Your Templates… Easily!
![]()
I know this is a ridiculously hectic time of year for everybody. And I also know that in a few short weeks all of us will have a plethora of new photos to scrap. So this quick little tut will show you how to make a template do double duty. Templates already help to streamline the process, and any time they can be modified to accomplish more than one purpose, it’s a bonus.
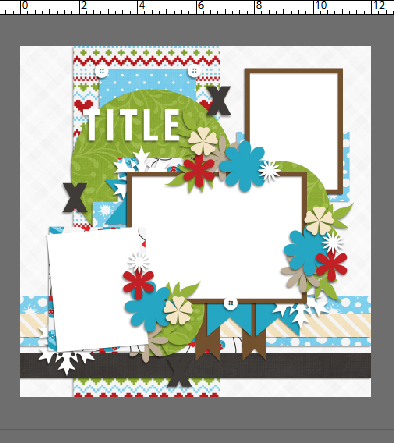
I had some very sweet photos of my daughter and youngest grandson that I was dying to make into a 2-page spread for the December Buffet challenge; I wanted the layouts to look similar but not identical, and I didn’t have a lot of time. So I found a template that would work really nicely for my photos in the lovely A Year in Review – December set from Krizstina of Tinci Designs, shown below. I’d already decided that Winter Whimsies from the amazing Katie – Just So Scrappy – would be perfect with my photos.

I knew I wanted to have the backgrounds identical to each other, in terms of papers used. So I turned off all the layers but the main paper blocks. A quick way to do that is to run your cursor over the eyeballs and up the column in the Layers panel while holding down the left mouse button. That’ll turn off every layer you run the mouse over.

If you look where the arrows are pointing you can see the eyeballs have been closed. I clipped my papers to each of the template’s main paper layers and this is what it looked like. Kinda blah, I know, but it gets better!

I’ve mentioned before that the symbols used by designers of templates aren’t RULES. They’re suggestions. You can substitute any manner of things for the flowers (for example), you can move them around if you find they’re covering up your photos in the wrong places, you can duplicate them or delete them and play with the any way you want. In a lesson down the road I’ll show you how to combine two templates into one smashingly unique layout. But back to the lesson at hand. I’ve turned on all the layers that were invisible before. This is an important step, because I want to know where all the place holders are later, when I use the copy of this layout I’m going to make in a second.
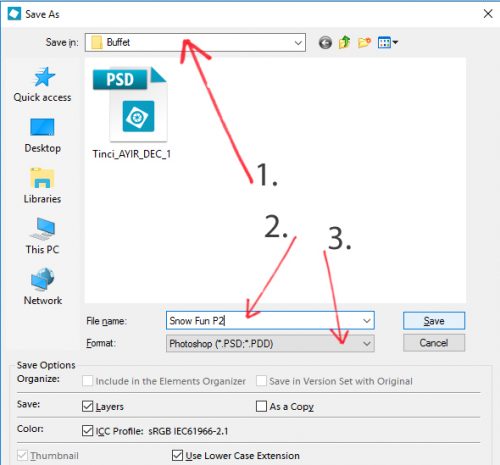
I took the steps shown below (oh, you know that’s a lie, I used keyboard shortcuts), and I saved the PSD file with the papers added in. I renamed the file so it wouldn’t overwrite the original template. I might want to use it again some day. For those of you dying to learn keyboard shortcuts, they’re actually right there in plain sight. CTRL/CMD>Shift>S is the quick way of getting to the Save As menu.

I’m going to share a little workflow tip with you now. I always make a folder for each of my layouts. Then I COPY the items I want to use into the folder so they’re all together and I can see how they’re going to look. When I’m ready to work on the layout, I open the folder and select all the items in it into PSE. Then when I’m all finished, I save the final layout in that folder both as a PSD file and a JPEG. When I’m positive I won’t need to make any changes (spelling, layers I forgot to shadow, weird little not-quite-right things I notice when I post to the gallery, you know what I mean) I can delete the rest of the things in the folder (BECAUSE THEY’RE COPIES) to save memory. That’s what I’ve shown you below.
In this step, I selected the folder I was saving to (1.) then renamed the file so I’d know which one was which (2.) and made sure it was still in PSD format so it could be changed later (3.)
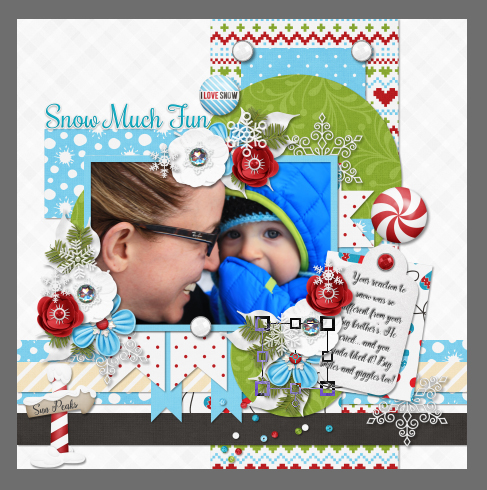
Here’s my first finished layout. (The gray border is the background of my workspace in PSE, not part of the layout.)

After I saved that layout as I explained above – with the layout name instead of the working file name! – I opened up the working template again. As I said, I wanted it to match the first one, but look different. I followed the steps shown below to flip the whole template horizontally so the paper strips would line up perfectly.

Then I went ahead and moved some things around a bit, eliminated one of the photos, used a tag instead of another of the photos, enlarged the one that was left, changed some of the elements I used and ended up with this!
Here are the two layouts side-by-side, just the way they’ll be in Aaron’s birthday album of his first year in pictures.

There you go… short, sweet and to the point. Have a great week… I’ll be thinking up something new to share with you next week.
![]()
Welcome to December! Of course it has been December for nearly two weeks. I missed last week’s blog post; and was unable to say welcome. 🙂 We are going to stray away from all things December today. No holiday talk! Today we are going to focus on one aspect of digital scrapbooking. More like focus on one of the great items you can use to scrap your digital scrapbooking pages.
Today we are going to Focus On….Masks. While looking around the gallery, I find that not many people use them. When they are used though, they really make a layout pop! So, what are masks?
In hands-on artistic works, a mask is a protective shield that keeps an area from being affected by an appplied medium.
For digital creations, that “shield” can end up being the very shape to which a medium is applied. What’s more that medium can be your photo. – via debbiehodge.com
I am no good at tutorials. That is why you always find me bring you great creative ideas and motivation. You should check out our Tutorial Tuesday posts for great how-to’s!….not written by me. lol. There are some great tuts in there on how to “clip”; which is what you do when using a mask.
Today though, we are going to take a look at what the store has to offer on masks! I love shopping. I even love digital window shopping. 🙂 I get to have the fun of looking around the store and bringing you some great GingerScraps digital scrapbooking supplies. Here are a few of those (all images linked to the store).


![]()
Good morning Gingerscrappers! We’re getting closer and closer to the holidays everyone is excited for! Trees are going up. The streets are lit up at night with multi-colored lights. We’re seeing white stuff fall from the sky! It’s time to bundle up, grab a nice cup of hot chocolate, and scrap our little hearts out!
Remember when you spend $10 in the store, you get a great new collab!

https://store.gingerscraps.net/GingerBread-Ladies-Collab-Crazy-Silly-Funny.html

Happy Thursday! Winter is just around the corner! Get ready by stocking up on some great winter themed kits releasing this week!
From Neia Scraps


From Tinci


From Dagi’s Tem-tations, Dear Friends Designs, and Littlefeet Designs


Have a Great Weekend!

For all you former paper scrappers: INKED EDGES!
![]()
After last week, I hope there are still people willing to read my tuts. I know it was a bit of a beast, but I’m sure somebody out there is happy to give it a whirl.
Recently I was making some greeting cards and reverted to my paper-scrapping days. I LOVE inked edges on various parts of my cards and I did them on many of my paper layouts too. While I was getting dirty it occurred to me there might be a digiscrapping tutorial in there somewhere. I’ve done inked edges on some of my digi layouts and have an easy way to do them so now I’m going to share that with you. And as promised last week, this is a short snapper of a tut.
This handy tip will work on just about any paper item you can think of, with some slight variations. The trick is to work on a separate layer and on a larger-than-usual canvas. I used a template from Aprilisa’s Ready for the Weekend template pack #1 for this tutorial layout since a template makes things simple to demonstrate. So let’s get going.
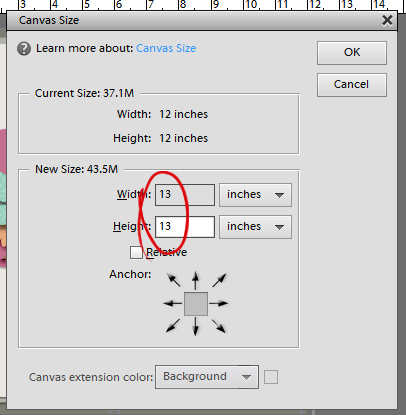
I opened my template on my work space. Then I enlarged the canvas size it’s sitting on to 13×13 inches. This part is important, otherwise all you’ll have is a mess. I use a keyboard shortcut (I know, shocking, right?) for this – CTRL/CMD>Alt>C but you might like to do it the hard way. Click on the Image tab, Resize and Canvas Size. (See the keyboard shortcut there?)

This menu will pop up. Choose something larger than 12×12 inches.
Now you should have a nice transparent border all around your template.

The next step is to turn off the visibility for all the layers except the background layer, where we’re going to start. There’s a quick and easy way to do this too. Just hold down the left click button while you drag your cursor over the little eyeballs.
Of course, if you’re just inking the edges on a tag or a journal card, you can skip this step. Just make sure you have a good transparent border all around your item.
*****Before going any further, open a new blank layer just above the layer you’re working on. All you have to do is click on the icon that looks like a piece of paper with a folded corner, above the Layers panel. This is another VITAL step.*****

Next, select a brush that has a bit of scatter, but not too much. You can use a default brush that came with your software, or you can pick up some cool free ones online from places like Brusheezy.com. I like to use a spray paint brush. And we old-school paper scrappers typically use a brown ink to grunge up our stuff, so I’ve got a brown in the foreground of my Color Picker. Just below the Brush pop-up menu is the adjustment panel for your brushes. Adjust the size so your brush isn’t huge, but is big enough to make the job easy. I usually go with about 400 pixels. You see the default settings for this particular brush set in the screenshot.

Now all you have to do is paint around the edges. Have your brush cursor just off the edge of the paper and go all around the whole piece of paper. You can stop-and-go or do it all as a smooth dragging movement.
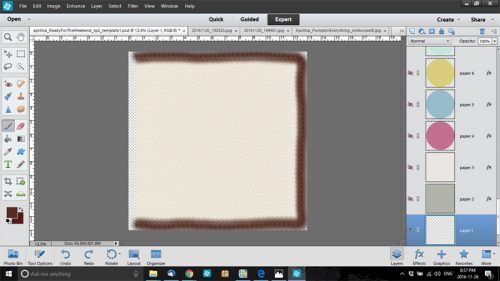
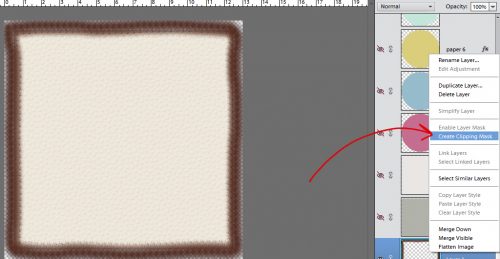
When you’ve got the whole edge inked you’re going to clip the brush layer to your paper. Right click on the brush layer in the Layers panel then choose Create Clipping Mask. Or you can do what I do, CTRL/CMD>G.
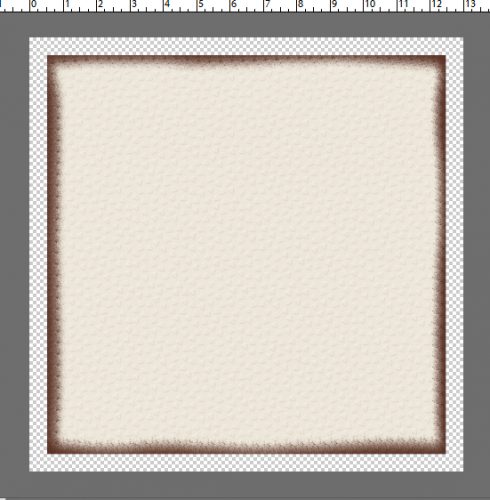
Magic! But there’s more!!
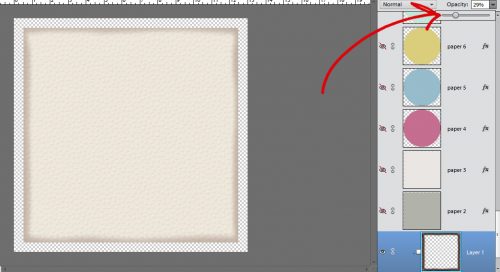
That inked edge is a tad bit dark, don’t you think? So let’s pull the opacity of that layer down to something more appealing. Like maybe about… oh… 29%. And now it’s a nice, grungy but understated inked edge.
The final step is to merge the layers. Select the background paper and brush layers, then right click and choose Merge Layers. Or… do like Jan does and go CTRL/CMD>E and you’re done.

I inked the edges of most of the papers I used for my layout for the November Buffet Challenge. I used parts of several kits: Aprilisa’s Pumpkin Everything Krafties, Connie Prince’s My Journey extra papers, Keley Designs’ Thankful for You stickers and Mandy King’s Family Tradition elements. And, of course, Aprilisa’s template.
I hope you’re enjoying your December and aren’t stressing too much about all the things you think you have to do. See you all next week!
![]()
![]()
Welcome to December. It’s time to catch up with our featured designer, Keley Designs and learn a few things about her.
How did you get started in digital scrapbooking?
I started in 2006 to work with my son’s photos. In 2008 I started to create my own kits, I was never without the scrap in my life.
What made you decide to design?
A friend encouraged me to create some freebies and soon I was already creating commercial use products and today I work only with the digital kits.
What do you use to create your designs (program, additional tools, etc.)?
I use Photoshop, Illustrator.
Describe your design workplace.
I have a desk in my room. I have lots of papers and colored pencils and pens because I like writing, drawing and painting. Besides that, there’s my desktop computer, the printer and some decorative stuff.
What is your favorite thing about designing?
I like to see the end result of each job, which starts by choosing the palette and then the theme for each kit.
What is your favorite kit currently in your GS store and why?
My favorite is Pure Happiness Collection.
What do you do when you are feeling very sad or depressed?
I create kits, today is a great therapy.
Which is the best vacation you’ve ever had in your life?
It was January of 2015 when we were able to travel the whole family. My mother, I, my son, my brother and nephews.
Which is your most cherished childhood memory?
Being able to play in the street, today unfortunately children can not due to violence.
Do you believe in ghosts?
No.
Who is your celebrity crush?
I don’t really have one.
What do you order when you go to Starbucks?
I never go to Starbucks. It’s not a very common cafe here in Brazil.
What is your favorite kind of cookie?
Chocolate with Chocolate Chips
How old were you when you had your first kiss?
18
Are you an optimist or a pessimist?
I used to be a pessimist, always worrying and complaining about things, even though I thought I was an optimist. Nowadays I think I?m very positive.
Would you change your name if you could? If so, what would you change it to?
No.
What is your favorite pizza topping?
Chicken with catupiry (soft Brazilian cheese).
If you could give the world one piece of advice, what would it be?
Don’t judge people. You don’t know what they’ve been through.
What do you do to wake up in the morning?
My mother always wakes me up. LOL
What is a small luxury that you treat yourself to?
Today is to eat sweet. I have cut because of my weight.
What did you want to be when you were small?
Teacher.
Which would you rather do: wash dishes, mow the lawn, clean the bathroom, or vacuum the house?
I do not like household chores … but among these may be washing the dishes.
If you could hire someone to help you, would it be with cleaning, cooking, or yard work?
Cooking.
What would you do if you won the lottery?
I help the family. Being able to work with what I really love designs without needing a job to pay the bills.
What’s the most interesting thing you can see out of your office or kitchen window?
The sky and some buildings, I live in an apartment on the 5th floor.
Share your favorite recipe with us.
I love oven noodles.
https://br.pinterest.com/pin/84935142951477526/
Thanks to Keley for answering my questions. Make sure to shop in her GS store and check our her FB page. Also make sure to grab the Daily Download from the blog post each day to get the kit she is sharing with you!

![]()
Good morning Gingerscrappers! It’s FRIDAY! Time to get excited and ready for the weekend! The designers aren’t letting the end of the year stop them from coming out with some gorgeous kits! Templates too! And some bundles at great prices!
Remember when you spend $10 in the store, you get a great new collab!

https://store.gingerscraps.net/GingerBread-Ladies-Collab-Crazy-Silly-Funny.html
It’s DECEMBER!!! One month left of the year! Whether you loved or hated 2016, its drawing to a close and now it’s only 24 days till Christmas! Did you love the new Buffet that debuted today? It sure put me in the Holiday spirit! We have some great new releases coming out tomorrow as well!
From Magical Scraps Galore:


From Guest Designer Eyeinspire


From Keley Designs

Come back tomorrow to see even more goodies!
