Archives for January 2020

Sneak Peeks January 9th, 2020

Happy Thursday!! Our designers have lots of goodies releasing tomorrow! Let’s take a peek at what our CT created with them!

From Dagilicious

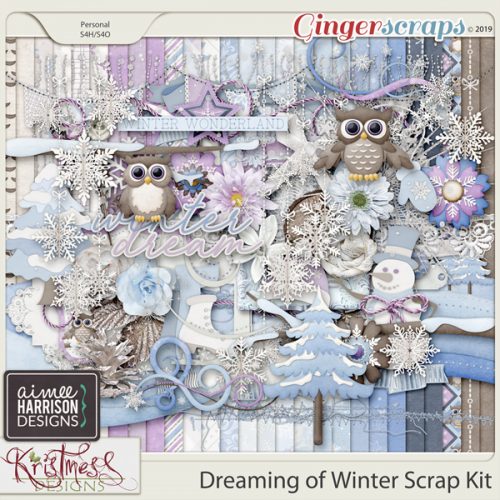
From JB Studio and Aimee Harrison

From Miss Fish

From Tinci

From Mags Graphics

From Heather Z

From Scrappin Serenity

From Aimee Harrison

From Cathy K

Tutorial Tuesday (Photoshop Elements)

Getting in on the Action(s)

When I was thinking about a topic for this week’s tutorial, I wasn’t inspired, so I did a Pinterest search for ideas. Are you ready to have your mind blown?? When I was playing with this subject so I could compose a coherent discussion, my mind certainly was!

I’ve referred to Actions in previous tutorials, but didn’t get into them too deeply. Your software came to you with a set of them already in place, and they form parts of the Guided Edits. If you’re unsure what Actions are, they’re like little scripts that tell Elements to make a series of predetermined changes to an image. The process is largely automatic, but there’re usually some options for personalizing the results. And I’m going to show you a really cool action I downloaded free. The image below is one I found at Pixabay; it turned out to be ideal for this little foray.

This is where I downloaded the Action I’ll show you. Most of the Actions here are completely free and have instructions within the Action menu itself. There are actions that perform one-step edits for portraits, actions that alter the colour of images, actions that make dodging and burning easier, ones that resize and sharpen images for different purposes, actions that watermark your photos… the list is endless! Check out the list here: The Coffee Shop Blog

Accessing the Actions on your workspace isn’t intuitive. Click on Windows>Actions to see which have been loaded (outside of the Guided Edits, since they’re specific to the Edit you’re playing with).

This is the default menu (with a couple of extra Actions I’ve loaded listed at the bottom). Click on the icon shown to open the Actions command centre. This is where you Load new ones.

The software will find any Actions you’ve downloaded and placed in the Actions folder of PSE. If you want to see which ones you already have, using the file explorer on your computer and look for .atn files. I have a LOT of them… I know. The one I’m going to show you is Coffee Shop Urban Grit.

Now that I’ve added it to the Actions menu, there it is! When I click on the triangle icon to the left of my chosen Action, it will open a dropdown that contains the script, or list of processes Elements is going to run.

Some Actions will have a dropdown list of steps that you can turn on or off. This one does too, but to see it I’d have to click on that triangle icon next to the name of the Action.

With the desired Action highlighted, click on the blue triangle icon shown to “play” the Action. The script will start running; with some Actions you can watch the changes being made flash over your image. With others the changes only happen when you decide where you want them. That’s how this one works.

So, it looks like all the software did was add a Layer Mask. The image itself looks exactly the same. But… the Brush tool menu is now open and the Layer Mask is selected. So I chose a large, soft, round brush and used it on the Layer Mask.

Can you see what’s happened? I just used the brush over the car and the girl. The sky, sea and sand weren’t touched. (Look at the Layer Mask to see what area was brushed over.)

But what else can I do with this now that I’ve played the Action? I duplicated the mask layer and it really amped up the effect. Here is where Blend Modes really come into play.

I liked the more obvious effect of the two mask layers but I wanted to try a few more things. I duplicated the mask layer and went down the list of Blend Modes until I found one I really liked. I’ve never found a way to use the Difference mode until now!

But the focal point of the image is too dark and muddy now. So I lowered the Opacity of the layer to 80% which made it better.

I moved that Difference layer down to the bottom and found the funk was still there but the image was much brighter. Can you see this on an art journal page?

I did one. More. Thing. If I decide to use this image on an art journal page, I’ll probably want to blend the sky/sea/sand areas into the paper. To make that possibility more workable, I changed the Background to a layer to make it editable. (I had NO clue what would happen when I started playing with it, I just wanted some more options.) To make the Background into an editable layer, right-click on the layer then choose Layer from Background from the dropdown. Then you can do what you like to that layer! I lowered the Opacity to 75% and was delighted to see that only the actual image background was changed. It became more transparent. So if I clip this finished image (with the layers merged) to a blended mask, it’ll look amazing. That’s next on my agenda!

This was just a quick-and-dirty guide to loading and using actions. There are so many ways they can be used for elevating our work. I hope you’ll download one or two and give them a whirl.

Fresh Baked: January 03, 2020

Third day of the month, and there still aren’t too many words that can be

Remember when you spend $10 in the store, you get a great new collab! Winter is fully set in and it’s time to cozy up and get warm.

fwp3

So, excuse me for a bit. I feel an overwhelming urge for a cup of coffee!

01

02

03

04

05

06

07

08

09

10

11

12

13

14

15

16

17

18

19

20

21

22

23

24

25

26

27

Remember, if you complete 10 challenges, just ten, you get a free kit as well!!

cr_thumb3

This kit makes me like snow. As long as I’m not driving in it…

A New Year, A New Decade, A New Start!

I’m not mentally prepared for it to be 2020. Ask me in a few days for a few words, and I’ll give you a few more words!

It is the First of the month, and that means the reveal of our new Buffet!!

Don’t forget to check out the Buffet Bundles, one easy click to add bundles of Buffet goodies to your cart, and an amazing value too!

buffet

The designers all had their own take on what the colors and theme said to them! I love the variety!

The designers definitely each made the palette their own and came up with some gorgeous designs, each unique but working so well with the other designers’ creations

The CT did such a great job showing how well all of the kits blend. They all did wonderful work!

This is just a few of the layouts.

Remember when you spend $10 in the store, you get a great new collab! Winter is fully set in and it’s time to cozy up and get warm.

fwp

So, excuse me for a bit. I feel an overwhelming urge for a cup of coffee!

The Monthly Mix this month is SO pretty. I just love the colors of Wintertide! It was created by ADB Designs, Aimee Harrison, LouCee Creations, Magical Scraps Galore, and Jumpstart Designs.

mm

The colors are so soft, yet chilly!

Before we see what the new year’s first Daily Download looks like, let’s see the full preview from December’s kit. Isn’t this gorgeous. The colors are perfect for a wintery kit.

Now for the first sneak peek of the new year. We have a wonderful collab from The Cherry on Top and Key Lime Digi Design.

Remember, the download is kept up for 5 days, and then it is taken down. If you miss pieces, the kit will be available for purchase on the first day of the following month.

Remember, if you complete 10 challenges, just ten, you get a free kit as well!!

cr

This kit makes me like snow. As long as I’m not driving in it…