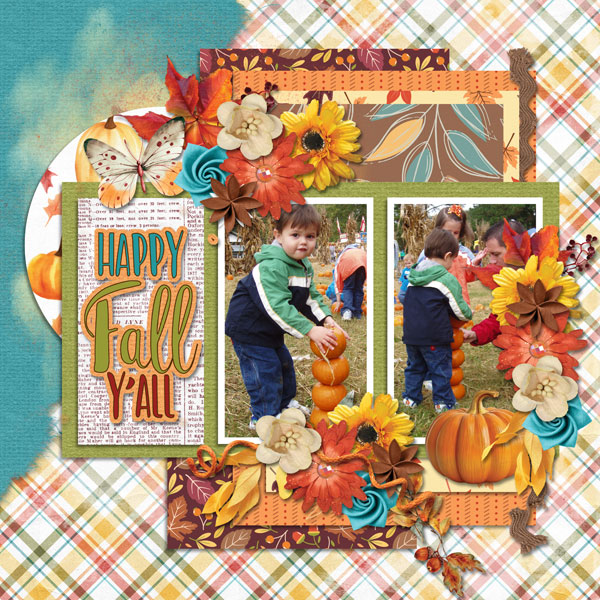
Tutorial Tuesday (Photoshop Elements)

Loading Those Styles Files

PDF Version : https://bit.ly/3RxUyDK

Back a couple of weeks, I said I’d put together a quick tut on how to load Styles into Elements. That’s where we’re going today. It’s really easy, but I can complicate anything! I’ll show you the easy way, and the more complicated way then let you decide how you’ll do it. Sound good?

But first, let’s talk about Styles a little bit. What are they, anyway? Essentially, they’re little automatic scripts that allow you to alter and enhance individual layers in your Photoshop Elements layouts. They include things like shadows, glitter, metal, fabric, gel, wood, cork, texture… so many different Styles exist and more are being created all the time. Several GingerScraps designers create Styles that coordinate with their kits. In fact, many of the GingerBread Ladies‘ collabs have Styles files in them, so you’ve probably got a bunch you aren’t even aware of! Let’s get you up to speed!

There are two ways to access your Styles portfolio. One is to click the Window tab along the top of the workspace then choose Styles from the drop-down menu. The second way – the one I use because it’s right there – is to click on the Styles button at the bottom of the Layers Panel. Once you’ve accessed them, there’s a Style Picker bar at the top of the Layers Panel.

Here’s the Style Picker. It will let you see all the Styles that are already Loaded. Elements includes several default Styles embedded in the software (Bevels, Complex, Drop Shadows, Glass Buttons, Image Effects, Inner Glows, Inner Shadows, Outer Glows, Patterns and more) That little stack of lines to the right of it is where the actual Styles Menu hides.

Let’s click on the stack of lines. Now choose Load Styles.

Here’s where I can complexify things… I learned how to find where my computer puts things and have worked out my own workflow using that knowledge. With Styles (and Brushes, which are Loaded in exactly the same way), I rename the files then move them into the folder where Elements will look for them first. I’ve outlined the path here. The path is C:\Program Files\Adobe\Photoshop Elements [Version #]\Presets\Styles. This makes it easier for me to find them later but it’s not the only way to manage them.

You can see that Styles files have the tag .ASL or .asl after the file name. Knowing that, you can let Windows search for your Styles. (Sorry Mac users, I know nothing about file searches in the Mac OS.)

Here you can see there’s at least one file I haven’t renamed. 😉 And it’s the file I’m going to use… To locate the folder it’s hiding in, I right-click on the file name and choose Open File Location from the drop-down.

Now I can go back to the Styles Menu, because I know where the file is, and retrieve it.

Click on the file and then Load. DONE!

The set is there, open and waiting for me to decide which one I want to use. Hovering the cursor over the thumbnail will tell you what the Style has been named by the designer.

I tried the two blues, but liked the black best. As I’ve shown in other tuts, the Style can then be adjusted by double-clicking on the fx icon on the layer and playing with the settings.

There are lots of sources of free Styles online. Some Photoshop Styles will work with Elements and some won’t. Brusheezy, which I’ve shared before, is pretty good at separating them out. I’ve linked you up if you’d like to explore.

See you in February!


Tutorial Tuesday (Photoshop Elements)

Quick Trick: Controlling Camera Shake

PDF Version : https://bit.ly/3wUBHtr

If you’re anything like me, you’ve got a lot of “nice” photos that miss being GREAT photos because they’re a little blurry. Sometimes it’s a focus issue, sometimes it’s camera shake. Because there are times when you can’t just whip out a tripod and get those magic moments captured perfectly, you’re okay with compromising on clarity for the sake of the memory. Well, I think I’ve got something that might make those “nice” shots a lot less woozy! This automatic enhancement was introduced with Elements 14; if you’re working with an earlier version, sorry. 🙁

Let me introduce you to one of my new neighbours. She and her family were some distance away and it was super-cold outside so I didn’t want to go outside to take photos. I used the zoom lens – which destabilizes the camera a bit – on one of my point-and-shoot digital cameras and shot them through the living room window. I knew they’d be soft and a bit fuzzy, and I accepted that.

I didn’t know about this trick until last night. It’s going to be VERY useful! Click on the Enhance tab and scroll down to Shake Reduction…

Elements will automatically make an adjustment to your photo. You’ll get a little preview of what will happen, and you can fine-tune it later. See the slider labeled Sensitivity? You can tweak that too, but be careful. A little goes a long way! Make it too sensitive and you’ll see a white outline around your subject.

The important part of the photo is her face, so I’ve drawn a box around her head and chest, and Elements starts working on it. See that thing in the middle of the box? It’s a progress bar, showing you where in the process your photo is currently. When it’s finished the icon disappears. Then, if you’re happy, click OK.

Here’s the Before image up close.

And the After image up close.

And a side-by-side… The change is subtle, but visible. You can see it even in the foliage.

Not bad for a couple of clicks!

Tutorial Tuesday (Individual Style)

Challenge Spotlight: Real Moments

PDF Version : https://bit.ly/3DlA2Ay

Did you notice there are a couple of new Challenges for 2023? Today we’re going to check in on the Real Moments Challenge hosted by Cindy Ritter. This is how Cindy describes the Challenge: “There’s a quote that says “Life isn’t measured by time, it’s measured by moments.” and that’s what this new challenge is about, preserving those moments that stand out; the good, the bad and everything in between. Many of those moments in our lives are not accompanied by photos so feel free to experiment and think outside the box while making your layouts.

Each month I will give you a theme and prompt (it might be a quote, a song, a poem or something different) and you should create whatever you are moved to do.

This months theme is Change.
Please use the following quote to inspire your page.
“Sometimes change requires you to take a giant leap. But, you won’t be able to fly unless you are willing to transform.” ― Suzy Kassem

I love the idea of scrapping REAL moments, even the ordinary ones. Each of us has our own idea of what that means, and our Individual Style will guide how we approach the Challenge. I think as memory-keepers we tend to scrap the happy stuff and pretend the no-so-happy stuff even happened. But we all have REAL moments, and we shouldn’t shy away from them. The layouts in the Challenge Gallery cover the gamut; there are a couple of them that might be too REAL for some of our readers; if that’s you, no one will know if you skip over those ones. The layouts will appear in the order they were uploaded to the Gallery. You may notice that a number of them have been created using Cindy’s Real Moments – Metamorphosis collection, and each participant will be gifted a matching mini-kit. As always, each layout is linked to its spot in the Gallery so you can drop by and leave some love; just click on the member’s name. Ready?

First up is a layout by lulutoo; her journaling, paired with that Pinterest-worthy photo would fit in well with our discussion on resolutions, wouldn’t it? I love her vertical cluster and how she’s combined all the papers she’s stacked behind it. Tucking elements between papers always adds interest.

As a former military spouse, I found 01lousmith‘s journaling to be very familiar. Change can be really hard, and not always good. She’s created a beautiful but haunting photoless artsy layout.

We’re all our own worst critic! AJsRandom proves it. The smiles in her photos and the cheery-ness of her clusters is a little at odds with her journaling. But I commend her for taking such a personal approach to the Challenge.

I really think I need to buy this collection! This beautiful, simple layout from dkane has me really convinced. There’s so much warmth and optimism here.

Talk about making lemonade outta lemons! Look at how mafrerichs has transformed that dorm room! The colour palette of the kit coordinates beautifully with the photos and those clusters… total thirst trap for me.

This simple but celebratory layout from twizzle made me smile. Congratulations! Feeling good about oneself is the key to happiness.

How gorgeous is this?? I love the way kabrak1207 has blended the gold border into the background paper and how that stitched heart is SO 3D. The quote from Wicked really captures the theme of the Challenge without needing a photo.

As dorannmwin says, change can be scary. Kudos to her for going back to school! She looks so confident in her photo, and the way she’s surrounded it with ephemera and clusters keeps the feel-good going.

NHSoxGirl has infused some humour into her layout. I knew instantly what she was going to focus on when I saw those photos. In keeping with the  serious-but-still-funny-ish topic she kept her layout clean and linear.


Our own AimeeHarrison has chronicled a significant challenge that changed her whole life. Her layout reflects triumph and hope through the bouncy clustered swag and all the hearts. Strength is a good trait to have!

A-M kept her layout simple and clean. Downsizing is definitely a change! We UPsized… I can’t even imagine.

(Content-warning) Katherine Woodin has always been very open and comfortable with her journaling as she records daily life. She’s probably the most dedicated Project 365 scrapper I know. She doesn’t gloss over the tough stuff, and this layout is an example of that. Her beloved Fred passed on to his next life on Christmas Eve and she strips bare her feelings as she details the events of that day. My deepest condolences, Katherine.

I can’t even count all the ways basketladyaudrey has covered “change” in her layout. She chose the most perfect colour palette possible for her photos, which tell the story of becoming a grown-up. Love it!

Leaving home is one of the hardest changes we all go through. Blaise used a list as journaling, and her photo tells the rest of the story.

If you were to participate in this Challenge, what would be the change you feature? Seeing all these layouts has given me some ideas – on top of the absolute determination to acquire Cindy‘s kit. Off I go to sort through my photos…

Tutorial Tuesday (Photoshop Elements)

It’s the Snowy Season! (Fancifying a Font)

PDF Version : https://bit.ly/3jf6vBS

If you’ve thought about taking part in the Font Challenge this month, you probably live in North America and have lots of snowy photos you can work with. Snowy Season is a showy font with lots of visual interest. It’s an all-caps font with scaled lower-case characters, a full set of numerics and the most commonly-used punctuation, which makes it a great title option. I think it would make for difficult reading as a journaling font though. Today’s tutorial will show you how to make the snowy parts of the font look like actual snow! Read on…

Before we get into the meat of the tutorial I want to welcome all the new GingerScrappers who have joined us in the last while and give an overview of Tutorial Tuesday. The first two Tuesdays of the month will focus on techniques that elevate our 2 dimensional layouts into 3D masterpieces. The third Tuesday is Challenge Spotlight day, when I share YOUR layouts and discuss what makes them special and interesting. On the fourth Tuesday, I provide a Quick Trick that will speed up your workflow. When I create these tutorials I want them to be achievable by anyone, with any amount of experience with digital scrapping. To that end, I typically provide both written and visual instructions of every step in the process I’m demonstrating. If you already are proficient you have my blessing to skip over all the extra instruction. I try to use free or software default fonts and styles wherever possible so you’re not having to shop before you can play. Most tutorials are for Photoshop Elements, which is the most commonly used software and what I work with. There are usually multiple ways to accomplish a task. I like to Work Smart, Not Hard, so I’ll show you the easiest/fewest keystroke ways, and include keyboard shortcuts where they exist. I work in Windows but recognize that there are a lot of Mac people out there. So any keyboard shortcut will include the appropriate function keys for both PC and Mac. For example, the keyboard shortcut for Merge Layers is CTRL>E for PC users and CMD>E for Mac users. So when I include Merge Layers in a tutorial it will look like this: CTRL/CMD>E. The other function keys that are part of keyboard shortcuts are the ALT (PC) and OPT (Mac) keys. Make sense? Now for today’s tut!

Our winter began a full 6 weeks early than usual and brought us a LOT of snow. I like to think outside the box when it comes to titles for my layouts and sometimes will do a Google search for related words, phrases or synonyms. That’s how I came up with this one. Notice the transparency inside the snowy bits. If I just used the font as is, whatever is behind my title will show in the snowy areas. Not what I want!

Before I can manipulate this title, the text needs to be Simplified. The actual text itself will no longer be editable so make sure it’s spelled properly and it says what you want it to say before you Simplify. One way to do this is to click Layer tab on the taskbar that sits at the top of your workspace then choose Simplify Layer. Or right-click on the text layer and choose Simplify Layer from the drop-down menu.

I made a Copy Layer of the title so I could work on a Copy and not the original. There are several ways of doing this. Click Layer>Duplicate Layer… on the taskbar. Or right-click on the layer then choose Duplicate Layer… from the drop-down menu. Both these will open another menu where you’re asked where the duplicate layer will go. In this instance, it’ll go into this project, so all you’d need to do is click OK on that pop-up. Or easiest for copying layers within the same project, CTRL/CMD>J will just do it all.

Here’s the pop-up I mentioned above.

Now I’ve made the original title layer invisible so I can see what I’m doing to the Copy Layer. Just click on the eyeball to close it.

I’m going to remove everything but the snowy areas from the title. I added a Layer Mask to it by clicking on the icon at the top of the Layers Panel that looks like a gray circle in a blue square. Why a Layer Mask? It lets you hide parts of a layer but not make them actually disappear. It gives you the most control you can have over what happens to your image. More later.

This is where Elements puts the Layer Mask. You want to be sure you’re working on the MASK and not the LAYER itself. When you look at the Layers Panel you’ll see a blue line box around the active part of the layer. Be careful to make sure you’re on the MASK.

Next, activate the Eraser Tool. You’ll have another reminder that you’re working on a MASK because the Color Picker will show black and white. It there are any other colours there, you’re NOT on the mask. If you remember “White REVEALS and Black CONCEALS” it’ll help with your task… but this mnemonic is referring to what’s BEHIND the object you’re masking. The magic of Layer Masks is that it lets you erase things, but if you accidentally remove a part you wanted to keep, it’s not really gone. For example, sometimes my track-pad sticks and my cursor goes haywire, erasing EVERYTHING it touches. To recover that stuff, I just toggle my colour from white to black and reveal it again by rolling my cursor over the oops. Toggling between foreground and background colours is easy, just click the X key.

Make sure your snowy areas are completely enclosed with a thin border of your font colour. It’ll save you a lot of grief later.

This is what you’ll be left with on the Copy Layer once you’ve concealed all the non-snow areas. Zoom in and go over all of it while you still have the ability to correct any little issues. Once you’ve moved on to the next step it’ll be too late…

Now, to be able to play with this layer, the Layer Mask has to be integrated into the layer by Simplifying it. Same steps as for the initial title.

As soon as your Layer Mask was integrated, your Color Picker will have returned to whatever colours you’d had there before. Set your foreground colour to white: you can either click your cursor on the upper left corner of the palette or you can type “ffffff” into the hex code # box.

Now to fill the snowy areas with white. I tried my preferred method of New Fill Layer>Solid Color>Use Previous Layer as Clipping Mask but all it Filled was the outline. In retrospect, that might have worked just as well as what I ended up doing. Keep that in mind as we proceed. I used the Paint Bucket to click-and-fill the snowy areas. This method is imperfect, sometimes leaving areas unfilled around the edges. That can be overcome by Filling again. As you can see from the screenshot, there’s still a navy blue outline that detracts from the look I want. Here’s where it might have been better to use the Fill Layer process, THEN the Paint Bucket. Live and learn!! Instead, I worked unsmart…

I essentially did the same thing that using the Fill Layer>Paint Bucket method would have done but with WAY more steps. I covered up the blue outline with a Stroke. Edit>Stroke (Outline) Selection…

To expand on the EXTRA steps I took, I had to experiment to find the right size and location for the Stroke. I settled on 6 pixels and Inside to conform to the contours of each snowy shape.

Okay, that looks a lot better. Still a few areas where the Stroke didn’t quite cover the outline – another reason to advocate for using the Fill Layer>Paint Bucket route.

Now to add some dimension! I experimented to find the right combo for this step. Click the Styles button at the bottom of the Layers Panel then go up to the drop-down menu at the top of the Layers Panel and choose Bevels. These are stock Styles that came with the software.

I got the best results with the Simple Inner Bevel as shown. I know it makes the snow look like toothpaste, but Styles are adjustable! Double-click on the fx icon on the layer to open the adjustments menu then push the Size slider to the left until it stops looking like it’s sitting in your bathroom sink. To reduce the glaring shadows, decrease the Opacity of the beveled layer to 66% or so.

Now make another Copy Layer of the snow. We’ll add some glitter to it so it glistens like real snow. CTRL/CMD>J. (Learn the keyboard shortcuts! They’re amazing!!)

Ugh. Let’s get rid of the glop. Right-click on the layer then choose Clear Layer Style. That’ll remove the bevel from the Copy Layer.

You may already have some fine white glitter loaded into your Styles collection. I didn’t have the one I wanted so I went to my Styles folder by clicking on the stack of lines to the top left of the Styles Panel and chose Load Styles. This is where your software stores Styles; if you’ve purchased some to coordinate with your kits this is where Elements will look for them. I’ll put together a tutorial on managing Styles later. For right now I’ll just give you the bare bones.

Here’s the result of applying fine white glitter, then decreasing the Opacity of that layer to 60% so the contours of the layer below are visible.

The finished title! I’m really happy with how it looks. Next time I’ll learn from my errors and skip a few steps!

See you next week. Which Challenge will be in the Spotlight?


Designer Spotlight: January 2023

Lisa Rosa Designs!

So here we are, kicking off a new year. I just don’t know where the time goes! Our first Designer Spotlight of 2023 is a relative newcomer to GingerScraps, Lisa Rosa Designs. Let’s see how our conversation went…

J: Hmm. You don’t want to talk about the mundane stuff, I guess, so let’s not. What is your favorite kit currently in your GS store and why?

L: Oh, Gosh… there are so many I really love and that I’m really proud of. But if I have to pick only one, I would say it is Never Give Up. I love its neutral colors… and I put a lot of me and the way I like to live in it.

J: It really has a shabby chic feel to it, don’t you think? What are your most favorite and least favorite colors?

L: Green and blue are my favorites… but I’m not really the biggest fan of yellow and purple.

J: Yeah, I don’t love yellow or orange, but do love purple! Are you more likely to dance or sing in the shower?

L: Sing, for sure. I’m not really a dancer. But I love to sing and every shower is like a live concert!

J: I thought that’s what you say. I seem to be the only one who dances in the shower. Maybe if more people had Bluetooth speakers in their bathrooms… If you could change one thing about yourself, what would it be?

L: My self criticism. I’m usually very kind to others… but when it comes to myself, I tend to be too harsh. I’m rarely satisfied with what I do, how I do… and my own results.

J: We really are our own worst enemies, aren’t we? Who would you want to play you in a movie of your life?

L: Diane Lane, hahaha

J: Oh, she’s gorgeous! You do kinda favour her. Good choice!! Do you have a green thumb? What do you grow?

L: Well… my thumb is not really green, but I try my best. Many plants have died in my watch, but most of them have thrived. I LOVE to grow new succulents, coleus and zamioculcas and give them as gifts to people around. I’ve tried to grow herbs gardens many times without success though.

J: I can grow lavender but kill parley EVERY time! What did you want to be when you were small?

L: A teacher or a seamstress. I LOVED sewing little clothes for my sister’s dolls when I was small. And I LOVED playing school with them on the weekends… my sister and her dolls were the students and I would teach them everything I learned at school during the week. Her dolls were always very well dressed for classes, hahaha.

J: I loved to create things out of nothing when I was a kid – we had pretty much nothing. I made several houses, complete with furniture, out of cardboard and fabric scraps. I learned how to sew when I was 11 and then started designing Barbie clothes. I think we would have been friends. If you had a warning label, what would yours say?

L: Don’t touch! I hate being touched by strangers or people I don’t have a close relationship with.

J: On, me too!!! I’m a hugger with people I know, but everybody else can just keep their mitts to themselves. If you could only eat one meal for the rest of your life, what would it be?

L: Some salad. I love salads.

J: I enjoy a good salad, but don’t usually take the time to make them. If time travel was possible, would you go back in time or ahead? Why?

L: Ahead! I would love to have a peek on what didn’t happen yet and on what I probably won’t be able to see… like how a place will look like in a hundred years… or if some music I love is still played on the radio, if people still know it.

J; Oh, I’m not sure I’d like to know what’s going to happen in the future. What if it’s something really horrible? Like another pandemic, or some extreme natural disaster… Aside from necessities, what one thing could you not go a day without?

L: Coffee, of course!

J: Hahahaha! I’ll refill your mug, just hold on a sec. Thanks for chatting with me!

Before we say goodbye to Lisa, I’ll remind you she’s providing this month’s Daily Download, links are found right here on the Blog. If you miss a few days, don’t worry, the whole kit will be available for purchase in the store in February. She’s also hosting the Designer Spotlight Challenge this month along with her usual Journaling Challenge. One last important thing to note is that she has discounted her store for the month by 23%! No coupon code required!!

Tutorial Tuesday (Potpourri)

I Do Hereby Firmly Resolve…

Are you a New Year’s resolution-making person? Do you choose “One Little Word” to set the tone for the coming year? Do you set intentions as part of your New Year’s Eve routine? Are you someone who begins the year with a ton of resolve to make your life perfect… only to quickly forget all about those dreams because they’re too much work before February arrives? And then you feel crushing guilt? This post is for you. And me.

“New year—a new chapter, new verse, or just the same old story? Ultimately we write it. The choice is ours.” Alex Morritt

Why do we put ourselves through this torture year after year? What makes us feel like we need to make huge changes in the way we live our lives? Especially when we know in our hearts of hearts that we’re not going to get there; lather, rinse, repeat. How many of us has resolved to lose 10 pounds by Easter… every year since we were 12? Part of the problem is that we internalize what OTHER PEOPLE think we should be or do.

“We spend January 1st walking through our lives, room by room, drawing up a list of work to be done, cracks to be patched. Maybe this year, to balance the list, we ought to walk through the rooms of our lives, not looking for flaws, but for potential.” Ellen Goodman

The thing about goals is that there are specific imperatives when setting them. They must be specific. They must be achievable. They must be measurable. And they must include a plan for getting there. If any of those imperatives isn’t there, it’s not a goal, it’s a wish. Let’s look at these in a bit more detail, using the 10 pounds as our goal. That’s specific. Is it achievable? It might be. It’s definitely measurable! So the plan… how will we get there? Will we cut out all the foods that bring us pleasure? Or will we work out for an hour 4 times a week but continue to eat what we like? It won’t be long before the first slip happens. The apple pie your mom made for Sunday dinner. The pizza that appears in the staff room. The day you have a long list of errands and are too tired to work out when you’re done. One slip leads to another and soon, the goal is no longer a goal. For change to become enduring, it needs to become habit. So maybe instead of setting a goal to lose 10 pounds, it might be more achievable to decide to take the stairs instead of the elevator if going up one or down two floors. That goal has all of the imperatives covered, and a side effect may be that you lose 10 pounds!

“Plant seeds every single day that you know who you are, you know what you’re about and you know what goals you’ve set for yourself.” Stephen Curry

When we don’t keep our resolutions, immediately the negative self-talk starts. “See, you never follow through. You’re doomed to fail! It might be better if you just didn’t even try.” Sound familiar? So the resolution goes in the waste basket and we’ve once again proven we’re not good enough. But is that true? Maybe a little. But at the heart of it, it isn’t. We can’t possibly be perfect, and striving for that is a huge waste of time and emotion. Look at the people you admire. Are they perfect? Nope. Do they have traits you’re not really a fan of? Probably. But there’s still much to admire, right? If we choose one small thing we’d like to change about ourselves and create a plan for that, we’re halfway to success! It’s when we stop trying that we fail; so today I ate the pie. Tomorrow I’ll try to do better.

“It is your right to choose what you do and don’t do, to choose what you believe in and don’t believe in. It is your right to curate your life and your own perspective.” Lady Gaga

I think we all spend too much time comparing our lives to those of others, while there really isn’t a level playing field for life. Most of us are just doing the best we can with what we have, and we’re often blind to the successes we’ve experienced. We let the great be the destroyer of the good. It’s human nature to look over the fence and wonder what life would be like if we were over there. Erma Bombeck wrote a book she called The Grass is Always Greener over the Septic Tank. She was right. It’s all an illusion.

“I’m deciding to be my own individual self, and it looks nothing like what anyone else is doing. There’s something so powerful about being unique.” Alicia Keys

Yes, we’re all unique individuals. But the human species is interconnected; we’re social animals but with intellect. Each of us has something to contribute, even when we don’t think we can. Even when we think we have nothing, we have ourselves! What they say about random acts of kindness is 100% true. Little gestures mean a lot. A friend of mine clears the snow off the sidewalk of his entire block every time it snows. His neighbours don’t know it’s him; he doesn’t do it for the recognition, he does it because he’s a nice person who has the time and the inclination. I started buying an extra bottle of dishwashing liquid when I’m getting groceries and putting it in the bin for the food bank – that’s one of the things not many people donate so I chose it as my contribution. Little things add up.

“We’re at our best when we support each other. Not when we cancel each other out for our past mistakes but when we help each other to grow.” Joaquin Phoenix

I guess what I’m trying to say is that you deserve to be happy, exactly as you are. If making resolutions makes you feel guilty or like a failure, don’t make resolutions! Pick one little thing you can work on. Work on it. Don’t expect it to be magic, because it won’t be. It’ll be work. When that thing is habit, pick another. The date on the calendar isn’t magic either. Don’t be buttonholed by the expectations of other people. You do you! Period.

“Happiness was always important to me, even at a young age. People would ask, ‘What do you want to be when you grow up?’ I’d tell them, ‘I just want to be happy.’” Goldie Hawn

Tutorial Tuesday (Photoshop Elements)

Quick Trick Tuesday: Close All

PDF Version : https://bit.ly/3vqKtyh

I hope everyone who celebrates at this time of year has some great memories made and new stories to tell. I won’t keep you with a long, drawn-out, convoluted, complicated tutorial for the last one of 2022. This Quick Trick is literally 4-clicks-and-done… a true WSNH trick. (*Work Smart Not Hard) Let’s proceed.

I know I’m not the only one who often has about a million objects open in my Elements Photo Bin while I’m working on a layout. The thought of putting away my toys then takes on quite an unhappy aspect, and I might want to start into a new project right away, so I don’t want to just shut down Elements then restart it… bleaah! But then I found this Trick and it’s been a life-saver!

This 4-click process is so easy! File>Close All… (Keyboard shortcut CTRL/CMD>ALT/OPT>W) opens a little submenu where it asks you what you want to do with the files. I always Save As the files I’ve changed that I want to save my efforts for later first, just as a good habit. For example, photos I’ve edited and layouts I’ve completed are Saved as I go along, but that button I Resized or that ribbon I recoloured? They don’t need to be Saved as changed. With this menu, I can use one click to tell Elements to do the same thing with everything in the Photo Bin.

And voilà! Everything is closed, Elements is waiting for the next project and woohoo! Time saved, effort saved.

As we say goodbye to 2022, I hope you all have some happy memories to soften the harshness this year has battered us all with. I hope all of you and those you love are safe from the extreme weather being experienced in so many parts of the world. And I hope you have much to look forward to in 2023!

PDF Version : https://bit.ly/3vqKtyh

Tutorial Tuesday (Individual Style)

Challenge Spotlight: Scraplift

I’ll admit that I’m a purist when it comes to scraplifting another scrapper’s layout. I think that if I like a layout enough to want to lift it, I should try to stay as faithful to the original as I can while still making it my own. I also know that scrapping is an intensely personal craft and we all approach it from our own points of view; this is very true when it comes to scraplifting. There are so many options! Let’s take a look at this month’s layouts and analyze them a bit to see if we can figure out what the scrapper chose to emulate. But first, the Scraplift Challenge is hosted by Dagi; she chooses the layout inspiration and this month she chose this layout by Effie3047. Each of the Challenge layouts is linked to the Gallery so you can pop in and offer the scrapper some praise. Just click on the scrapper’s “handle”. This is the inspiration layout for reference.

These layouts are in the order they were posted to the Gallery. First is this blue confection from dhariana. She chose to follow the blueprint of the layout fairly closely, with the photo, journal card and elements in the same arrangement. The doodle circles are her own touch.

kristal has also stayed close to the blueprint, but kept her layout crisp by increasing white space. She also has used a wooden background like the original has.

For her layout, lulutoo chose a much brighter palette, but stayed true to the basic layout and the wood background. I like that she went with a narrower paper strip behind her elements and tilted her photo a smidge… an original touch.

Tbear‘s layout is quite different, but you can see the basic shape of the Challenge layout. A single photo, a journal card, a Christmas theme with carefully-constructed clusters and a similar palette are what ties her layout to Effie‘s.

I can see the bones of the Challenge layout here in robinoes66‘ entry. She’s gone with a dark palette, positioned her photo in the same place but omitted the journal card. She used a good amount of paint and her primary colours are beautifully supported by her black background.

To me, ayla63‘s layout looks more like a scraplift of robinoes66‘s layout than it does Effie‘s! And that’s alright. Their visions are very similar. I like that she chose to turn her photo into a sketch, which makes her layout unique.

I love what Jill has done; she went with a portrait-oriented photo rather than a landscape and used gears instead of paper circles, while adding a couple of extra paper pennants. Her layout looks quite different than the original, but still has the important components.

Pippin has stayed true to the original layout in most ways. Her blended background is beautiful, but can we talk about that photo? So cute!!

For her layout, pinklily went bigger with her photo and paper strip base, supersized her title, flipped the script horizontally and kept her clusters small.

AJsRandom chose to increase the size of her photo but has kept most other aspects faithful to Effie‘s layout. The twined strings that anchor her journal card are a great substitute for the strings of lights Effie used.

I like that breoni chose to place a row of circular photos across the lower third of her layout rather than clusters. That krafty background really makes her photos pop off the page.

The choices Kristi Martin made of a large photo and minimal embellishments against a black canvas really gives her layout presence in the Gallery.

Our second Hanukkah layout by zanthia is another faithful lift. She made her title really do the heavy lifting here! The word-cloud journal card is a clever twist too.

Treemoon took a really different approach by enlarging EVERYTHING. She kept the horizontal aspect and the basics of the design. Her palette compliments her photo so nicely and I love the clusters she’s anchored her banner with.

We’ve had some really miserable weather here in the BC Interior. We have a ridiculous amount of snow and it’s bitterly cold. I was planning a road trip to see my parents and bring them a box full of treats for the holidays but we were snowed in! I hope wherever you are and whatever you’re celebrating, you’re warm and safe!


Tutorial Tuesday (Photoshop Elements)

Coloured and Patterned Shadows

PDF Version : https://bit.ly/3HXqGOs

When I saw this technique on another site, I was intriqued. The scrapper was using Photoshop, but I knew I could make it work just as well in Elements so I had to prove it to myself. This is the result!

This tutorial will be a review of how I create custom shadows, but with a twist. It will work best with a white/light coloured alpha or meaty font against a white or light-coloured solid background. The alpha I used is from the GingerBread LadiesDream Big collab and will be part of a layout created with JB Studio’s Farmhouse Winter. My layout was also created with this month’s Challenge template from Scrabookcrazy Creations by Robyn.

When I create a title with alphas, I usually put it together on its own canvas so I can easily tweak whatever needs tweaking without the distraction of all the rest of the layout. I usually go with a straight line +/- some individual height or angle changes for interest. But because this technique is a shadow trick, this time my working title is on an angle. The shadows on the title must lie in the same direction as the rest of the layout and the title will be on an angle on the finished layout. So…

Typically, once I’ve got the title the way I want it I shadow any overlapping areas and Merge the characters. But you’ll see that I’ve kept each character on its own layer and will keep them separate. This is important for later.* (If you’re using a font, you may want to put each letter on its own layer. Skip ahead to the * to see if that’s what you need to do.) The first step to a custom shadow is to Select the outline of the object. CTRL/CMD>click on the Layer Thumbnail – that little image of what you’ve put on a layer that shows at the left side of the layer in the Layers Panel.

Next, I add a new blank layer UNDER the working layer. The quickest way to do that is to hold down the CTRL/CMD key and click on the Create New Layer icon – the one that looks like a sheet of paper with one corner turned up.

Next, I set the foreground colour in the Color Picker to the colour I want for my shadows. If I’m using a template, I’ll match that to whatever the template designer has used. In this case, it’s just black. Using the Paint Bucket tool, I fill the outline of the letter on the blank layer. This is the Shadow layer.

Don’t be concerned that you can see a thin rim of black around your letter. It’s not going to make any difference to the final product.

Here is where this technique departs a bit from my usual custom shadow routine. I made a Copy layer of the SHADOW: right-click on the layer and choose Duplicate Layer… then click OK on the pop-up menu. The keyboard shortcut is CTRL/CMD>J.

I renamed the two shadow layers; the first, bottom one is Shadow, the top one just below the actual letter is Narrow Shadow. If you want to rename your layers, go to the Layers Panel and double-click on the name of the layer that you can see. Type in what you want it to be called and Enter. Then I turned the visibility of the NARROW SHADOW layer off.

I did this process for each of the letters in my title, creating two shadow layers and turning visibility for the one just underneath the letter itself off.

Now to give the Shadows an offset, which is a regular step in my custom shadow process: Activate each of the visible, bottom SHADOW layers by holding down the CTRL/CMD key and clicking on each layer all the way up the pile. This lets me move all the Shadows in one movement so they match.

For the most realistic look all the shadows on a layout lie in the same direction and give dimension to the objects above them. The shadow Styles on the template I used are at 60° (I flipped the template horizontally, and the shadows flipped too.) To know the exact angle of light on a template double-click on the fx symbol on one of the template’s layers and it’ll show up in the pop-up.

Now to soften the Shadows. So far I haven’t found a way to do this step in a batch, so I processed each layer individually. First step is to add a Filter>Blur>Gaussian Blur…

Elements provides a Preview of the Filter effect. If you don’t see anything in the Preview pane, click your cursor on the edge of your Shadow. It’ll appear in the pane. Or you can just watch what’s happening on the canvas. Using the slider, adjust the amount of Blur the Filter adds. I want them to be quite soft, so I used a Radius of 6.5 pixels. Elements also “saves” the settings of the most recent Filter used, which makes it easy to add that Filter to multiple layers. Simply click Filter>Last Filter. The keyboard shortcut for that is CTRL/CMD>F. One step!

Next, I changed the Blend Mode to Linear Burn. This mode makes the shadow transparent so the layers below are visible – just like a real shadow!

Then to tone the harshness down a bit more, I decreased the Opacity of the Shadow layer to 70%. This step is also subject to personal preference. If you try this and 70% doesn’t look good to you, find what does! It can also be further adjusted later.

This is what the title looks like with each of the Shadow layers Blurred and lightened. I could stop here and be quite happy. But this tutorial is about coloured and patterned shadows, so onward ho!

Yes. You’re not seeing things. I’m going to Clip a patterned paper to the Shadow layer under my “O”.

Doesn’t that look neat?

I Clipped a different* patterned paper to each letter, using the same paper for the two “E”s and went with the green houndstooth for the ellipsis at the end. If you want to use the same patterned paper for all your letters, you could Merge all the alpha layers/not separate the characters if using a font then do all of the preceding steps on your title as a unit.

Okay, so once I had all the Shadows coloured, I decided they looked a little anemic. So I increased the Opacity of each Shadow layer to 80%. That looks better to me.

Now to add just a tiny bit more definition to that alpha. I’ve made all the Narrow Shadow layers visible again and activated them by CTRL/CMD>clicking on each layer. A little nudging in the same 60° direction as the coloured shadows – just a little! – gives each letter an actual shadow.

Again, they’re pretty sharp and harsh so Filter>Blur>Gaussian Blur first.

But because these ones are a lot closer to the objects they’re shadowing, the Blur should be less pronounced. I went with a Radius of 3.0 pixels.

I didn’t need to decrease the Opacity of these shadows. They look just right to me!

Here’s my finished layout. The technique isn’t really obvious, so you might want to work on a larger scale, with a bit more space around your title if you choose to try this. I’m really pleased with my layout as is.

Five days until the first night of Hanukkah, twelve days until Christmas, thirteen until Kwanzaa and nineteen until next year… is everybody as behind on EVERYTHING as I am? Thinking about it exhausts me. But I have an amusing little anecdote I want to share. On Saturday one of my former coworkers (the very last one I saw before I moved away, to be exact) posted to Facebook that her maternal grandmother had passed away. She linked to her Baba’s obituary. Where’s the fun part, you ask? Well, it turns out we’re RELATED! Distantly and by marriage, but still!! Her maternal great-grandfather’s first wife was my great-grand-aunt’s sister-in-law. There are a couple of other spots where our roots intertwine too, that I’ll be untangling over the next while. We ended up talking on the phone for an hour and a half; she said finding out we’re “cousins” was the best thing to happen to her all month.

Before I forget… There was a comment on the cardmaking tut from a few weeks back from Lisa. She said she uses Royal Brites Matte Photo paper to print hers. I couldn’t find any locally, but was able to buy some Staples premium matte photo paper and printed my cards with it. OMG!!!! The difference00 is HUGE!! Thanks and a shout-out to Lisa!!

Next week we’ll be checking out the Challenge Spotlight and the final tutorial of the year is a Quick Trick you’re going to LOVE! See you soon!!

PDF Version : https://bit.ly/3HXqGOs


Tutorial Tuesday (Photoshop Elements)

Don’t Let Your Text “FLOAT”!

PDF Version : https://bit.ly/3ju3KfO

Have you ever wanted to run some text across an element, like a piece of washi tape, a paper ribbon, or even just over a crease in your digital paper, but then look at it and think, “Well that looks like garbage…”? Odds are you feel that way because the text isn’t grounded to the element and looks like it’s floating. Kathi (granny5pics) was in that situation and asked if I could help. This is it!

My example uses a piece of crumpled washi from Cheré Kaye‘s portion of the Beautiful Struggle collab she created with Aimee Harrison and Cindy Ritter, and a very creased label from Cindy Ritter‘s Autumn Treasures. Killing two birds with one stone, as it were.

After I typed out my text and positioned it where I wanted it, I Simplified the layer so that Elements will allow my changes. My method for Simplifying is to right-click on the layer then choose Simplify Layer. It can also be achieved by clicking Layer>Simplify Layer.

Next, I chose the Dodge Tool – the one that looks like the paddle the optometrist uses to close one of your eyes. This tool lightens the area it’s used upon; I like to start with less, then work my way up to more. My settings were Range: Highlights, Exposure: 30% (I adjusted that after I took the screenshot) and 45 pixels for my brush size. Note that I’m working on the text layer, not the tape layer, so the changes I make will only affect the text. I ran the Dodge brush over the parts of the text that are over top of areas where the light creates highlights, the creases on both the tape and the label. For straight lines like the creases in the label, click your Tool at one end of the area you’re working on, hold down the SHIFT key and click just past the other end. Don’t worry about going past the edges of the text; the Tool will only affect the layer you’re on. If you have text that crosses the same crease on multiple lines, you can do all of them in one pass.

Next I switched to the Burn Tool, the “OK” sign, and used similar settings. This tool darkens areas where it’s used. Again, I like to build the effect, because it’s easier to see when to stop. This time, I ran the brush over areas where the text crosses shadowed areas of the tape and the label. I adjusted the Size of the brush to suit the width of the shadowed areas by using the [ key to make it smaller, the ] key to make it larger. Zooming in and out let me see if I needed to go over any areas again.

Here’s a close-up. The arrows point out the areas where I’ve made my adjustments. I can see some dimension beginning to be visible.

I kept Dodging and Burning until I was satisfied. Then I planned how I was going to show the edge of the tape where the ink from my pen wouldn’t have reached the paper below.

The tear at the left edge of the tape is jagged so to help me out, I CTRL/CMD>clicked on the tape layer’s thumbnail to Select the edge, but kept the text layer as my active layer. Then I used a very small Eraser brush to erase a narrow bit of my text. I also shaved a thin strip along the bottom edge of the tape.

If I’d decided it still needed something, I could have used the Smudge Tool – the flying fickle finger of Fate – to gently push the top edge of the text toward the high crease on the tape, knowing that the Smudge Tool blurs the image a bit. But it looked right to me so this is what I’m happy with.

Here’s a Zoomed out look. Can you see the way the text seems to follow the contours of the tape and the creases in the label?

Here they are, side-by-side. I think you’ll all see it now!

PDF Version : https://bit.ly/3ju3KfO