Happy Thursday!! Our designers have a ton of new goodies for you this week! Let’s take a peek!
From Scrapping Serenity


From Tinci


From Neia


From Aimee Harrison


From Jb Studio


From Lindsay Jane


From LDrag


Happy Thursday!! Our designers have a ton of new goodies for you this week! Let’s take a peek!
From Scrapping Serenity
From Tinci
From Neia
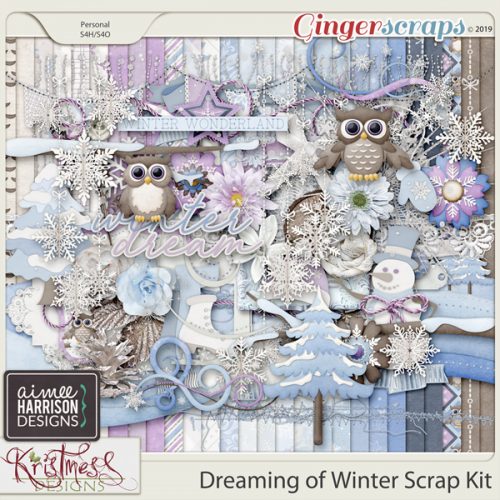
From Aimee Harrison
From Jb Studio
From Lindsay Jane
From LDrag

I know – it’s almost the end of January and I’m just now getting this posted. I don’t know about anyone else, but work has been absolutely crazy. I’ve worked enough hours the last two weeks to take a full week off. If only it worked that way.
I had the pleasure to have The Cherry on Top and Key Lime Digi Designs answer my questions. Let’s see what they have to say.
How long have you been designing?
TCOT: I’ve been designing around 5 years.
KLDD: Summer 2013
What made you decide to design?
TCOT: I’ve always loved being creative on all kinds of medium since I was kid. I went from a full time professional to a stay at home to take care of my handicapped sons and I needed some other fun outlet to feel whole.
KLDD: I was on many Creative Teams and Store Team at a large digi site starting beginning around 2007 I think….After a while I picked up enough knowledge and increased my skill set to want to try the next step.
What do you use to create your designs (program, additional tools, etc.)?
TCOT: I use PSE/PS/Procreate/a sketch book.
KLDD: I am still using the out of the box software from right before Adobe moved to subscription. As the saying goes, If it ain’t broke…
Describe your design workplace.
TCOT: Disgustingly neat and tidy. I cannot concentrate in a mess. A glass of wine or tea is as reckless as I get!
KLDD: Organized chaos. I am absolutely terrible at putting away and organizing. I constantly make “digital” post it notes to remind me to do something and then forget about it. I have 3 EHDs that I promise myself will be THE ONE that gets organized. As for my work space, I have from the beginning, and probably will always remain a desktop gal. I can’t do laptop.
What motivates and inspires you as a designer?
TCOT: Absolutely everything! Beauty is everywhere. In a cloud formation. The way the sun reflects on a gently flowing river. The cat napping in just the right position…
KLDD: I love good color harmony, so when I see it on a blouse at a store I will snapshot it or at least make a note of the colors that were in it and run home to make a palette of it.
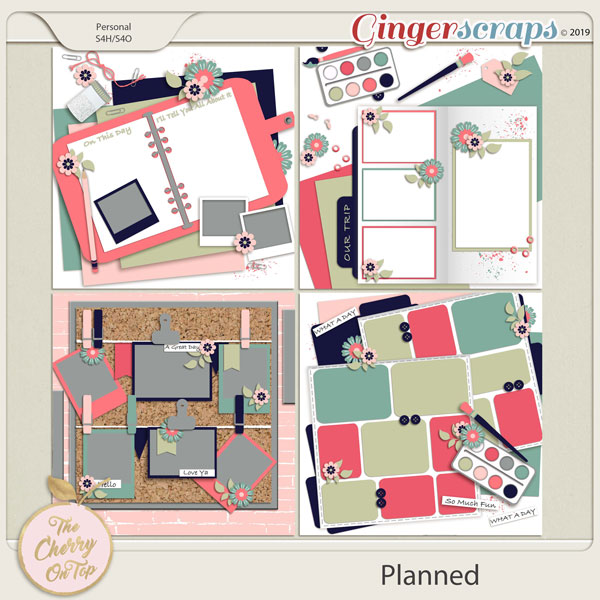
What is your favorite kit currently in your GS store and why?
TCOT: Awe, man! It’s just cruel to make me choose! My favorite template pack, (I assume you mean our own and not another designers?) would be the Planner series. I really dig those realistic, mock up types of pages, currently.
Link to all of the Planned templates: https://store.gingerscraps.net/search.php?mode=search&page=1&keep_https=yes
KLDD: I Belong to the Sea. When I was making it, I was in my element. I live in a coastal area, actually on an island chain, so I guess while making it was like being home. Bonus factoid: That collection began with the colors in the Little Sailor Boy Tin element. A close second though, has to be Indigo Serenade..I mean you gotta check out the CT Layouts on that one. They make me swoon.
What was your first job?
TCOT: I worked at AARP everyday after school, weekends and summers. I started at 13.
KLDD: Counter girl at a deli…hated it and never did food service again…LOL!
Have you ever met anyone famous?
TCOT: The list is very long. I lived in Florida where many famous people can be found and I also worked as a bartender in a huge, popular club not too far from NYC. I guess the biggest names might be John Cougar, John McEnroe, Dawn Wells, Green Day, The Ramones, Hootie and the Blow Fish…
KLDD: I would say quite a few, especially because they are here to relax. The latest one was Norbert Leo Butz. He played the middle son in Netflix’s Bloodline (filmed here in the Keys) and was in original cast of Wicked. He joined the local guys at a jam one night about 3 years ago. He can sing! It was great to be in a small audience of 15 or so people.
What are you reading right now?
TCOT: I’m a super geek. I usually ready between 3-5 books at one time. Half fiction, the other half…dork material. Currently, on my nightstand and in the John is Outlander (#4), The 4th of July, The Great Cholesterol Myth and Marijuana Horticulture.
KLDD: I have been reading a series on the kindle- The Peridale Cafe Mysteries by Agatha Frost. They are easy to do in small bursts and am awaiting Book 20.
What is your favorite quote?
TCOT: “And in the end, it’s not the years in your life that count. It’s the life in your years.” Abraham Lincoln
KLDD: “I’ve learned that people will forget what you said, people will forget what you did, but people will never forget how you made them feel.” Maya Angelou
What is something you want to do in the next year that you’ve never done before?
TCOT: I’d love to stop shouting. Next year, any year…I’ve never gone a day without shouting.
KLDD: Become wealthy..haha.
You have your own latenight talk show, who do you invite as your first guest?
TCOT: Ozzy Osborne! He’s a riot!
KLDD: Jason Momoa (Aquaman) would be a fun personality to kick off with.
If you had to delete all but 3 apps from your smartphone, which ones would you keep?
TCOT: I’d need a phone with apps first…
KLDD: Email, banking and maybe one game.
If you could have someone follow you around all the time, like a personal assistant, what would you have them do?
TCOT: Take the darn dog out every time he wants to go outside!
KLDD: I would not as such, but I would welcome a “collaborator”. Life is a learning opportunity meant for sharing.
Would you rather travel back in time to meet your ancestors or to the future to meet your descendants?
TCOT: Family…I’m an ocean away for a reason…I’d rather just stay right here and deal.
KLDD: BACK-remember the disappointment Marty McFly had seeing his self-centered kids…LOL!
What commercial jingle gets stuck in your head all the time.
TCOT: “When it’s time to relax, we’ve got the beer. Miller Beer! If you’ve got the time, we’ve got the beer.”
KLDD: None, really
If you could turn the ocean into a liquid other than water, which one would you pick?
TCOT: Check out last answer…
KLDD: I would not want to take from the sea creatures, so instead how about a kiddie pool of margaritas, like in The Last Man on Earth.
Such fun answers. Thank you ladies so much!!
Want to stalk them? Here are all the details:
The Cherry on Top: GS Store, Facebook Fan Page, Blog
Key Lime Digi Design: GS Store, Facebook Fan Page, Facebook Group
And make sure to grab the Daily Download. I know it’s late in the month. If you have missed the beginning links, you can always grab the full kit in the store next month.
Thanks for hanging out with me tonight!!

Following Up for Donna
![]()
Last week’s organization tips drew some great comments. Many of you have good systems for sorting and retrieving your digi goodies. But… there are some things that still prove elusive.
Donna had this to say: “Dragging from all different folders from the finder is a pain in the ***, it was so much easier dragging from the searched results in photos.. ” Because I usually copy the files I plan to use and place them in a subfolder of my digiscrapping master folder, I hadn’t worked out a trick for that process that might streamline it a bit for those of you who prefer to drag-and-drop right from your folders into your scrapping software. Read on!
First I’ve shown my folder method using the search box in Windows. (Sorry, I’m not a Mac girl so I don’t have any tips for that platform.) I ran a simple search for “buttons“. The search box is at the upper right of the window and the progress bar runs from left to right as Windows does the work for you.
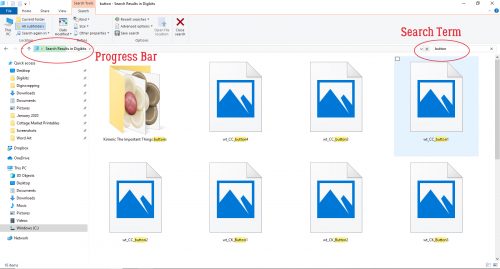
Once the search was done, I selected 4 buttons with a similar colour scheme, from 4 different folders. Remember, to make multiple selections, hold down the CTRL/CMD key while you’re clicking on the items you’re choosing.

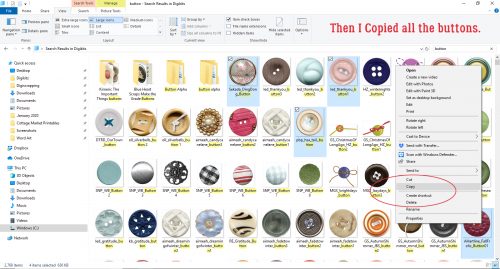
Next, I Copied all 4 of the buttons.
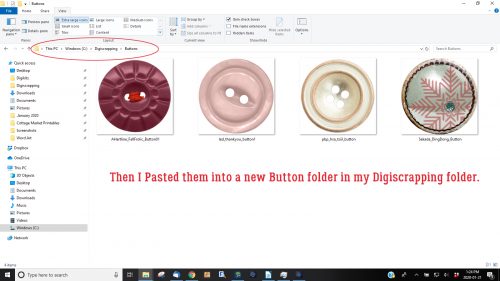
Finally, I Pasted those buttons into a new Button folder I’d created within my Digiscrapping folder. Now, when I’m ready to use them in Elements, I can open that Button folder with the Open tool on the main screen. But that seems to be a little involved. Is there a way to select the same 4 buttons and open them in Elements without the extra steps? Work Smart, Not Hard, right??
OF COURSE!! I got Elements up and running. Then I activated that big Open button at the left of the main screen. But instead of having a dedicated folder with my buttons in it, I instead opened my Digikits folder and USED THE SEARCH BOX! It was something that had never occurred to me before. I typed “button” into the search box and waited.
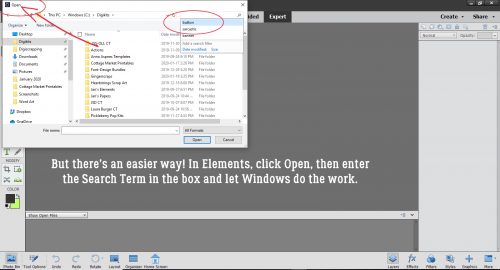
Then I went through the results in the same way I would any other time. I Selected the same 4 buttons as before. (The image below shows the search results as a list. I did my selections using medium icons so I could see the actual images then I changed the display to a list so I could show you multiple selections.) When I had all 4 selected, I just hit that Open button at the bottom right of the menu.
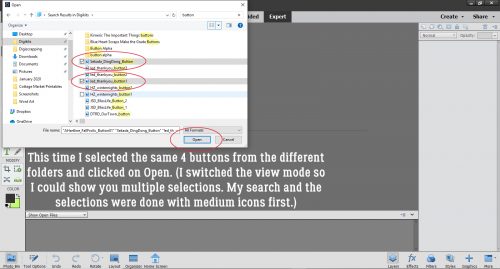
And there they are! All from different folders and in fewer steps! I hope this is what Donna was looking for.

Her second organizational challenge reads like this: “Having switched to using my cellphone as my primary camera these last few years has actually made it more difficult to group as events, etc because of all the random photos, notes, screenshots etc that I also take photos of. Open to any suggestions there…?” This one is actually an easy fix. Both iPhone and Android have the ability to build albums with our photos. My Android phone creates some of its own albums, but I can make more to suit myself. Moving photos into the albums is as easy as clicking on them, going to the gallery menu and moving or copying the selected photos over. The key here is to sort them soon after you take them so it doesn’t become an all-day job. If you’re planning to use a group of photos taken on a specific day, make an album for that day. Sending the photos to the platform upon which you do your scrapping is the same process as whatever you’re doing now. If you’re using the iCloud, Dropbox or Google Drive or some other cyber-sharing device, that will allow you access to all your phone folders. Give it a try and see if it makes life easier!
Next week I’ll be showing you another paper-to-digi technique courtesy of Steph Barry. I think you’re going to love it!
![]()
Happy Thursday! It’s a holiday weekend here in the states! And there’s a cold front coming in which means its the perfect weather to stay home and get some scrapping done! Our designers have been busy creating new goodies to scrap this weekend!
From Down This Road


From Miss Fish


From JB Studio


From Snickerdoodle Designs


From Dagilicious


From Tinci


From CathyK


From Aimee Harrison


Decluttering Isn’t Just for Homes
![]()
It’s January. It’s bone-chillingly cold in some parts of the world (like HERE!) and unseasonably warm in others. The holidays are over, and winter stretches out in front of us like a long and bumpy road. There’re no truly exciting events on the horizon, so what’s a girl to do? Well, the flyers are filled with supplies for organizing our stuff… But for digiscrappers, we don’t need to buy anything. It’s all right in front of us! I think now is a good time to talk about organizing our stuff, and maybe actually making some effort to get ‘er done. This is how I do it, but I know y’all have your own way of doing things, The important part is to DO it!
It’s not as important where we start as that we actually DO start. For me, the place to begin will be with all the new kits I’ve amassed but haven’t unzipped. This is actually my New Year’s Resolution, to unzip and relocate my supplies as soon as I download them. I was keeping up just fine until my dogs started fighting in the house and I had to spend a lot of time keeping them away from each other. I have a backlog, and I WILL attend to it ASAP. I use Extract Now, a free rapid unzipping app that makes the unzipping part pretty easy. I make folders within my download folder into which I unzip the new goodies, which eliminates a couple of steps in the process, and it works pretty well. I still go through each of the subfolders, deleting all the duplicate previews and things I know I’m not going to use (like alpha sheets!). If the kit is templates, I delete the PNG files and the TIFF files, and I add to the name of the previews to include single or double and the number of photo spots the template includes. That lets me put a keyword like “single4” in the search bar and Windows will find all the previews with 4 photo spots. Once I’ve arranged my folders the way I like them, I move them en bloc to my digikit folder for the store or designer as appropriate. Then my download folder should be empty. Until I fill it up again!
The way I sort my digikits is primarily by store or by designer’s creative team, with the exception of Heartstrings Scrap Arts… I have so many of Bryony’s kits I need a separate folder just for them. Having said that, my GingerScraps folder is ENORMOUS! (24.6GB without the kits sitting in my downloads folder. Thank heaven I have a 2TB drive on this laptop!) I rename each kit’s folder: DesignerNameKitName, unless it’s a Buffet kit, then it’s MonthYearBufDesignerNameKitName. That makes it easier when I’m doing a store challenge.
I try to organize my photos as I take them, so the job isn’t too daunting. I don’t care for the Organizer that comes with Photoshop Elements so I don’t use it. But it can be very useful for both organizing and retrieving your photos. The Help menu can give you some ideas about how to maximize your efficiency. The way I file my photos is in folders… what else? I create a new folder for the current year, and a subfolder for each month. I download a lot of photos from my daughter’s Tiny Beans album where she posts pics of my grandchildren. Those I rename with a suitable tag so I can run a keyword search later. If I’m looking for photos of Aaron, I just type in his name. These photos go into the folder for the month and year they were taken so I have some frame of reference later. I have a folder for the photos my friend Sandy takes and graciously allows me to ‘steal’ and one for the photos I download from Pixabay. My Pixabay folder is broken down into subfolders by topic: Kids, Insects/Flowers, Animals, Portraits, Scenic and such. This method of filing makes it a lot faster to find what I’m looking for.
I also organize my layouts. I have folders for each month’s challenges, with subfolders for the challenges themselves. When the year is over, they all collectively are filed in a folder for the whole year. Then again, I have some folders that have copies of the finished layouts for my daughters’ weddings, my grandkids’ first years, all of my Ireland layouts and for the creative teams I’m on. It’s all about finding things later!
Since I set up this new(ish) laptop back in September, I haven’t taken the time to go through my 1400+ fonts and retag them for MainType. That’s something I really need to get on with! It’s a daunting task, but you know what they say. Focus on the first step. I know the time I spend on it now will decrease the time it takes me to find the one font I’m looking for later. The best part of MainType is that I decide what my tags are, based on MY workflow – how I search for things. And like everything else, if I work at it as I add new fonts, the amount of time I spend on it will go way down. But just writing about it is giving me a rash, so let’s move on!
One caveat. If you’re going to delete duplicate files, make sure you only delete the ones you’re not going to want to search for later. I made the mistake of using a Windows utility and chose the wrong metric so it removed a LOT of my original templates and left me with the PSD files for the last layout I used them for. Retrieving the original template takes a lot of time but is necessary when I use the search feature to find previews for my desired number of photos.
I’m interested to hear how YOU organize your stuff. So please, share your secrets!!
![]()
A third of the way through the first month of the year. How are those resolutions going? Are you ready to start a new adventure? Maybe some of the new kits and templates will jump start your motivation and creativity!
Remember when you spend $10 in the store, you get a great new collab! Winter is fully set in and it’s time to cozy up and get warm.

So, excuse me for a bit. I feel an overwhelming urge for a cup of coffee!


Remember, if you complete 10 challenges, just ten, you get a free kit as well!!

This kit makes me like snow. As long as I’m not driving in it…
![]()
Happy Thursday!! Our designers have lots of goodies releasing tomorrow! Let’s take a peek at what our CT created with them!
From Dagilicious


From JB Studio and Aimee Harrison


From Miss Fish


From Tinci


From Mags Graphics


From Heather Z


From Scrappin Serenity

From Aimee Harrison


From Cathy K


Getting in on the Action(s)
![]()
When I was thinking about a topic for this week’s tutorial, I wasn’t inspired, so I did a Pinterest search for ideas. Are you ready to have your mind blown?? When I was playing with this subject so I could compose a coherent discussion, my mind certainly was!
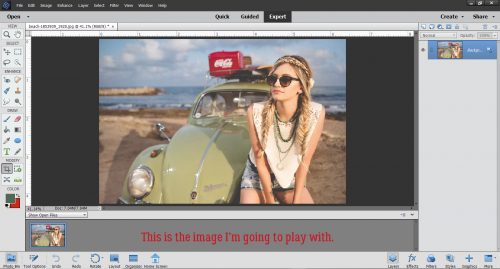
I’ve referred to Actions in previous tutorials, but didn’t get into them too deeply. Your software came to you with a set of them already in place, and they form parts of the Guided Edits. If you’re unsure what Actions are, they’re like little scripts that tell Elements to make a series of predetermined changes to an image. The process is largely automatic, but there’re usually some options for personalizing the results. And I’m going to show you a really cool action I downloaded free. The image below is one I found at Pixabay; it turned out to be ideal for this little foray.
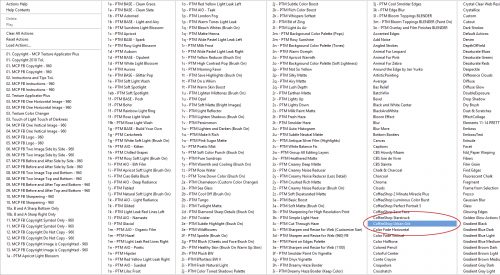
This is where I downloaded the Action I’ll show you. Most of the Actions here are completely free and have instructions within the Action menu itself. There are actions that perform one-step edits for portraits, actions that alter the colour of images, actions that make dodging and burning easier, ones that resize and sharpen images for different purposes, actions that watermark your photos… the list is endless! Check out the list here: The Coffee Shop Blog
Accessing the Actions on your workspace isn’t intuitive. Click on Windows>Actions to see which have been loaded (outside of the Guided Edits, since they’re specific to the Edit you’re playing with).
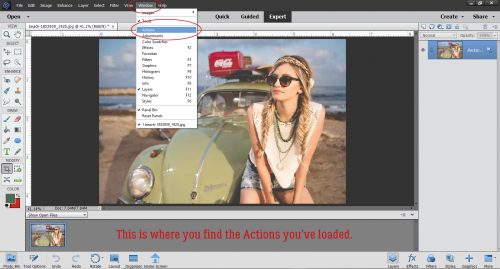
This is the default menu (with a couple of extra Actions I’ve loaded listed at the bottom). Click on the icon shown to open the Actions command centre. This is where you Load new ones.
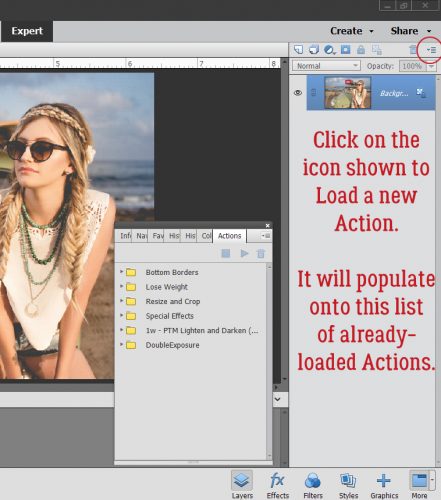
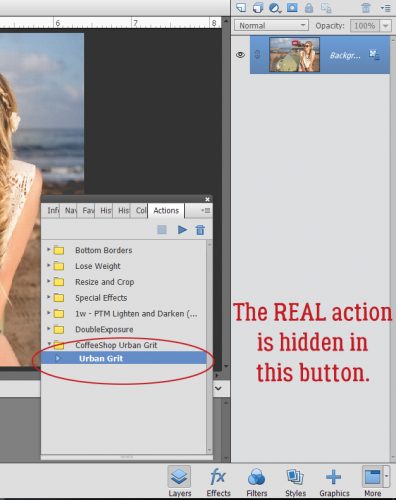
The software will find any Actions you’ve downloaded and placed in the Actions folder of PSE. If you want to see which ones you already have, using the file explorer on your computer and look for .atn files. I have a LOT of them… I know. The one I’m going to show you is Coffee Shop Urban Grit.
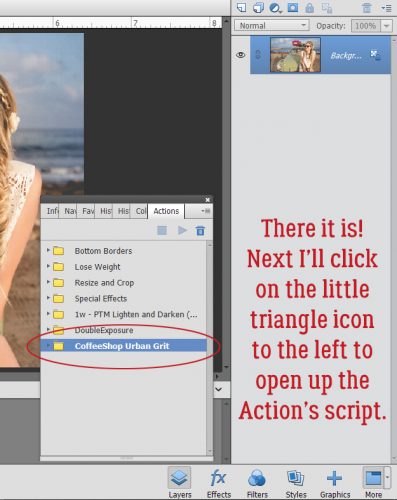
Now that I’ve added it to the Actions menu, there it is! When I click on the triangle icon to the left of my chosen Action, it will open a dropdown that contains the script, or list of processes Elements is going to run.
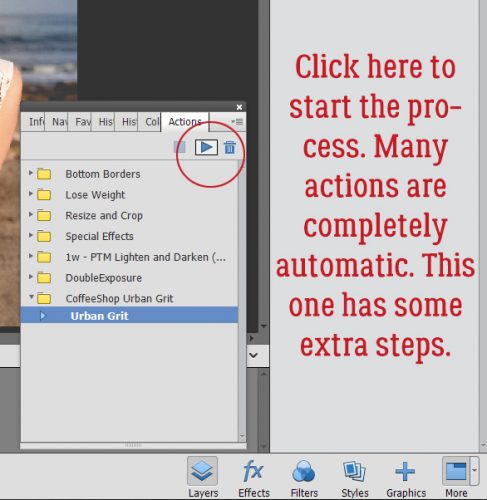
Some Actions will have a dropdown list of steps that you can turn on or off. This one does too, but to see it I’d have to click on that triangle icon next to the name of the Action.
With the desired Action highlighted, click on the blue triangle icon shown to “play” the Action. The script will start running; with some Actions you can watch the changes being made flash over your image. With others the changes only happen when you decide where you want them. That’s how this one works.
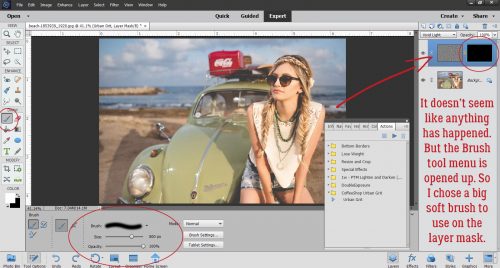
So, it looks like all the software did was add a Layer Mask. The image itself looks exactly the same. But… the Brush tool menu is now open and the Layer Mask is selected. So I chose a large, soft, round brush and used it on the Layer Mask.
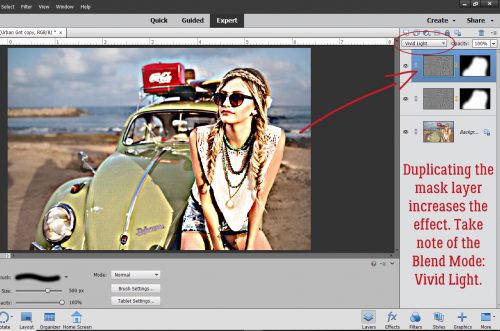
Can you see what’s happened? I just used the brush over the car and the girl. The sky, sea and sand weren’t touched. (Look at the Layer Mask to see what area was brushed over.)

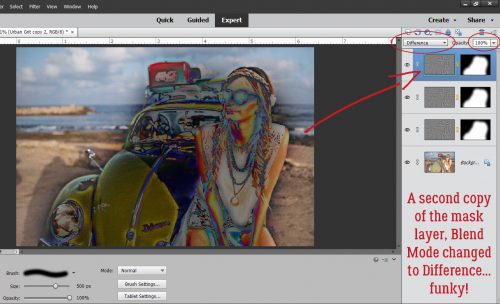
But what else can I do with this now that I’ve played the Action? I duplicated the mask layer and it really amped up the effect. Here is where Blend Modes really come into play.
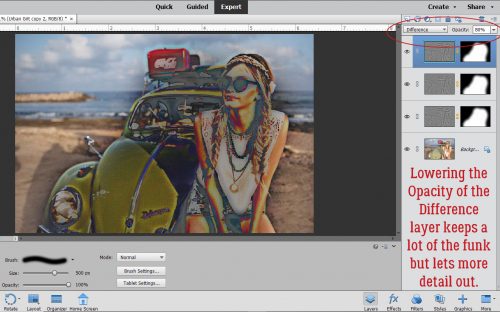
I liked the more obvious effect of the two mask layers but I wanted to try a few more things. I duplicated the mask layer and went down the list of Blend Modes until I found one I really liked. I’ve never found a way to use the Difference mode until now!
But the focal point of the image is too dark and muddy now. So I lowered the Opacity of the layer to 80% which made it better.
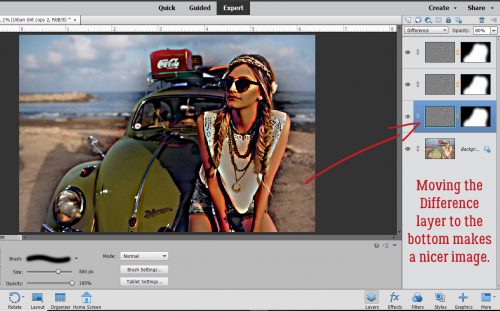
I moved that Difference layer down to the bottom and found the funk was still there but the image was much brighter. Can you see this on an art journal page?
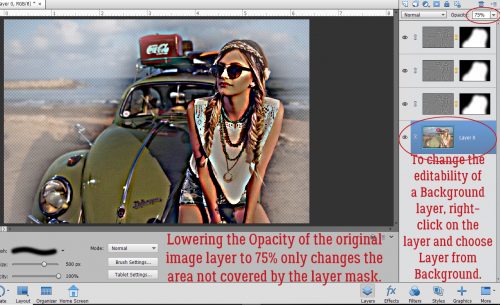
I did one. More. Thing. If I decide to use this image on an art journal page, I’ll probably want to blend the sky/sea/sand areas into the paper. To make that possibility more workable, I changed the Background to a layer to make it editable. (I had NO clue what would happen when I started playing with it, I just wanted some more options.) To make the Background into an editable layer, right-click on the layer then choose Layer from Background from the dropdown. Then you can do what you like to that layer! I lowered the Opacity to 75% and was delighted to see that only the actual image background was changed. It became more transparent. So if I clip this finished image (with the layers merged) to a blended mask, it’ll look amazing. That’s next on my agenda!
This was just a quick-and-dirty guide to loading and using actions. There are so many ways they can be used for elevating our work. I hope you’ll download one or two and give them a whirl.
![]()
Third day of the month, and there still aren’t too many words that can be
Remember when you spend $10 in the store, you get a great new collab! Winter is fully set in and it’s time to cozy up and get warm.

So, excuse me for a bit. I feel an overwhelming urge for a cup of coffee!


Remember, if you complete 10 challenges, just ten, you get a free kit as well!!

This kit makes me like snow. As long as I’m not driving in it…
![]()
I’m not mentally prepared for it to be 2020. Ask me in a few days for a few words, and I’ll give you a few more words!
It is the First of the month, and that means the reveal of our new Buffet!!
Don’t forget to check out the Buffet Bundles, one easy click to add bundles of Buffet goodies to your cart, and an amazing value too!

The designers all had their own take on what the colors and theme said to them! I love the variety!
The designers definitely each made the palette their own and came up with some gorgeous designs, each unique but working so well with the other designers’ creations
The CT did such a great job showing how well all of the kits blend. They all did wonderful work!
This is just a few of the layouts.
Remember when you spend $10 in the store, you get a great new collab! Winter is fully set in and it’s time to cozy up and get warm.

So, excuse me for a bit. I feel an overwhelming urge for a cup of coffee!
The Monthly Mix this month is SO pretty. I just love the colors of Wintertide! It was created by ADB Designs, Aimee Harrison, LouCee Creations, Magical Scraps Galore, and Jumpstart Designs.

The colors are so soft, yet chilly!
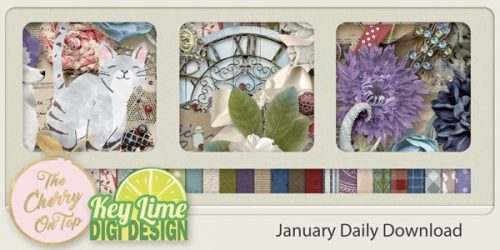
Before we see what the new year’s first Daily Download looks like, let’s see the full preview from December’s kit. Isn’t this gorgeous. The colors are perfect for a wintery kit.
Now for the first sneak peek of the new year. We have a wonderful collab from The Cherry on Top and Key Lime Digi Design.

Remember, the download is kept up for 5 days, and then it is taken down. If you miss pieces, the kit will be available for purchase on the first day of the following month.
Remember, if you complete 10 challenges, just ten, you get a free kit as well!!

This kit makes me like snow. As long as I’m not driving in it…
![]()