It All Comes out in the Wash-i
![]()
This week’s tutorial is brought to you by Shana Read, whose suggestion for a topic in response to my Facebook plea last night was the one I could get together the quickest. I’m finding I have even less motivation “in these uncertain times” – so tired of that cliché!! – than I usually do and was in need of a good kick in the butt. There were some great suggestions offered up and I’ll be working on them in coming weeks. But first, we’re going to make digital Washi tape look real!
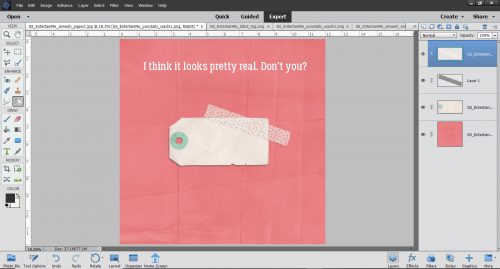
I started out with a cardboard tag, a pretty piece of Washi tape and some heavily-creased cardstock from the GingerBread Ladies‘ collab Entertain Me. I didn’t deliberately choose that kit, although it seems weirdly appropriate. I did, however, deliberately choose the creased cardstock, because it’ll make the tutorial more meaningful.

I added a drop shadow to the tag, setting it at the same angle as the shadows cast by the creases on the cardstock. I like consistency and when I’m shooting for realism, that’s one of the key aspects.

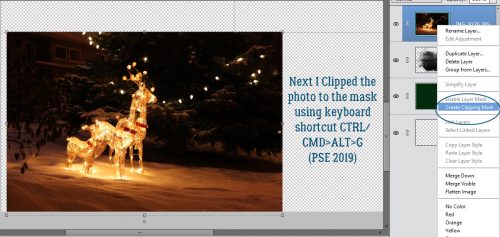
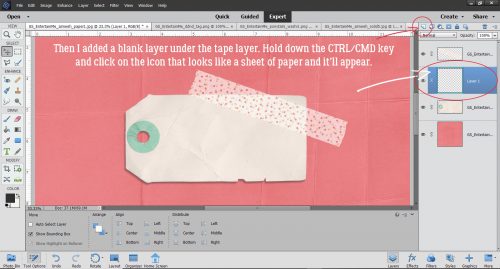
Those of you who are using my custom shadowing method can skip down about 6 steps… For those who need a refresher or who haven’t tried it yet, this is how my custom shadows start. I create a new, blank layer underneath the object I’m going to shadow. The keyboard shortcut for this process is to hold down the CTRL/CMD key and click on the new layer icon, the one that looks like a sheet of paper with the lower left corner curling up.
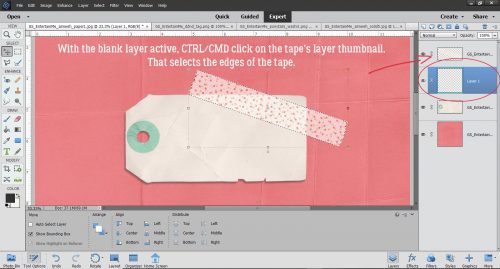
Still on that blank layer, I CTRL/CMD>click on the layer thumbnail – that tiny picture of the object you can see on the layers panel – to select the edges of the object, tape in this case.
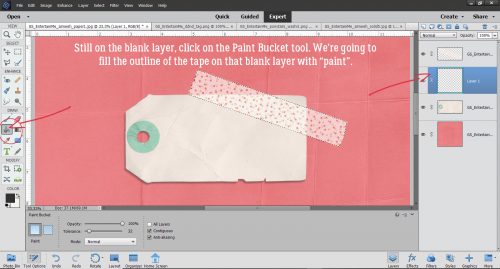
Next, click on the Paint Bucket tool so you can fill the outline of the tape.
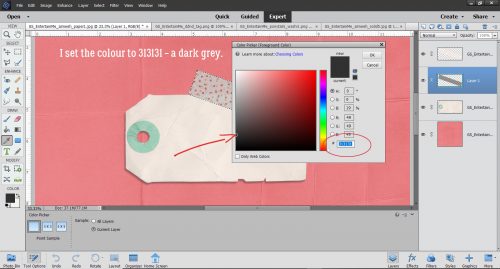
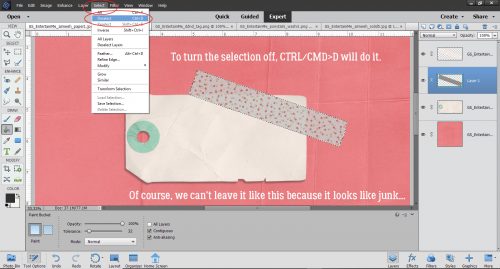
The colour I like for shadows is 313131, which I just type into the box I’ve circled below. It’s a medium grey and works pretty well for most purposes.
With that grey as the foreground colour, click anywhere on the blank layer. The outline will fill with grey like magic. To get rid of the marching ants, either click Select>Deselect or just use the keyboard shortcut CTRL/CMD>D. We can’t leave it like this though, because it shows through the tape and looks like junk!
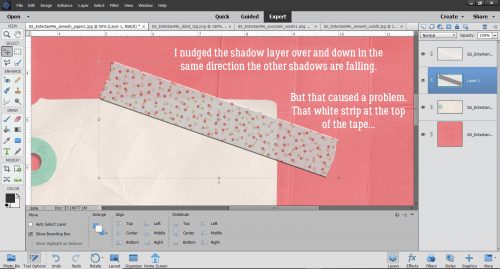
I like to move the shadow to where I’d like it to be before I start tweaking it. So I nudged it over a bit to the left and down, again keeping the same angle of light as seen in the shadows cast by the creases. The only drawback to that is that the tape is semi-transparent and now there’s a white strip at the top. I’ll show you how to take care of that in a minute.
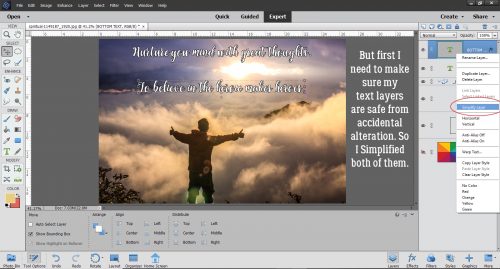
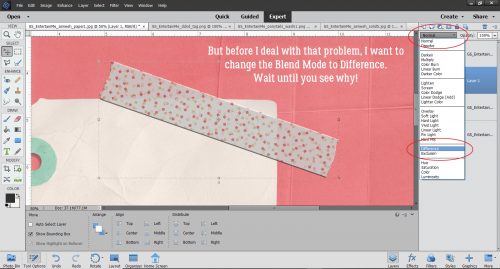
But first I’m going to change the Blend Mode (that button at the top left of the layers panel just under all the icons) to Difference. You’re going to love it!
Can you see the shadow peeking out at the bottom edge of the tape? I know you can see the tag showing through it. I could leave it like that, but that’s not how I’m made. So let’s keep going.

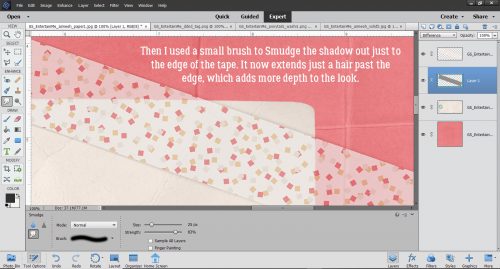
To adjust the shadow layer, I use the Smudge tool. It looks like a hand in a white glove with the index finger stuck out. I tend to use a fairly big brush and a very light touch. I start a bit of a distance from the edge of the shadow and just slightly move the brush toward or away from the object being shadowed, depending on where the light source is, and how much of the object would actually be touching the paper if it was real. In this case, I brought the shadow away from the tape a little where it comes off the tag and onto the cardstock to suggest it’s not stuck down quite as tightly there. Then I pushed it back toward the tape a little where the tape crosses the crease, because it would be adhering more closely here. For this kind of detail, I use a very small brush, still with a light touch. It’s better to go a tiny bit at a time so you know when to stop than to try and do it all in one step and have to start all over.
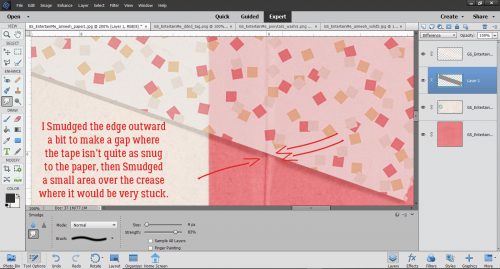
To eliminate that white strip at the top, I used the same small brush to very carefully nudge out the shadow right to the edge of the tape. There’s a hint of the shadow coming out from under the tape at the top, and that only adds to the realistic look.
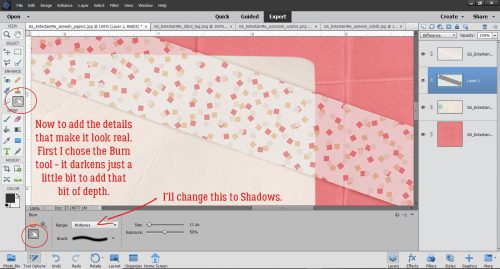
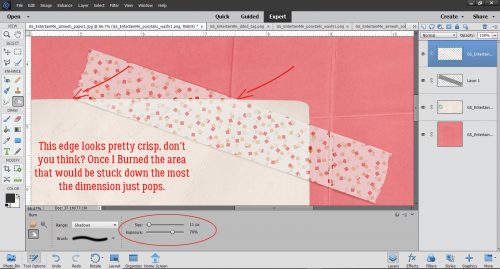
So how do we make the tape look even more realistic? Easy! We’ll use the Dodge and Burn tools. Dodging and burning are old tricks used in print photography to spot-improve exposure. Dodging lightens an area while burning darkens. If you have trouble remembering which is which, just think of a burnt stick… it’s black! The edges of my tag are nice and straight so this technique will be simple. I started with the Burn tool and changed the Range to Shadows from the default Midtones.
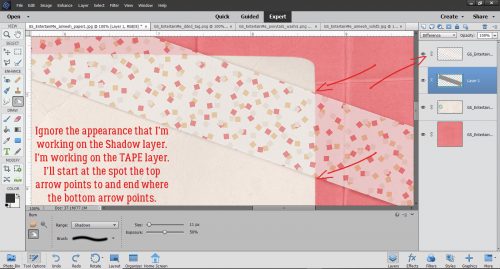
With the TAPE layer active, and a small brush size selected, I set the centre of the brush tip over the spot where the tape and the paper meet, with the width of the brush on the area on top of the paper. Holding the Shift key down, I clicked at that spot then moved the brush tip down to the spot at the bottom of the tape and clicked again. There’s a very faint darkening of the tape along the edge. As long as I hold down the Shift key, I can go back and forth between the top and the bottom of the tape as many times as necessary to build up a nice sharp edge.
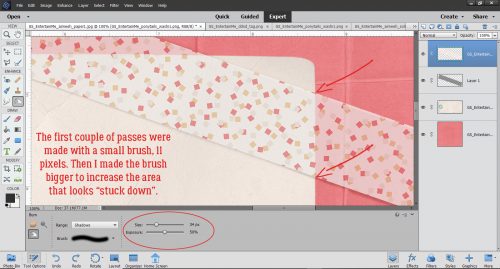
The last pass over the edge is with a wider brush to make the tape look like it has been pressed down firmly with a finger.
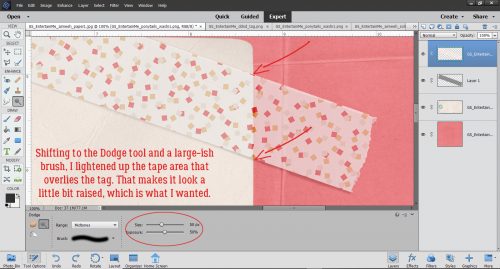
Then I switched to the Dodge tool and a large-ish brush. There will be more light hitting the tape where it sits on top of the tag, so we need to lighten that area just a bit. Using exactly the same steps but with the brush’s width sitting on top of the tag, I Dodged that edge.
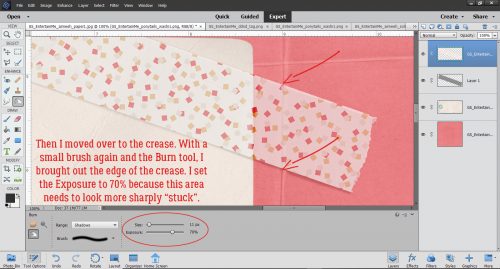
Can you see the difference where I’ve already done the D&B? Let’s move over to the crease that runs under the tape. The shadowy area is a bit more pronounced here so with a small brush and the Exposure set to 70%, I Burned the tape where it overlies the shadowed edge of the crease. If I remember correctly, I made 4 passes top to bottom and back up, so a total of 8 clicks.
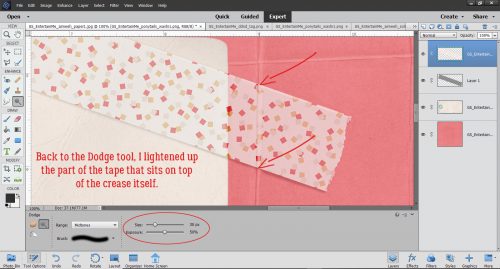
The section of tape that runs along the domed part of the crease needs to be lightened quite a bit to give the crease back its dimension. I Dodged with a brush sized to just cover the crease edge-to-edge. It took several passes to get it right, but like I said before, building up a little at a time gives you control and you’ll know when to stop.
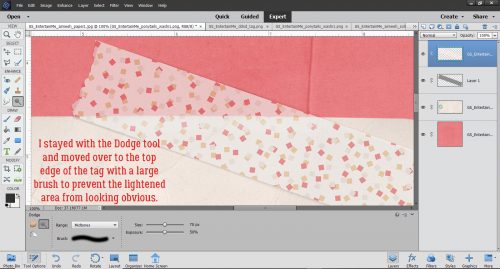
Once I was happy with the creased area, I moved over to the top edge of the tag. The Dodge tool was active so I did that phase first. There’s a lot more tag covered with tape at this edge so I used a big brush with its width sitting on top of the tag to “elevate” the edge.
Don’t worry about being too precise with positioning the brush tip. If you’re past the end of the spot where the tape and tag touch, it doesn’t matter; the tool won’t do anything to the inactive layers – the paper and tag layers. It’s actually better to go a bit past than it is to stop too short. After I Burned the stuck-down area it looks like real Washi tape and real cardstock. It sounds like a lot of work, but it really isn’t once you get the hang of it.
So there you have it, Jan’s technique for adding a shadow to Washi tape. I suggest that if you’re going to do this, turn the visibility of all the other layers off so you can see exactly what you’re doing. Dodge and Burn even the parts that will be hidden by other layers, for the best results. You never know when you might resize an element, or move things around… right?
See you all next week!
![]()