Archives for April 2018

Tutorial Tuesday – General

UNZIP Me Dahling!

I don’t know about you but I will never have too many digikits!! But being a digikit hoarder has its downside… All those kits have to be unzipped and organized. Who has time for that? And then there’s National Scrapbooking Day (well, more like NSWeek!) coming up in no time, with all the fantastic new products it brings with it. That you’re going to want to play with right away. What to do, what to do?

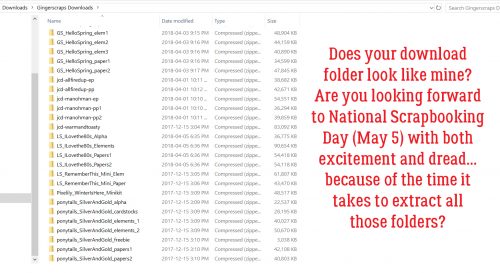
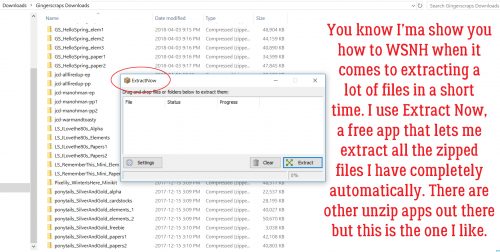
I’ll be the first to admit that my downloads folder is a mess. I’m trying to develop some better work habits, and keeping on top of unzipping is one thing that would really make a difference. So I’m going to show you a terrific app I found that lets me unzip multiple files with only a few keystrokes. It’s called Extract Now (clickable link) and it’s FREE! I work in Windows, but there’s a Mac version too. I’m guessing it’s similar in layout and behaviour, but I can’t say that for sure. I’ve tried a few others, one of which carried a virus… and this is the one I liked best for its ease of use. It’s on my taskbar now for ease of access. The menu looks like the image below.

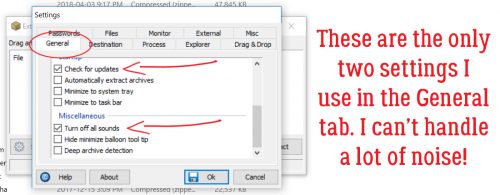
There are several ways you can customize the performance of the app. I don’t use a lot of them, but the ones I do use include letting it check for its own updates and turning off the sounds. I’m surrounded by noise all day every day (if you’ve ever been on an intensive care unit, you’ll know what I mean), so I don’t want a bunch of added noise in my environment if I can turn it off.

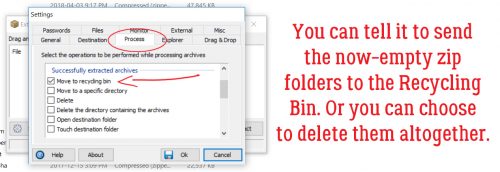
In the Process tab, you can tell it what to do with the zip folders after they’ve been extracted. At first I had the app delete them as soon as they were extracted, but I had to retrieve some stuff and now I manually delete them.

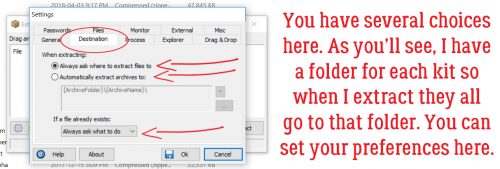
This is where Extract Now really shines. You can designate exactly where your unzipped files are sent by using the Destination tab. I had it set up to extract everything into a Downloads subfolder, but found I left things in there forever and eventually forgot about them. The Help button is really useful at showing you how to customize the app for your purposes.

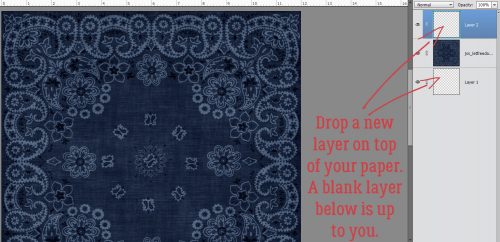
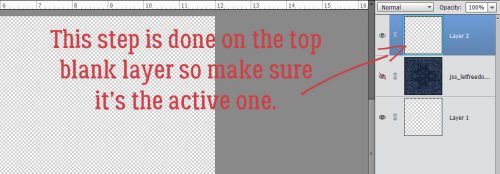
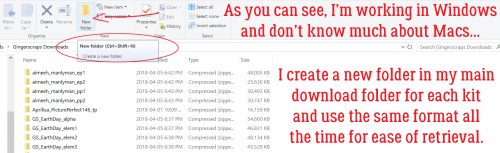
I create a new folder for each kit I’ve downloaded. If you’re into keyboard shortcuts, hit CTRL/Shift>N (Windows) and you’ll have a new folder you can call whatever you want.

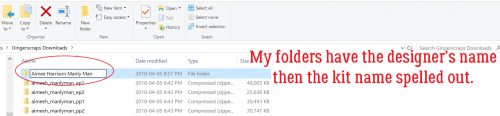
Over the years I’ve refined how I manage my digikits. They all go into their own folder, which later becomes a subfolder within my store folders. I name them all with the same format, designer’s name and kit name spelled out in full. That makes it so much easier to find what I’m looking for later, and it helps too with credits when I post my layouts to various galleries.

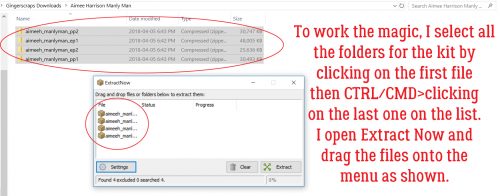
I select all the zipped folders for each kit by clicking on the first one on the list, CTRL/CMD>clicking on the last one and voilà!! Then I can open up Extract Now and drag them onto the menu.

When I click on Extract, a submenu opens asking me where I want the files to go. This is when I find the new folder I’ve created for the kit in my Downloads folder and click on it.

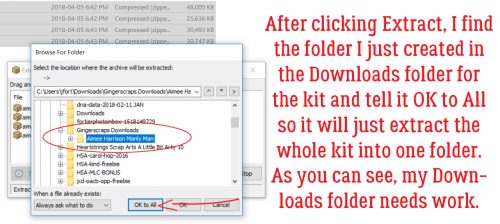
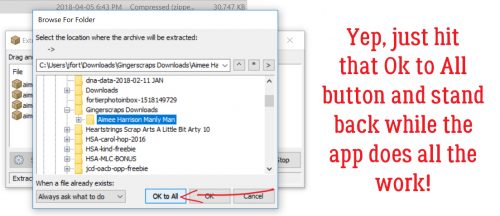
Click on OK to All and the app goes to work.

You can watch the progress as your files are extracted. When all the files are successfully unzipped, you’ll see green check-marks next to each one and there’s a new button activated at the bottom right. Click on Clear and all the files are removed from your app workspace. I can extract several dozen files in a matter of a couple of minutes with this useful tool.

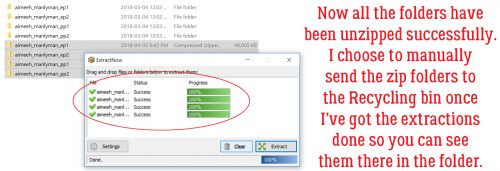
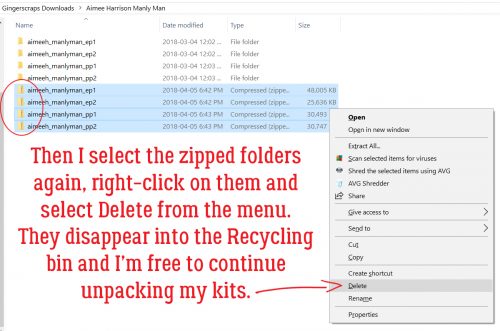
Like I said, I choose to manually delete the zipped folders from my kit folder, which is super-simple because they’re all still selected. After I minimize or close Extract Now, I only have to right-click on the selected files and choose Delete from the menu.

We all have much better things to do with our time than extract one file at a time, right?! Give it a try and see what you think. (You can always remove the app if it doesn’t work out for you.) May 5 will be here before we know it. Now go get your scrap on!

APRIL’S DESIGNER SPOTLIGHT

LAURIE’S SCRAPS & DESIGNS

Hey all you GingerScrappers! It’s April and our Designer Spotlight is on Laurie of Laurie’s Scraps & Designs. Laurie was in the hot seat in August 2017 and I’ve already interviewed her so I’m not going to put her through all that again. If you’d like to get to know her a bit better, you can find our interview right here.

Laurie has a beautiful Daily Download for us this month. It’s called I Love the 80s and you’re going to love it!

Make sure you check out Laurie’s shop and get in on the fun at the Designer Spotlight Challenge.


Fresh Baked: April 06, 2018

Beer and Grilled Cheese! What is better than that? If you’re a fan, Saturday and Thursday are your days! But get even more excited! It’s time to announce the winners of this year’s Survivor!

It was such a pleasure hosting the 8th season of Scrapping Survivor! I had such a wonderful time watching the gallery of stunning layouts and so much love, support and positivity. I hope everyone that played was inspired by the fun challenges as well as their fellow scrappers creativity and encouragement! Dang, I just love our GingerScraps community so much, you make my heart so very happy.

Now it is the moment you have all been waiting for … it is time to announce our WINNERS for this season!!"

Coming in THIRD PLACE is becky_a

GS_Survivor_8_Third-Place

Coming in SECOND PLACE is Pachimac

GS_Survivor_8_Second-Place

Coming in FIRST PLACE is FormbyGirl

GS_Survivor_8_WINNER_First-Place

And last but not least we have our Staff Winner! For the second time in a ROW our staff FIRST PLACE WINNER is CathyK!

GS_Survivor_8_STAFF_First-Place

Remember when you spend $10 in the store, you get a great new collab! It’s time to celebrate the Earth!

fwp_thumb
https://store.gingerscraps.net/GingerBread-Ladies-Collab-Earth-Day.html

[Read more…]

Sneak Peeks April 5th, 2018

Happy Thursday! How is the first week of April treating you? Our designers are fully embracing spring and have a bunch of new releases for you this week!

From Heather Z

From Mags Graphics

From CathyK

From Tinci

From Lindsay Jane

From Aimee Harrison

Have a great weekend!

Tutorial Tuesday – Photoshop Elements

Totally TACKY!

We’ve moved into the second quarter of 2018 already! And with a new month comes new challenges at GingerScraps… Don’t you love them?? This month, Marina (Magical Scraps Galore) has a really different spin on the Mix It Up challenge. She wants us to use at least 3 different silver or chrome elements on a layout. Well. When I saw “chrome”, it was like a bell went off! I had planned to show you how to create a dotted border the quick-and-easy way, and it very quickly morphed into a tacky border instead. (Well, it’s a couple of additional steps.)

I chose this fabulous bandana-style paper as my background. It’s from Just So Scrappy‘s Let Freedom Ring collection. Then I popped a new layer on top of it for my border layer.

Next step was to choose a round brush from the Brush tool menu. I resized it to 75 pixels (to give it some presence) and set the Opacity to 100%. The colour really doesn’t matter but you should choose something that will show up against your background. I’m going to turn the visibility of my paper layer off for the next few steps. You can do whatever works for you.

After making sure I was working on the BLANK layer at the top, I went on to my next step.

I went back to my Brush menu and clicked on the Brush Settings button. Here I made sure my Fade was set to 0, Hue Jitter also to 0 and Scatter to 0. Spacing needs to be a big number. It’s a percentage of the brush’s size and will determine how much space is between the dots. Since I have a 75 pixel brush, I set this number to 400%. But feel free to experiment. Hardness (determines how sharp the edge of the brush will be) and Roundness both need to be at 100% (unless you’re faking a stitched border but we’re not going to go there today).

I turned on my Grid (View>Grid or CTRL/CMD>’) to save myself some effort. I decided my border should be 1/2 inch in from the corner. Then I clicked my Brush at that spot.

Do you remember how to draw a straight line in Elements? Hold down the Shift key and click at the spot where you want your line to end!

To make the rest of the border, it’s simply holding down the Shift key and clicking in the other three corners. It literally will take you 15 seconds. You can stop here if you just want a dotted border.

Now, to turn that dotted border into a tack border. I went to my Styles button down at the bottom of the Layers panel then chose Wow Chrome. In that menu I selected Wow-Chrome Shiny Edge. This Style set is one of the default styles that come with the Elements software right out of the box.

I liked the effect but thought it looked too umm… domed. If I’m smacking tacks with a hammer, they’re gonna flatten a bit. So I right-clicked on the fx on the layer and decreased the Bevel to about 6 pixels. I left the drop shadow alone.

This is how the finished border looked with the paper behind it.

To give you a better idea of scale, here’s the entire 12×12 canvas.

I wanted to see what other effects I could get using default Styles. So I copied the border layer and turned the Visibility of that layer off. It’s possible to add multiple Styles to an object or text as long as you work on individual layers with each.

This time I chose Bevels from the Styles menu and went with the Scalloped Edge bevel. Now the dots look like fancy tacks.

Next I selected the top layer and turned the Visibility back on.

I used the very same Wow-Chrome Shiny Edge style, but dropped the Opacity of that layer to 70%. Now the tacks look more like those pearl-inlaid buttons you see on Western shirts.

The different isn’t blatant, but it’s definitely there.

Another of the default Styles that came with Elements is Complex. I tried a couple of the choices here and settled on the Diamond Plate style. It has a funky industrial look to it.

When I decreased the amount of Bevel on this style, the effect became somewhat more matte and there wasn’t as much detail. It really looks like hand-cut nail heads to me now.

And here it is with the paper behind it. I’m not sure which one I like best. They’re all so neat!

There’s one more thing I played with and that’s turning the dotted border into holes in the paper. So I Selected the Layer thumbnail of the dotted border layer by clicking on the thumbnail in the Layers panel. That gave me my marching ants.

I turned off Visibility for the border layer and made sure I was working on the paper layer.

Then I Cut the selected dots out of the paper. (Edit>Cut or CTRL/CMD>X)

That gave me perfectly spaced holes in my paper to perhaps weave a ribbon through.

I bet you can think of a few more ways to make this technique work for you. I’d love to see what you do with it!

HapPy Easter and Happy April from Gingerscraps!

April Fool’s! Happy Easter! Are you ready for a new month? Did you know that April is Stress Awareness Month? Did you know that digital scrapbooking has been proven to lower your stress levels? Okay, maybe it hasn’t, but it sounded good, right. Well, even if it’s not proven, use the excuse to scrap more!

It is the First of the month, and that means the revel of our new Buffet!!

Don’t forget to check out the Buffet Bundles, one easy click to add bundles of Buffet goodies to your cart, and an amazing value too!

[Read more…]

DD: Apr 01

There’s no foolin’ when it comes to the daily download. I considered a trick and saying we weren’t having one this month but I decided against it.

Before I show you this month’s, I just have to show off last month’s:

dd-march
https://store.gingerscraps.net/Lucky-To-Have-You-DD.html

I know we were all lucky to have this kit for March!

And here’s this month’s:

dd
https://bit.ly/2Gh2ng3

All I know is that this “old lady” is loving the vibes from this kit!

Remember, the download is kept up for 5 days, and then it is taken down. If you miss pieces, the kit will be available for purchase on the first day of the following month.