Archives for January 2019

Sneak Peeks

Happy last day of the month! One month down in 2019! Tomorrow is not only new release day, its a new Buffet day! There will be tons of new goodies debuting tomorrow! Let’s take a look!

From JB Studio

From Mags Graphics


From LDrag Designs

From Snickerdoodle Designs

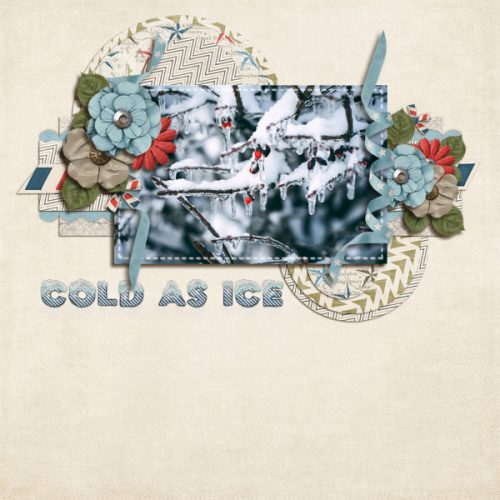
And a massive sneak peek at the Buffet!

Tutorial Tuesday (Photoshop Elements)

Fancifying Those Fonts

As promised, today’s tutorial is a demonstration of how to add some variety to your fonts. IceCold had the most options so I went with it for the layout I did up for the Mix It Up Challenge. I used a template from Jumpstart Designs that I’ve had forever and CathyK‘s Aviator kit.

If you’re a faithful reader, you’ll recall that I like to create my titles on their own work space so I can play around without distraction and without messing up anything on my layout accidentally.

Before I can do anything to the text I first have to Simplify the layer. Right-click on the layer on the Layers panel then select Simplify Layer.

Because I never know where I might go with my experimentation, I like to make several copies of my original layer so I won’t have to recreate it later. Then I play with the copies. CTRL/CMD>J will make one copy for each time you perform the keyboard shortcut. Or you can right-click on the layer in the Layers panel and select Duplicate Layer. (Can you see why I use the WSNH – Work Smart Not Hard – shortcut?)

The first thing that occurred to me was to make the snow caps look like snow caps. I was originally going to just Erase the letter parts but thought better of it.

I added a Layer Mask by clicking on the icon that looks like a square of paper with a circle in the centre, right there in the middle of the icons at the top of the Layers panel. Why? Because if I go too far with my Eraser, I can easily change the tool to a paint brush and paint back the part I should have left alone. It’s as simple as toggling between black and white in the Color Selector. To know which color is the one you want, remember the phrase “White conceals, Black reveals“. Keyboard shortcut? Just hit the X key!

Then I started Erasing away the letters from the snow caps.

This part of my technique is VERY time-consuming. And it causes eye-strain too… but that never stops me from trying new things or writing tutorials about my experiments!

Is it just me or do these look more like eyebrows than snow caps?

Once I had all the letter parts removed, I Simplified the layer. Same like with the font step. Otherwise, unless you’re paying particular attention (and I’m usually not… watching TV while I work is how I roll!) you won’t know what part of the layer you’re working on until you’ve committed some massive blunder and can’t reverse it. (Guilty as charged!)

Now I want to add some chill to my snow caps. In retrospect, I really didn’t need this step, but I have the screenshots so I’m going to show you because it does tie in with a later step.

To quickly and easily change to colour of fonts and text, just create a Layer>New Fill Layer>Solid Color. It will apply your new colour to everything selected.

When the New Layer menu box opens, make sure the Use Previous Layer to Create Clipping Mask box is checked. If you don’t take that action, the whole canvas will be filled with that new colour.

I know the blue is impossible to see, and as I said, I really didn’t need to do this step. But can you see in the screenshot that I Copied the snow cap layer BEFORE I added the Fill layer to the original snow cap layer? That’s another WSNH tip. Only do things once!

Again, you want to Merge these two layers in the same way and for the same reason you Simplify text and other Layer Masks. It’s to preserve what you’ve already done.

This next screenshot is impossible for anyone to actually read, so I’ve included the pertinent information on it. I’m going to use a glitter Styles set from Just So Scrappy‘s Lucky Me bundle. The fastest way to get to your Styles folder is to just click on the Styles button at the bottom of the Layers panel.

Katie of JSS always includes both chunky and fine glitter in her Styles bundles. I chose the fine white glitter #2 option because my title isn’t going to be huge, and snowflakes aren’t either.

This is the effect it gave my snow caps. Now you can see why I said the colour change wasn’t necessary… you can’t see any of the blue anyway!

On we go to the copy of the snow caps.

The colours in JSS‘s Lucky Me bundle work for this next phase, so I’m using the Chrome set for this. The Style adds a very smooth shiny look to whatever you hit with it.

Again, Katie offers options! There are thick and thin Chrome coatings here. I knew I’d want the thin one so that’s what I used.

It didn’t look quite like I wanted it to, so I right-clicked on the fx icon on the layer in the Layers panel and opened up the Style menu. I adjusted the various sliders to give me more of a chilly, icy look.

Then I lowered the Opacity of the Chrome layer and the snow cap has dimension, some colour and some sparkle.

I could stop here. HA!

I went down to the very first layer where I’d typed out my title, hid all the other layers, and added a Layer Mask to that first layer.

Then I started Erasing the thin lines from the letter section of the title.

Once I got them all Erased, I Simplified the layer.

I also wanted to lose the snow caps, but because I’d already isolated the snow caps, it was a piece of cake to get rid of them. I clicked on one of the snow-cap only layer thumbnails to Select the outlines of the snowcaps – while still on my lowest layer – then Edit>Cut (CTRL/CMD>X) them away.

I knew I wanted to use the Paint Bucket to fill the wide spaces with colour and I knew (from prior experience) that if the areas I was filling were not COMPLETELY enclosed, the whole shebang would be filled, I decided to put a Edit>Stroke around the snow caps’ edges. Just a skinny one, 1 pixel wide. Then I erased the parts that weren’t required.

This is where I wound up.

Then I used the Paint Bucket tool to fill in all the spaces inside the letters using the same light blue as before. I decided the dark brown lines were just too harsh, so I wanted to change them to a darker blue/green. So I went to Enhance>Adjust Color>Replace Color.

Another thing I’ve learned form doing it wrong a thousand times is to make sure the colour I WANT is the BACKGROUND colour. Then I clicked on the colour swatch at the top of the menu – the colour I want to replace – and used the eyedropper that popped up to click on the dark brown.

Then I clicked on the lower colour swatch to make it active. If I had a colour on my canvas that I wanted to use, I could then click on it with the eyedropper, but I don’t so I clicked on the background colour swatch where I have my darker blue-green. And bingo! the dark brown is now dark blue-green.

I could stop here. But you know me… I didn’t. I felt like the letters needed some sheen to make them look icy. I opted to use the Wow Plastic Styles that were already in PSE when I bought it. There are 10 options in that set. If you hover your cursor over the little blocks it’ll tell you what each one is.

As you can see, it changed the colours quite a bit while adding that shine I was after. I played around with the fx menu a bit.

Then I checked to see if the title looked the way I wanted it to. And it didn’t.

I went back to the title canvas and Copied the white glitter layer, moving the copy layer to the very top, above the shiny blue Chrome layer. Then I Erased some of the top white glitter layer to make it look like freshly-fallen snow on top of some older, crusty stuff. (Those of you who live in the snowbelt know what I mean.) Then I opted to play with the letters layers again. I tried one of the Glass Buttons Styles, which also are integrated PSE styles.

Only snag? All that work I did with the stripes went bye-bye. Boo! But wait… There’s a tweak for that.

And back they come! Almost happy…

I still had some snow-cap-less layers there in the middle so I went to one of them and erased everything but the skinny lines.

Quick change to the colour – Layer>New Fill Layer>Solid Color in white.

It’s pretty subtle, but it’s there and I like it! So let’s see how it looks on the layout.

YES!! I think it’s a lot closer to the colours in the photo and I’m very happy with the outcome!

See you all next week!

Fresh Baked: January 25, 2019

The end of the month is nearly upon us! Don’t forget to get signed up to all of the designers’ newsletters and get some extra freebies!

Remember when you spend $10 in the store, you get a great new collab! It’s time to celebrate the start of a new year!

fwp_thumb3_thumb_thumb_thumb
https://store.gingerscraps.net/GingerBread-Ladies-Collab-New-Year.html

01
Collection: https://store.gingerscraps.net/360-Life-Feb-Pure-Collection-by-Aimee-Harrison.html
Kit: https://store.gingerscraps.net/360-Life-Feb-Pure-Page-Kit-by-Aimee-Harrison.html
Alphas: https://store.gingerscraps.net/360-Life-Feb-Pure-Alpha-Sets-by-Aimee-Harrison.html
Frames: https://store.gingerscraps.net/360-Life-Feb-Pure-Frame-Clusters-by-Aimee-Harrison.html
Blooms: https://store.gingerscraps.net/360-Life-Feb-Pure-Blooms-by-Aimee-Harrison.html
Extra Papers: https://store.gingerscraps.net/360-Life-Feb-Pure-Extra-Papers-by-Aimee-Harrison.html
Edges: https://store.gingerscraps.net/360-Life-Feb-Pure-Messy-Edges-by-Aimee-Harrison.html
Glitters: https://store.gingerscraps.net/360-Life-Feb-Pure-Glitters-by-Aimee-Harrison.html

02
https://store.gingerscraps.net/Little-Joys-5-Grab-Bag.html

03
https://store.gingerscraps.net/Football-Fever-BGD.html

04
https://store.gingerscraps.net/Football-Fever-Bundle-BGD.html

05
https://store.gingerscraps.net/wiogymtime-by-Clever-Monkey-Graphics.html

06
Bundle: https://store.gingerscraps.net/Travelogue-Alaska-Bundle-Pack-by-Connie-Prince.html
Word Art and Flair Pack: https://store.gingerscraps.net/Travelogue-Alaska-Word-Art-and-Flair-Pack-by-Connie-Prince.html
Kit: https://store.gingerscraps.net/Travelogue-Alaska-Kit-by-Connie-Prince.html
Word Bits:https://store.gingerscraps.net/Travelogue-Alaska-Word-Bits-by-Connie-Prince.html
Templates: https://store.gingerscraps.net/Travelogue-Alaska-12×12-Temps-CU-Ok-by-Connie-Prince.html

07
https://store.gingerscraps.net/One-Of-A-Kind.html

08
https://store.gingerscraps.net/Project-2019-Getting-Piggy-With-It-Templates.html

09
https://store.gingerscraps.net/Snowed-In-Digital-Scrapbook-Kit-by-Dandelion-Dust-Designs.html

10
https://store.gingerscraps.net/Third-Three-Months_Bundle.html

11
https://store.gingerscraps.net/Layered-Page-Templates-January.html

12
https://store.gingerscraps.net/Sports-Dance-GrabBag.html

13
Bundle: https://store.gingerscraps.net/BeYOUtiful-Bundle.html
Kit: https://store.gingerscraps.net/BeYOUtiful-PageKit.html
Flairs: https://store.gingerscraps.net/BeYOUtiful-Flairs.html
Grunge:https://store.gingerscraps.net/BeYOUtiful-Grunge.html
Clusters: https://store.gingerscraps.net/BeYOUtiful-Clusters.html
Clusters: https://store.gingerscraps.net/BeYOUtiful-Titles.html
Cards: https://store.gingerscraps.net/BeYOUtiful-Cards.html

14
Kit: https://store.gingerscraps.net/Where-The-Heart-Is-by-LDragDesigns.html
Journal Cards: https://store.gingerscraps.net/Where-The-Heart-Is-Journal-Cards-by-LDragDesigns.html
Cluster Frames: https://store.gingerscraps.net/Where-The-Heart-Is-Cluster-Frames-by-LDragDesigns.html
Alphas: https://store.gingerscraps.net/Where-The-Heart-Is-Alphas-by-LDragDesigns.html
Worn Out Papers: https://store.gingerscraps.net/Where-The-Heart-Is-Worn-Out-Papers-by-LDragDesigns.html
Embossed Papers: https://store.gingerscraps.net/Where-The-Heart-Is-Embossed-Papers-by-LDragDesigns.html

15
Kit: https://store.gingerscraps.net/All-You-Need-Is-Love-by-LDragDesigns.html
Cluster Frames: https://store.gingerscraps.net/All-You-Need-Is-Love-Cluster-Frames-by-LDragDesigns.html
Journal Cards: https://store.gingerscraps.net/All-You-Need-Is-Love-Journal-Cards-by-LDragDesigns.html
Alphas: https://store.gingerscraps.net/All-You-Need-Is-Love-Alphas-by-LDragDesigns.html
Worn Out Papers: https://store.gingerscraps.net/All-You-Need-Is-Love-Worn-Out-Papers-by-LDragDesigns.html

16
39: https://store.gingerscraps.net/Page-Borders-39-by-Lindsay-Jane.html
Rec 39: https://store.gingerscraps.net/Page-Borders-Rec-39-by-Lindsay-Jane.html

17
40: https://store.gingerscraps.net/Page-Borders-40-by-Lindsay-Jane.html
Rec 40: https://store.gingerscraps.net/Page-Borders-Rec-40-by-Lindsay-Jane.html

18
https://store.gingerscraps.net/Document-Life-January-2019-Grab-Bag-by-Luv-Ewe-Designs.html

19
https://store.gingerscraps.net/Outline-Alpha-Upper-and-Lower-Case-Bundle-by-Miss-Fish.html

20
https://store.gingerscraps.net/Photo-Stackers-1-Templates-by-Miss-Fish.html

21
A Pizza My Heart QPs – https://store.gingerscraps.net/A-Pizza-My-Heart-Quick-Pages-by-Scraps-N-Pieces-SNP_APMHqps.html
Southern Charm QPs – https://store.gingerscraps.net/Southern-Charm-Quick-Pages-by-Scraps-N-Pieces-SNP_SCharmqps.html
Primitive Autumn QPs – https://store.gingerscraps.net/Primitive-Autumn-Quick-Pages-by-Scraps-N-Pieces.html
Boys…Trouble QPs – https://store.gingerscraps.net/Boys…Trouble-Quick-Pages-by-Scraps-N-Pieces.html
Sweet Magnolia 2 QPs – https://store.gingerscraps.net/Sweet-Magnolia-2-Quick-Pages-by-Scraps-N-Pieces.html

22
Kit: https://store.gingerscraps.net/Follow-Your-Heart-Kit-by-Snickerdoodle-Designs.html
Collection:https://store.gingerscraps.net/Follow-Your-Heart-Collection-by-Snickerdoodle-Designs.html
Bonus Papers: https://store.gingerscraps.net/Follow-Your-Heart-Bonus-Papers-by-Snickerdoodle-Designs.html
Borders 1: https://store.gingerscraps.net/Follow-Your-Heart-Borders-1-by-Snickerdoodle-Designs.html
Borders 2:https://store.gingerscraps.net/Follow-Your-Heart-Borders-2-by-Snickerdoodle-Designs.html
https://store.gingerscraps.net/Follow-Your-Heart-Clusters-1-by-Snickerdoodle-Designs.html
https://store.gingerscraps.net/Follow-Your-Heart-Clusters-2-by-Snickerdoodle-Designs.html
https://store.gingerscraps.net/Follow-Your-Heart-Masks-by-Snickerdoodle-Designs.html
https://store.gingerscraps.net/Follow-Your-Heart-Glitter-by-Snickerdoodle-Designs.html

23
https://store.gingerscraps.net/I-Heart-You-Bundle-by-ADB-Designs.html

Here is the Freebie from the GingerScraps shop for the January 2019 Newsletter Hop! It is an alpha set the coordinates with the January {2019} Free With Purchase shop collab "New Year".

02_thumb
Direct Downloads (make sure you get them all, there are 4 alphas included)
Alpha 1: https://gingerscraps.net/Ginger/2019_NLFree_AlphaSet/GS_NewYear_Alpha_1_NLFree.zip
Alpha 2: https://gingerscraps.net/Ginger/2019_NLFree_AlphaSet/GS_NewYear_Alpha_2_NLFree.zip
Alpha 3: https://gingerscraps.net/Ginger/2019_NLFree_AlphaSet/GS_NewYear_Alpha_3_NLFree.zip
Alpha 4: https://gingerscraps.net/Ginger/2019_NLFree_AlphaSet/GS_NewYear_Alpha_4_NLFree.zip

Remember, if you complete 10 challenges, just ten, you get a free kit as well!!

cr_thumb3_thumb_thumb_thumb

January is Mental Health Month! This kit is PERFECT for that!

Tutorial Tuesday (Fontography)

Fancy and Fun Fonts for Wintery Layouts

As much of the Northern Hemisphere is being walloped by heavy snow, high winds and frigid temperatures (which basically would be Wednesday here in northern Alberta 😉 ) I thought I’d compile a collection of free fonts y’all can use for your winter layouts. Sound good? Each of the fonts I show you will be linked to the source so you can find ’em quickly!

My favourite go-to website for free fonts is dafont.com. They have such a huge assortment of fabulous fonts and dingbats!

Like Snowtop Caps, which also includes numbers and punctuation.

Winter Fall is a rounded font that would be great for a wintery title, but it only includes a small number of special characters and no numerals.

Iceberg is chunky but still rounded. It also only has a few punctuations and no numerals.

Winter Flakes has it all! It includes some dingbats too, so it’s pretty much perfect.

Igloo Laser is a modern-looking all-caps font with numerals and a few punctuation characters.

Snowflake Letters would look smashing with a bevel and a clear, glossy style on it. It’s all-caps, with numerals and punctuation.

You could use Snowhouse for journaling; it’s a script font with numerals and some punctuation, and includes a large variety of special characters.

Snowinter is another super-title font, with all the goodies one would need.

I like Kingthings Christmas a lot. It’s a complete package with awesome potential.

I think I’m going to build a tutorial about how to use Ice Cold to its best advantage. It’s got some serious title charm!

CF Tuques is just a fun font for winter. (I’m super-happy the designer spells “tuque” correctly!) No numerals or punctuation though.


Now how about looking at some dingbats. Don’t know what a dingbat is? Basically, it’s a symbol, shape or drawing accessed through your alpha keyboard.

Winter has a collection of line drawings of winter things, like snowmen and snowed-in houses. It’s pretty cute!

DH Snowflakes could be used for borders, dividers or backgrounds. Lots of possibilities!

Faux Snow is another snowflake dingbat set with unique shapes.

And so is WW Flakes.

KR Snowpeople has an assortment of snowmen and snow-women.

I invite you to check out the vast collection of fonts and dingbats at Dafont. I know you’ll find lots of inspiration there!

Retirement Sale and a Newsletter Hop!

It’s not to late to jump on the newsletter hop! Visit the forum to get a complete list of all the newsletters that have new freebies for you, they will be arriving to your inbox over the next few days! If you missed the January 16th sign up deadline, don’t worry. The freebies will be provided in 2 consecutive newsletters, so if you missed the first batch- it will be in the second batch too.
Here is the Freebie from the GingerScraps shop! It is an alpha set the coordinates with the January {2019} Free With Purchase shop collab "New Year".
Here is a link to the forum with the complete list of newsletters: {2019} Newsletter Hop!
Make sure to scroll all the way to the end of this newsletter to get the Freebie Alpha Set from the GingerScraps Shop!
We also have a retiring products sale happening now! 65% off retiring products, get them now before they are gone!

01
https://store.gingerscraps.net/Out-With-The-Old-2019-Retiring-Products-65-OFF

Remember when you spend $10 in the store, you get a great new collab! It’s time to celebrate the start of a new year!

fwp_thumb3_thumb_thumb
https://store.gingerscraps.net/GingerBread-Ladies-Collab-New-Year.html

03
https://store.gingerscraps.net/American-Bandstand-Bundle-by-ADB-Designs.html

04
Set 1: https://store.gingerscraps.net/Heritage-Resources-Magazine-Clips-The-1950-s-Set-01-by-ADB-Designs.html
Set 2: https://store.gingerscraps.net/Heritage-Resources-Magazine-Clips-The-1950s-Set-02-by-ADB-Designs.html

05
Collection: https://store.gingerscraps.net/Beautiful-Life-Collection-by-Aimee-Harrison.html
Kit: https://store.gingerscraps.net/Beautiful-Life-Page-Kit-by-Aimee-Harrison.html
Alphas: https://store.gingerscraps.net/Beautiful-Life-Alpha-Sets-by-Aimee-Harrison.html
Titles: https://store.gingerscraps.net/Beautiful-Life-Titles-by-Aimee-Harrison.html
Extra Papers: https://store.gingerscraps.net/Beautiful-Life-Extra-Papers-by-Aimee-Harrison.html
Journal Cards: https://store.gingerscraps.net/Beautiful-Life-Journal-Cards-by-Aimee-Harrison.html
Edges: https://store.gingerscraps.net/Beautiful-Life-Messy-Edges-by-Aimee-Harrison.html
Glitters: https://store.gingerscraps.net/Beautiful-Life-Glitters-by-Aimee-Harrison.html

06
https://store.gingerscraps.net/Today-Is-The-Day-Collab-Grab-Bag.html

07
https://store.gingerscraps.net/Rubber-Ducky-BGD.html

08
Grab Bag: https://store.gingerscraps.net/January-2019-Grab-Bag-Timeless-by-Connie-Prince.html
Alpha Pack AddOn: https://store.gingerscraps.net/Timeless-Alpha-Pack-AddOn-by-Connie-Prince.html
Word Art: https://store.gingerscraps.net/Timeless-Word-Art-Pack-by-Connie-Prince.html
QuickPages: https://store.gingerscraps.net/Timeless-QuickPages-by-Connie-Prince.html

09
https://store.gingerscraps.net/Project-2019-Getting-Piggy-With-It-Collection.html

10
https://store.gingerscraps.net/All-Bundled-Up-Digital-Scrapbook-Kit-by-Dandelion-Dust-Designs.html

11
https://bit.ly/ddnd-GS

12
https://store.gingerscraps.net/Inspired.html

13
Bundle – https://store.gingerscraps.net/Nutty-for-The-New-Year-BUNDLE-by-Heather-Z-Scraps.html
Kit – https://store.gingerscraps.net/Nutty-for-The-New-Year-KIT-by-Heather-Z-Scraps.html
Journal Cards – https://store.gingerscraps.net/Nutty-for-The-New-Year-JOURNAL-CARDS-by-Heather-Z-Scraps.html
Accents – https://store.gingerscraps.net/Nutty-for-The-New-Year-ACCENTS-by-Heather-Z-Scraps.html

14
https://store.gingerscraps.net/Hot-Cocoa-Bundled-Collection-by-JB-Studio.html

15
Bundle: https://store.gingerscraps.net/Capricorn-Bundle.html
Kit: https://store.gingerscraps.net/Capricorn-Kit.html
Cards: https://store.gingerscraps.net/Capricorn-Cards.html
Alphas: https://store.gingerscraps.net/Capricorn-Alphas.html
Glitters: https://store.gingerscraps.net/Capricorn-Glitters.html
Cardstocks: https://store.gingerscraps.net/Capricorn-Card-Stocks.html

16
https://store.gingerscraps.net/BeYOUtiful-GrabBag.html

17
https://store.gingerscraps.net/Little-Precious-Moments-by-LDragDesigns.html

18
Collection: https://store.gingerscraps.net/Little-Precious-Moments-The-Collection-by-LDragDesigns.html
Cluster Frames: https://store.gingerscraps.net/Little-Precious-Moments-Cluster-Frames-by-LDragDesigns.html
Journal Cards: https://store.gingerscraps.net/Little-Precious-Moments-Journal-Cards-by-LDragDesigns.html
Worn Out Papers: https://store.gingerscraps.net/Little-Precious-Moments-Worn-Out-Papers-by-LDragDesigns.html
Glitterstyles: https://store.gingerscraps.net/Little-Precious-Moments-Glitterstyles-by-LDragDesigns.html

19
Collection: https://store.gingerscraps.net/New-Beginning-Collection-by-Lindsay-Jane.html
Kit: https://store.gingerscraps.net/New-Beginning-by-Lindsay-Jane.html

20
https://store.gingerscraps.net/New-Beginning-Quick-Pages-by-Lindsay-Jane.html

21
https://store.gingerscraps.net/Today-Is-The-Day-Grab-Bag-by-Luv-Ewe-Designs-and-Blue-Heart-Scraps.html

22
Mega Retirement Bundle: https://store.gingerscraps.net/Miss-Fish-Templates-Mega-Retirement-Bundle.html
Bundle 1: https://store.gingerscraps.net/Miss-Fish-Retirement-Bundle-1-Jan-2019.html
Bundle 2: https://store.gingerscraps.net/Miss-Fish-Retirement-Bundle-2.html
Mini Bundle: https://store.gingerscraps.net/Miss-Fish-Retirement-Mini-Bundle.html

23
https://store.gingerscraps.net/Photo-Frenzy-Lifes-Adventure-Templates-by-Miss-Fish.html

24
https://store.gingerscraps.net/Out-With-The-Old-2019-Retiring-Products-65-OFF

25
https://store.gingerscraps.net/Out-With-The-Old-2019-Retiring-Products-65-OFF

26
https://eepurl.com/61bMX

27
https://store.gingerscraps.net/Out-With-The-Old-2019-Retiring-Products-65-OFF

28
https://goo.gl/UBQg62

29
https://store.gingerscraps.net/Hot-Cocoa-Bundled-Collection-by-JB-Studio.html

30
https://store.gingerscraps.net/Out-With-The-Old-2019-Retiring-Products-65-OFF

GingerScraps January {2019} Newsletter Hop Freebie!

02
Direct Downloads (make sure you get them all, there are 4 alphas included)
Alpha 1: https://gingerscraps.net/Ginger/2019_NLFree_AlphaSet/GS_NewYear_Alpha_1_NLFree.zip
Alpha 2: https://gingerscraps.net/Ginger/2019_NLFree_AlphaSet/GS_NewYear_Alpha_2_NLFree.zip
Alpha 3: https://gingerscraps.net/Ginger/2019_NLFree_AlphaSet/GS_NewYear_Alpha_3_NLFree.zip
Alpha 4: https://gingerscraps.net/Ginger/2019_NLFree_AlphaSet/GS_NewYear_Alpha_4_NLFree.zip

Remember, if you complete 10 challenges, just ten, you get a free kit as well!!

cr_thumb3_thumb_thumb

January is Mental Health Month! This kit is PERFECT for that!

Sneak Peeks January 17th 2019

Happy Thursday!!! Did everyone have a great week? Did you get some pages you have been meaning to done? Maybe you are in a rut and you need a little inspiration, well let’s check out some pages by the wonderful Gingerscraps CT with some of this week’s new releases!

From Heather Z


From Dagi

From Tinci

From Lindsay Jane

From LDrag

From Miss Fish

From Aimee Harrison

From JoCee

Tutorial Tuesday (Photoshop Elements)

Memory-Keeping with Not-So-Great Photos

I don’t know about you, but I’m seriously lousy at getting good selfies. Maybe I’m too critical, or maybe I just don’t look good in photos. But when the only photos I have of an event I really want to scrap about are those nasty selfies, what’s a woman to do? Such was the day I went to the beach on the Wild Atlantic Way… the ONLY day out of the whole two weeks I was in Ireland this time when it rained. It was also the only chance I would have to walk on the beach at Kilkee, where my 3x great-grandparents were born. So I went ahead to walk on the beach (although I didn’t walk the cliffs – I AM a bit of a chicken) and took the nasty selfies, then scrapped them into a minimalist layout for the January Color Challenge.

When I say it was raining, I’m not talking about the soft, misty rain Ireland is usually known for; it was more like a prairie downpour. My hair was plastered to my head and my jacket was soaked through. (And I was freezing… in July!)

If I was going to do something with these photos that I could live with, I was going to have to think a bit. I made a copy of my photo so I’d be playing with it and not the original.

Then I did something I’d never done before… I checked out the possibilities in the Effects menu. I played with each of the options to see what they do, and some of them will be given more attention in upcoming tuts. Imagine my surprise when I found an even quicker-with-fewer-steps sketch effect than we’ve looked at in other tuts.

Just one click and I had a sketch!

The effect produced another new layer.

The details are pretty blown-out, so I thought about how to find them again. (Although I wasn’t really upset that the crowsfeet are gone!)

I used the Levels adjustment (Enhance>Adjust Lighting>Levels or CTRL/CMD>L) to darken the outlines. With Levels, pushing the Input Levels dark value slider to the right as shown and the Output Levels light value slider just slightly to the left allowed some colour to leak back in, but also brought the details and textures back. The raindrops on my glasses are more obvious now.

I wanted a tiny bit more sketchiness so I duplicated the sketch layer (right-click on the layer then select Duplicate Layer or CTRL/CMD>J) then played with the Levels again. Can you see the difference in the histograms between the two images?

Just for fun, I played with some Blend Modes too. Some of them give really interesting results… There are no limits on creativity here!

I chose Pin Light. The only difference it makes is to brighten the image up a bit. And maybe sharpen the sketch effect a smidge.

Lowering the Opacity of that layer lets a bit more colour show through without losing the total sketch effect.

But naturally, I have to play a bit more.

I tried all the Modes then settled on Overlay.

That’s more like it! Some of the gray is gone,, the details are sharper and there’s a hint of colour.

After I Merged all the layers, this is what I ended up with.

And my final layout looks like this… The blended photo in the background is simply clipped to a mask then the mask’s Opacity was lowered a bit to blend the background a bit more.

Hop Hop! Newsletter Hop & a New Designer!

Hello lovely scrappers! I hope you all are having a wonderful start to your 2019!
We have a super fun way to kick off the new year … A Newsletter Hop!
All you need to do is sign up to receive the following list of newsletters BEFORE January 16th.
The newsletters containing a new freebie will begin to arrive in your inbox on January 18th. If you are already a subscriber to a newsletter, don’t worry, you will also receive the new freebies too!
Please visit the forum thread for a complete list of the newsletters!
{2019} Newsletter Hop!

Remember when you spend $10 in the store, you get a great new collab! It’s time to celebrate the start of a new year!

fwp_thumb3_thumb
https://store.gingerscraps.net/GingerBread-Ladies-Collab-New-Year.html

HAPPY DANCE TIME! We have a designer, who was a member of the family before, but had to step away from designing. When she came back, she knew where she needed to be!

HERE! Of course! <3

Welcome back, Dagi!

01

You know we had to ask her for some bit of an intro of herself. We do have new fans and all!

I’m almost 38 yrs old mom to two amazing boys (also 2 dogs and 5 cats!) from the Czech republic that discovered the world of digital scrapbook back in 2008. Very soon, I realized that templates are my cup of tea, so in 2011 I decided to slowly start designing my own. Besides scrapping and designing I also love reading (Stephen King is my favorite) and taking long walks. I am very thrilled to be coming back to Ginger Scraps. I simply love the entire community!

Don’t worry Dagi! We love you too!! We’re so happy to have her back!

And here are just a few things available in her store:

02
https://store.gingerscraps.net/Hello-2018-Collection.html

03
https://store.gingerscraps.net/Taste-Of-Winter.html

04
https://store.gingerscraps.net/Temp-ting-Duos-3.html

And it wouldn’t be an opening without a great sale!

05
https://store.gingerscraps.net/Dagi-s-Temp-tations/

06
https://store.gingerscraps.net/Everyday-memories-1.-Winter-dream.html

07
https://store.gingerscraps.net/Spicy-Sweet-Bundle-by-ADB-Designs.html

08
https://store.gingerscraps.net/ADB-Seasons-Best-Bundle-By-ADB-Designs.html

09
https://store.gingerscraps.net/Patterns-A-Plenty-3-Templates-by-Aimee-Harrison.html

10
https://store.gingerscraps.net/Pocketful-2-Templates-by-Aimee-Harrison.html

11
Hello January – Kit https://store.gingerscraps.net/Hello-January-Kit.html
Hello January – Cards https://store.gingerscraps.net/Hello-January-Cards.html
Hello January – Templates https://store.gingerscraps.net/Hello-January-Template-Pack.html
Hello January – Bundle https://store.gingerscraps.net/Hello-January-Bundle.html

12
https://store.gingerscraps.net/Be-Magical-5-Grab-Bag.html

13
https://store.gingerscraps.net/Binge-Watching-BGD.html

14
https://store.gingerscraps.net/Bear-Hugs-Mini-Kit-by-CathyK-Designs.html

15
https://store.gingerscraps.net/January-2019-Template-Bundle-by-Connie-Prince.html

17
https://store.gingerscraps.net/Chilled-Digital-Scrapbook-Kit-by-Dandelion-Dust-Designs.html

16
https://store.gingerscraps.net/Shine-On-Templates-by-Dear-Friends-Designs.html

18
Bundle – https://store.gingerscraps.net/Celebrate-2018-TEMPLATES-BUNDLE-by-Heather-Z-Scraps.html
Vol. 1 – https://store.gingerscraps.net/Celebrate-2018-TEMPLATES-VOL.-1-by-Heather-Z-Scraps.html
Vol. 2 – https://store.gingerscraps.net/Celebrate-2018-TEMPLATES-VOL.-2-by-Heather-Z-Scraps.html
Vol. 3 – https://store.gingerscraps.net/Celebrate-2018-TEMPLATES-VOL.-3-by-Heather-Z-Scraps.html

19
https://store.gingerscraps.net/JB-Studio/

21
https://store.gingerscraps.net/Rainy-Days-Trio.html

22
https://store.gingerscraps.net/Rainy-Days-Trio.html

23
https://store.gingerscraps.net/Curved-Photo-Templates-Vol.-7-by-LDrag-Designs.html

24
Kit: https://store.gingerscraps.net/It-s-My-Hairday-by-LDragDesigns.html
Word Art: https://store.gingerscraps.net/It-s-My-Hairday-Wordart-by-LDragDesigns.html

25
Kit: https://store.gingerscraps.net/Slumber-Party-by-LDragDesigns.html
Bundle: https://store.gingerscraps.net/Slumber-Party-The-Collection-by-LDragDesigns.html

26
https://store.gingerscraps.net/Random-Pieces-28-Templates-by-Lindsay-Jane.html

27
https://store.gingerscraps.net/Random-Pieces-27-Templates-by-Lindsay-Jane.html

28
https://store.gingerscraps.net/Document-Life-December-2018-Grab-Bag-by-Luv-Ewe-Designs.html

29
Bundle: https://store.gingerscraps.net/Pretty-Paws-Cats-collection.html
Page kit: https://store.gingerscraps.net/Pretty-Paws-Cats.html
Journaling Cards: https://store.gingerscraps.net/Pretty-Paws-Cats-cards.html
Graffiti Pack: https://store.gingerscraps.net/Pretty-Paws-Cats-graffiti.html
Bonus Papers: https://store.gingerscraps.net/Pretty-Paws-Cats-bonus-papers.html
Word Bits: https://store.gingerscraps.net/Pretty-Paws-Cats-words.html
Bonus Elements: https://store.gingerscraps.net/Pretty-Paws-Cats-bonus-elements.html

30
https://store.gingerscraps.net/Just-The-Basics-Templates-by-Miss-Fish.html

31
https://store.gingerscraps.net/Great-Big-Memories-Templates-by-Miss-Fish.html

20
https://store.gingerscraps.net/JB-Studio/

15_thumb
https://store.gingerscraps.net/JoCee-Designs/

Remember, if you complete 10 challenges, just ten, you get a free kit as well!!

cr_thumb3_thumb

January is Mental Health Month! This kit is PERFECT for that!

Sneak Peeks January 10th 2019

Happy Thursday! Tomorrow is jam packed with new releases! Let’s see all the awesome goodies releasing!

From Dagi

From Heather Z

From LDrag

From Tinci

From JB Studio

From CathyK

From Miss Fish

From Aimee Harrison

From Luv Ewe

Have a great weekend!

Tutorial Tuesday (Photoshop Elements)

Any Way You Slice It

After last week’s tutorial went out and I posted my Possibilities layout there were several comments about the photo treatment I used. Well, I actually stole it from a paper layout I saw in an old issue of Creating Keepsakes. Sort of. The digital version is a lot less labour-intensive and creates no mess or destruction. No glue either. So I thought that might make a suitable topic for today’s tutorial!

I started out by adding a new blank layer above my photo layer. That can be done simply by clicking on the little piece-of-paper icon at the top of the Layers Panel. Then I activated the Rectangular Marquee tool. (CTRL/CMD>M)

Next I pulled out a narrow rectangular selection along the left edge of my photo, including the parts of the photo I wanted to keep and excluding the part I didn’t – who wants to look at a roof?

Then I added a narrow white stroke around the selected area.

Then I dragged out another rectangular selection from my photo. See that little dialog box with numbers in it? That’s a great tool! It tells you the dimensions of whatever shape you’ve dragged out, therefore allowing you to keep the width or length of your selection identical. (Or you can just CTRL/CMD>J it and make an identical copy that you can then adjust to whatever dimensions you want…)

These are the settings I used for all my strokes: 5 pixels in width, centered over the selection, white and 100% visible.

I made a bunch of copies of my second rectangle and moved them over, which let me really WSNH (Work Smart, Not Hard) by skipping a lot of steps. I left the width the same but stretched or shrunk heights as I went. Once I had the whole photo “sliced” up, I Merged the frames.

Then I moved back to the photo layer and, still using the Rectangular Marquee, I started selecting the areas of the photo I didn’t want to keep. Then I Cut those areas away. (CTRL/CMD>X)

All that was left was to apply a hint of a drop shadow on the frame layer to give the whole thing a little dimension. The shadow settings I used were Angle: 90°, Size: 16 pixels, Distance: 0 pixels and Opacity: 18% with the colour being black. I didn’t add a shadow to the photo itself.

It’s really that easy!