We’re almost halfway through the year. 2019 is flying by even faster than 2018 did! That doesn’t mean that the designers are letting that slow them down! They have some amazing things coming!
Remember when you spend $10 in the store, you get a great new collab! Just because you’re working on that summer body doesn’t mean you don’t deserve a treat!

https://store.gingerscraps.net/GingerBread-Ladies-Collab-No-Diet-Days.html

Kit – https://store.gingerscraps.net/I-Believe-in-Unicorns-by-Scraps-N-Pieces.html
Invitation – https://store.gingerscraps.net/I-Believe-In-Unicorns-Birthday-Invitation-by-Scraps-N-Pieces.html
CU Templates – https://store.gingerscraps.net/I-Believe-in-Unicorns-CU-Templates-by-Scraps-N-Pieces.html


https://store.gingerscraps.net/Lemon-Love-Page-Kit-by-ADB-Designs.html

https://store.gingerscraps.net/Wild-Wild-West-Bundle-by-ADB-Designs.html

Collection: https://store.gingerscraps.net/360-Life-June-Elegance-Collection-by-Aimee-Harrison.html
Kit: https://store.gingerscraps.net/360-Life-June-Elegance-Page-Kit-by-Aimee-Harrison.html
Alphas: https://store.gingerscraps.net/360-Life-June-Elegance-Alpha-Sets-by-Aimee-Harrison.html
Frames: https://store.gingerscraps.net/360-Life-June-Elegance-Frame-Clusters-by-Aimee-Harrison.html
Blooms: https://store.gingerscraps.net/360-Life-June-Elegance-Blooms-by-Aimee-Harrison.html
Extra Papers: https://store.gingerscraps.net/360-Life-June-Elegance-Extra-Papers-by-Aimee-Harrison.html
Edges: https://store.gingerscraps.net/360-Life-June-Elegance-Messy-Edges-by-Aimee-Harrison.html
Glitters: https://store.gingerscraps.net/360-Life-June-Elegance-Glitters-by-Aimee-Harrison.html

Bundle: https://store.gingerscraps.net/Dreamland-Bundle.html
Kit: https://store.gingerscraps.net/Dreamland-Kit.html
Flairs: https://store.gingerscraps.net/Dreamland-Flairs.html
Ombres: https://store.gingerscraps.net/Dreamland-Ombres.html
Smatters: https://store.gingerscraps.net/Dreamland-Smatters.html
Word Bits: https://store.gingerscraps.net/Dreamland-Word-Bits.html

https://store.gingerscraps.net/Timber-BGD.html

Bundle: https://store.gingerscraps.net/-2019-June-Bundle-Collection-by-Connie-Prince.html
Kit: https://store.gingerscraps.net/-2019-June-Kit-by-Connie-Prince.html
Mixed Media: https://store.gingerscraps.net/-2019-June-Mixed-Media-by-Connie-Prince.html
Quoted: https://store.gingerscraps.net/-2019-June-Quoted-Pack-by-Connie-Prince.html
Messy Papers: https://store.gingerscraps.net/-2019-June-Messy-Papers-by-Connie-Prince.html
Border Clusters: https://store.gingerscraps.net/-2019-June-Border-Clusters-by-Connie-Prince.html
Week 23: https://store.gingerscraps.net/-2019-June-Week-23-Template-Pack-CU-Ok-by-Connie-Prince.html
Week 24: https://store.gingerscraps.net/-2019-June-Week-24-Template-Pack-CU-Ok-by-Connie-Prince.html
Week 25: https://store.gingerscraps.net/-2019-June-Week-25-Template-Pack-CU-Ok-by-Connie-Prince.html
Week 26: https://store.gingerscraps.net/-2019-June-Week-26-Template-Pack-CU-Ok-by-Connie-Prince.html
Extra Papers: https://store.gingerscraps.net/-2019-June-Extra-Papers-by-Connie-Prince.html
Alpha Pack: https://store.gingerscraps.net/-2019-June-Alpha-Pack-AddOn-by-Connie-Prince.html
Word Art: https://store.gingerscraps.net/-2019-June-Word-Art-Pack-by-Connie-Prince.html
Pocket Cards: https://store.gingerscraps.net/-2019-June-Pocket-Cards-by-Connie-Prince.html
Quick Pages: https://store.gingerscraps.net/-2019-June-Quick-Pages-by-Connie-Prince.html


https://store.gingerscraps.net/Angel-Wings-Digital-Scrapbook-Kit-by-Dandelion-Dust-Designs.html

Together In Spirit | Collection: https://store.gingerscraps.net/Together-In-Spirit-Collection.html
Together In Spirit | Kit: https://store.gingerscraps.net/Together-In-Spirit-Kit.html
Together In Spirit | Finishing Touches: https://store.gingerscraps.net/Together-In-Spirit-Finishing-Touches.html
Together In Spirit | Journal Cards: https://store.gingerscraps.net/Together-In-Spirit-Journal-Cards.html

https://store.gingerscraps.net/Ilonkas-Designs/

Bundle: https://store.gingerscraps.net/Hey-Mister-Bundle-by-JB-Studio-and-Juno-Designs.html
Kit: https://store.gingerscraps.net/Hey-Mister-Page-Kit-by-JB-Studio-and-Juno-Designs.html
Papers: https://store.gingerscraps.net/Hey-Mister-Papers-by-JB-Studio-and-Juno-Designs.html
Elements: https://store.gingerscraps.net/Hey-Mister-Elements-by-JB-Studio-and-Juno-Designs.html
Alphas¨https://store.gingerscraps.net/Hey-Mister-Alphas-by-JB-Studio-and-Juno-Designs.html
Artsy Papers: https://store.gingerscraps.net/Hey-Mister-Artsy-Papers-by-JB-Studio-and-Juno-Designs.html
Cards: https://store.gingerscraps.net/Hey-Mister-Cards-by-JB-Studio-and-Juno-Designs.html

https://store.gingerscraps.net/CU-Layered-Templates-USA.html

[kit] https://store.gingerscraps.net/Summer-Is-Calling-by-LDragDesigns.html
[alphas] https://store.gingerscraps.net/Summer-Is-Calling-Alphas-by-LDragDesigns.html
[embossed papers] https://store.gingerscraps.net/Summer-Is-Calling-Embossed-Papers-by-LDragDesigns.html
[collection] https://store.gingerscraps.net/Summer-Is-Calling-The-Collection-by-LDragDesigns.html
[glitters] https://store.gingerscraps.net/Summer-Is-Calling-Glitterstyles-by-LDragDesigns.html

[graffiti] https://store.gingerscraps.net/Summer-Is-Calling-Graffiti-by-LDragDesigns.html
[borders] https://store.gingerscraps.net/Summer-Is-Calling-Borders-by-LDragDesigns.html
[journal cards] https://store.gingerscraps.net/Summer-Is-Calling-Journal-Cards-by-LDragDesigns.html
[worn out papers] https://store.gingerscraps.net/Summer-Is-Calling-Worn-Out-Papers-by-LDragDesigns.html

https://store.gingerscraps.net/Sum-Sum-Summertime-Templates-MissFish.html

https://store.gingerscraps.net/Usual-moments-Photobook-templates-Set2.html

Bundle – https://store.gingerscraps.net/Rustic-splendor-Bundle.html
Kit – https://store.gingerscraps.net/Rustic-splendor-Kit.html
Painted papers – https://store.gingerscraps.net/Rustic-splendor-Painted-papers.html
Clusters – https://store.gingerscraps.net/Rustic-splendor-Clusters.html
Masks&Frames – https://store.gingerscraps.net/Rustic-splendor-Masks-Frames.html
Stamps – https://store.gingerscraps.net/Rustic-splendor-Stamps.html
Stamps&Borders – https://store.gingerscraps.net/Rustic-splendor-Stamps-and-Borders.html
Splatters&Accents – https://store.gingerscraps.net/Rustic-splendor-Splatters-and-Accents.html

https://store.gingerscraps.net/Lindsay-Jane/

https://store.gingerscraps.net/Miss-Fish-Templates/

https://store.gingerscraps.net/Stay-At-Home-Mom-Bundle-by-JB-Studio.html

https://store.gingerscraps.net/Shepherd-Studio/
Remember, if you complete 10 challenges, just ten, you get a free kit as well!!

Think positive and focus on the good things in life!
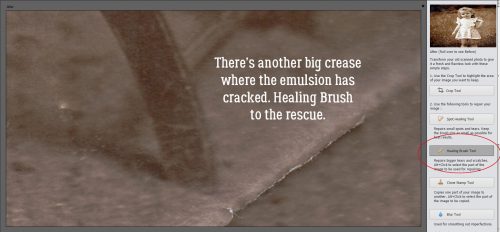
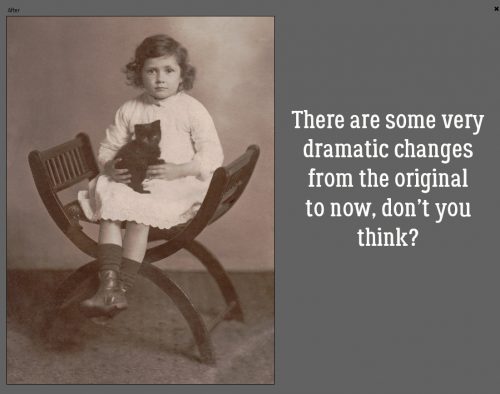
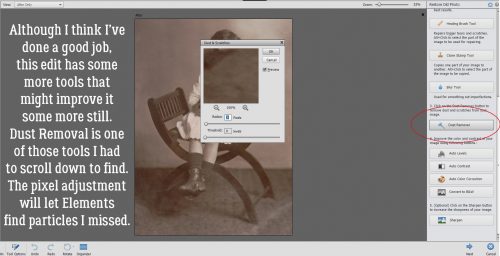
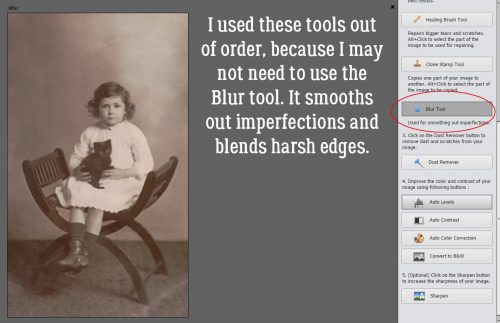
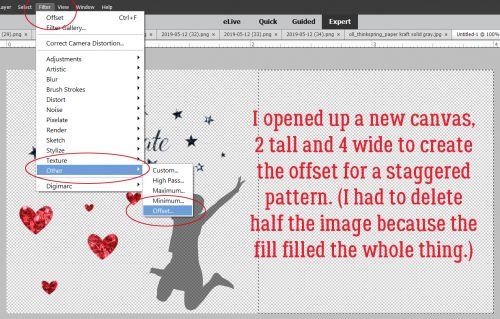
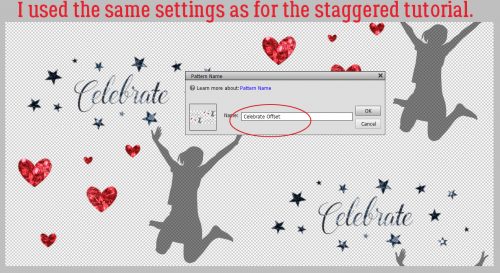
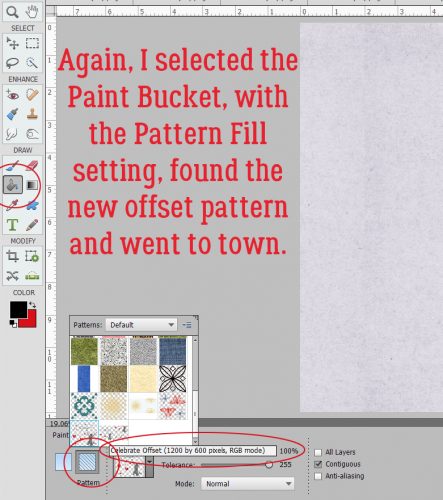
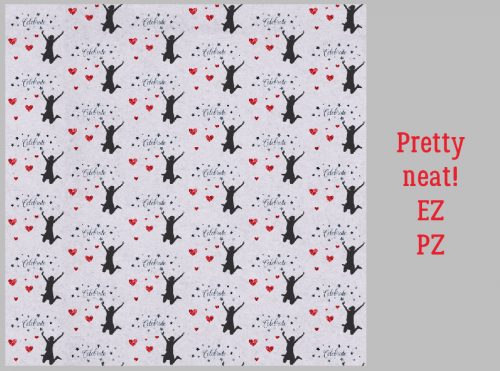
![]()