Build-Your-Own-TEMPLATE!
![]()
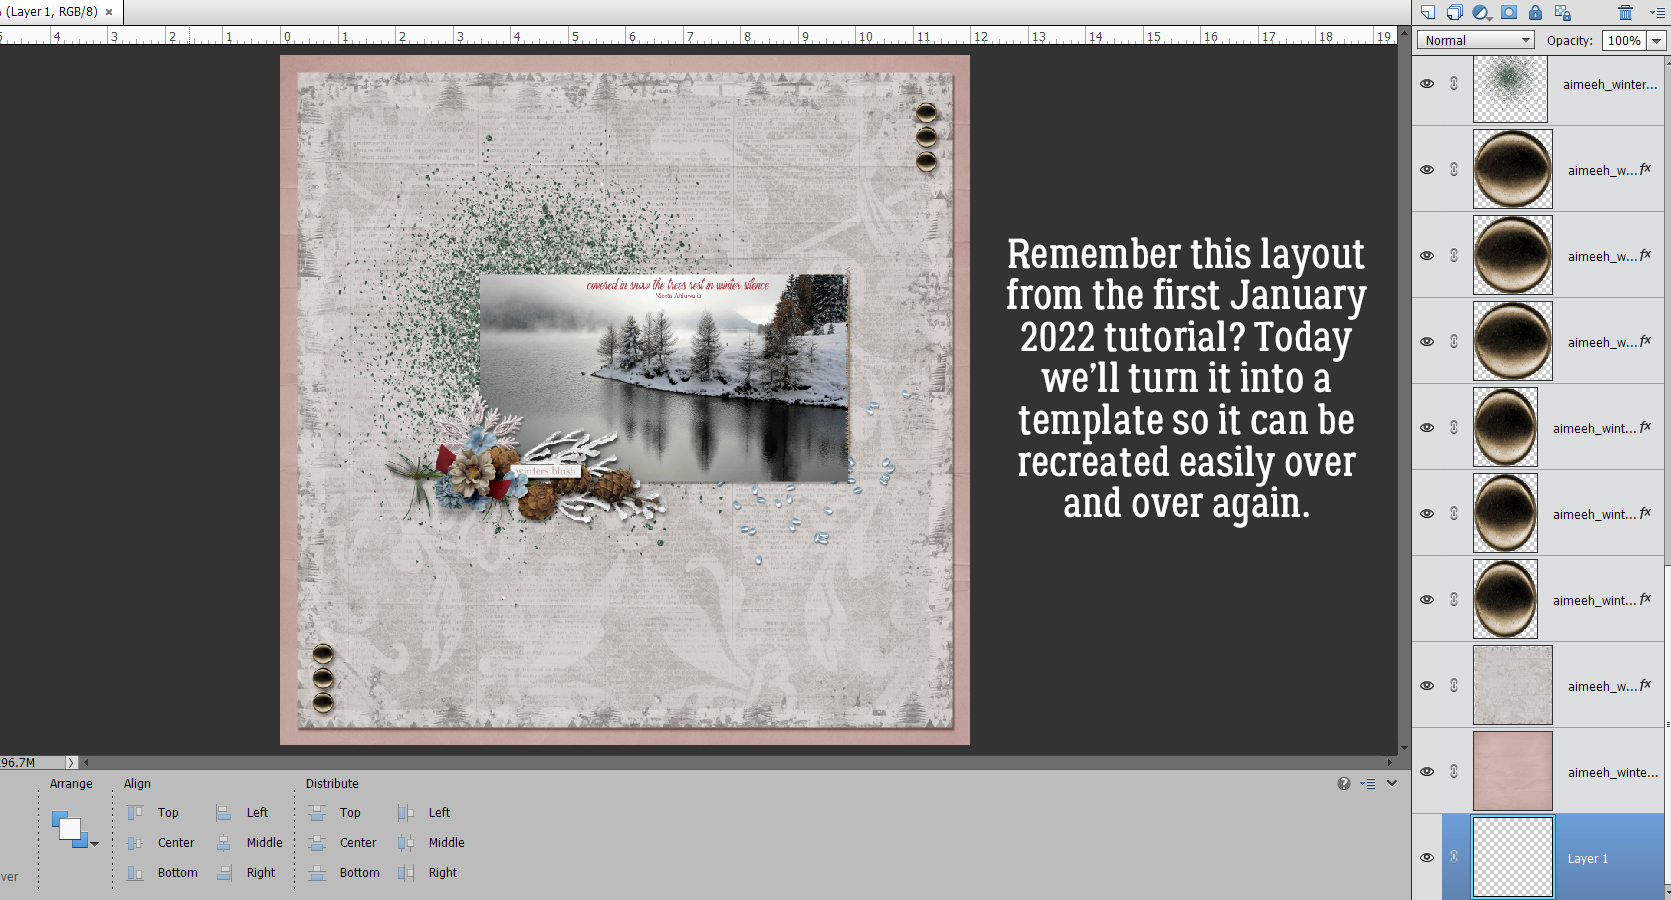
A few weeks back I asked for some tutorial topic suggestions and there were some really good ones! Steph brought up the idea of building templates from your favourite (unique!) layouts, and it was something I’d given some thought to already so it was a slam-dunk that I’d take it to the next step. The layout I created and based the save-a-cluster tutorial on last week was purposefully 100% designed in my own head with both the cluster tut and this template-creation tut too. Working Smart, Not Hard, I am.
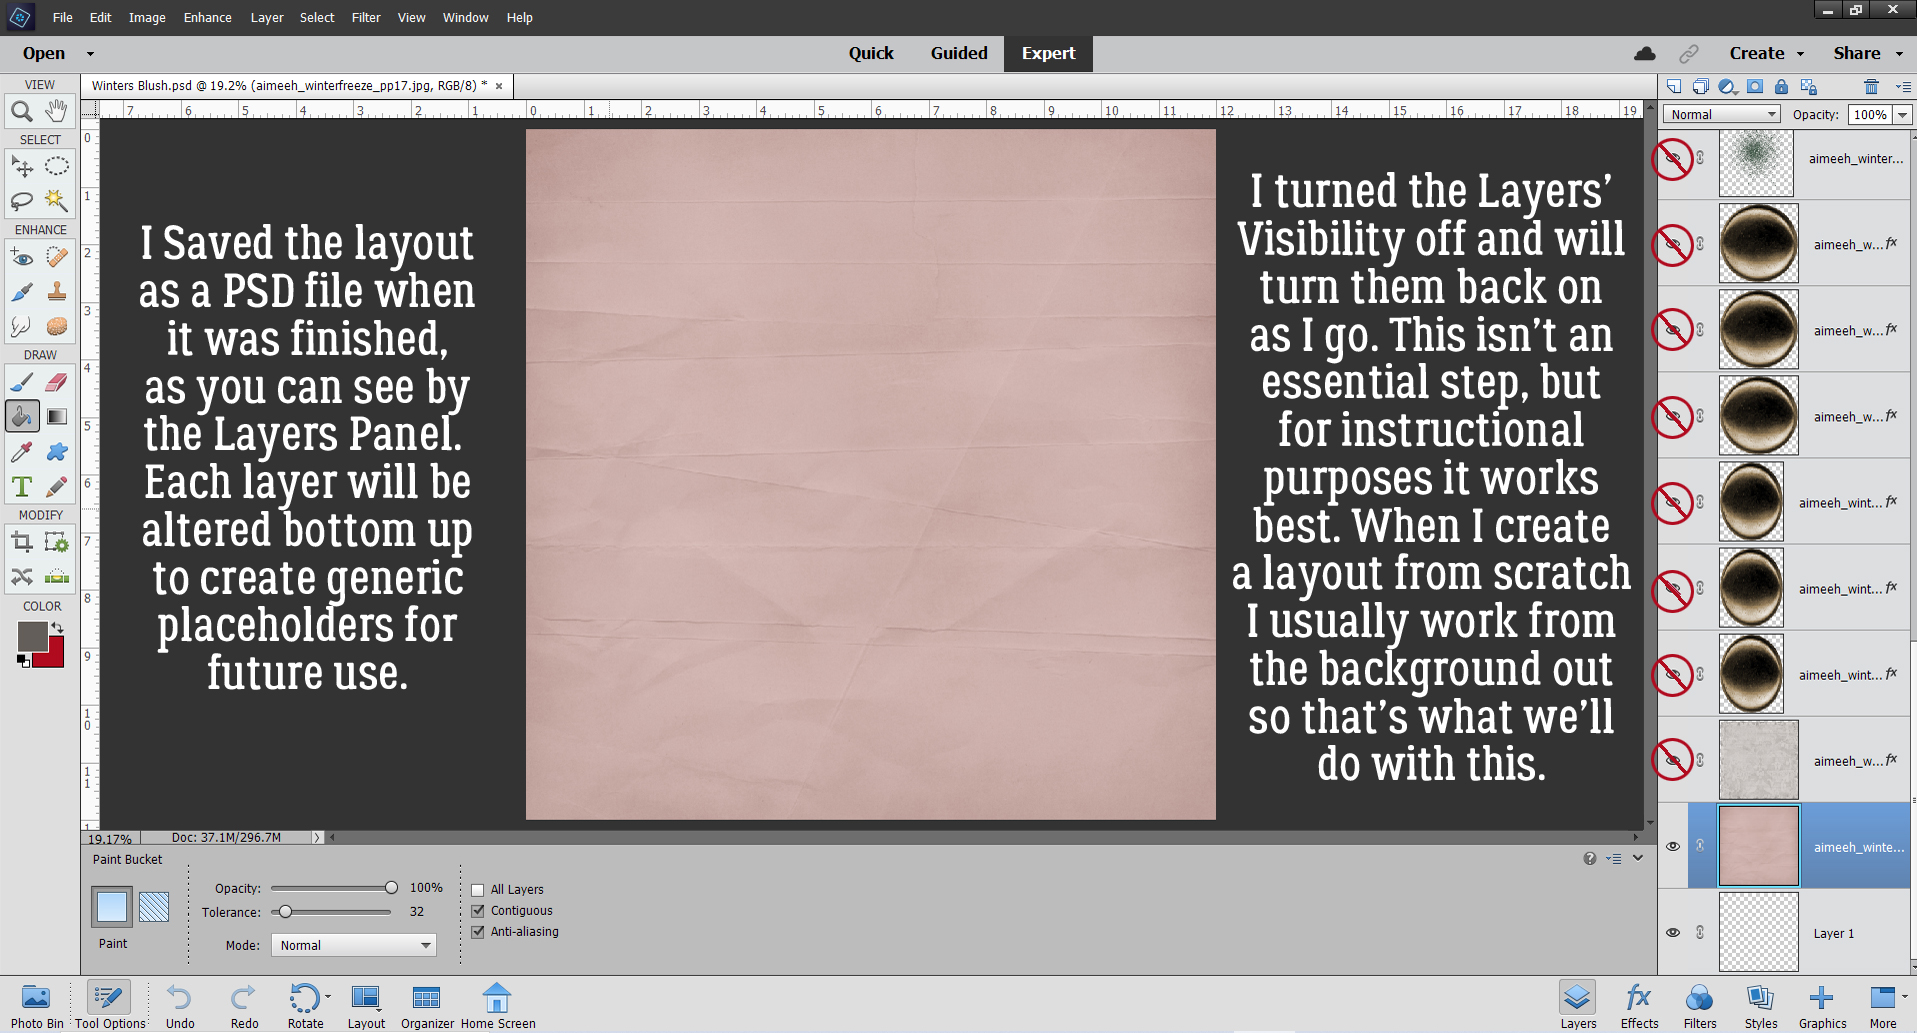
This is the layout I’m talking about. The kit I used is Aimee Harrison‘s Winter Blush. When I create a layout I always Save As a PSD file in case I need to make some adjustments. That’s also a necessary step for turning a layout into a template.
I build layouts from the bottom up, just as I would if I was using paper and glue rather than digital supplies. That’s how I’m going to build the template too. I turned the layers’ Visibility off for clarity but if you choose not to do that, no problem!
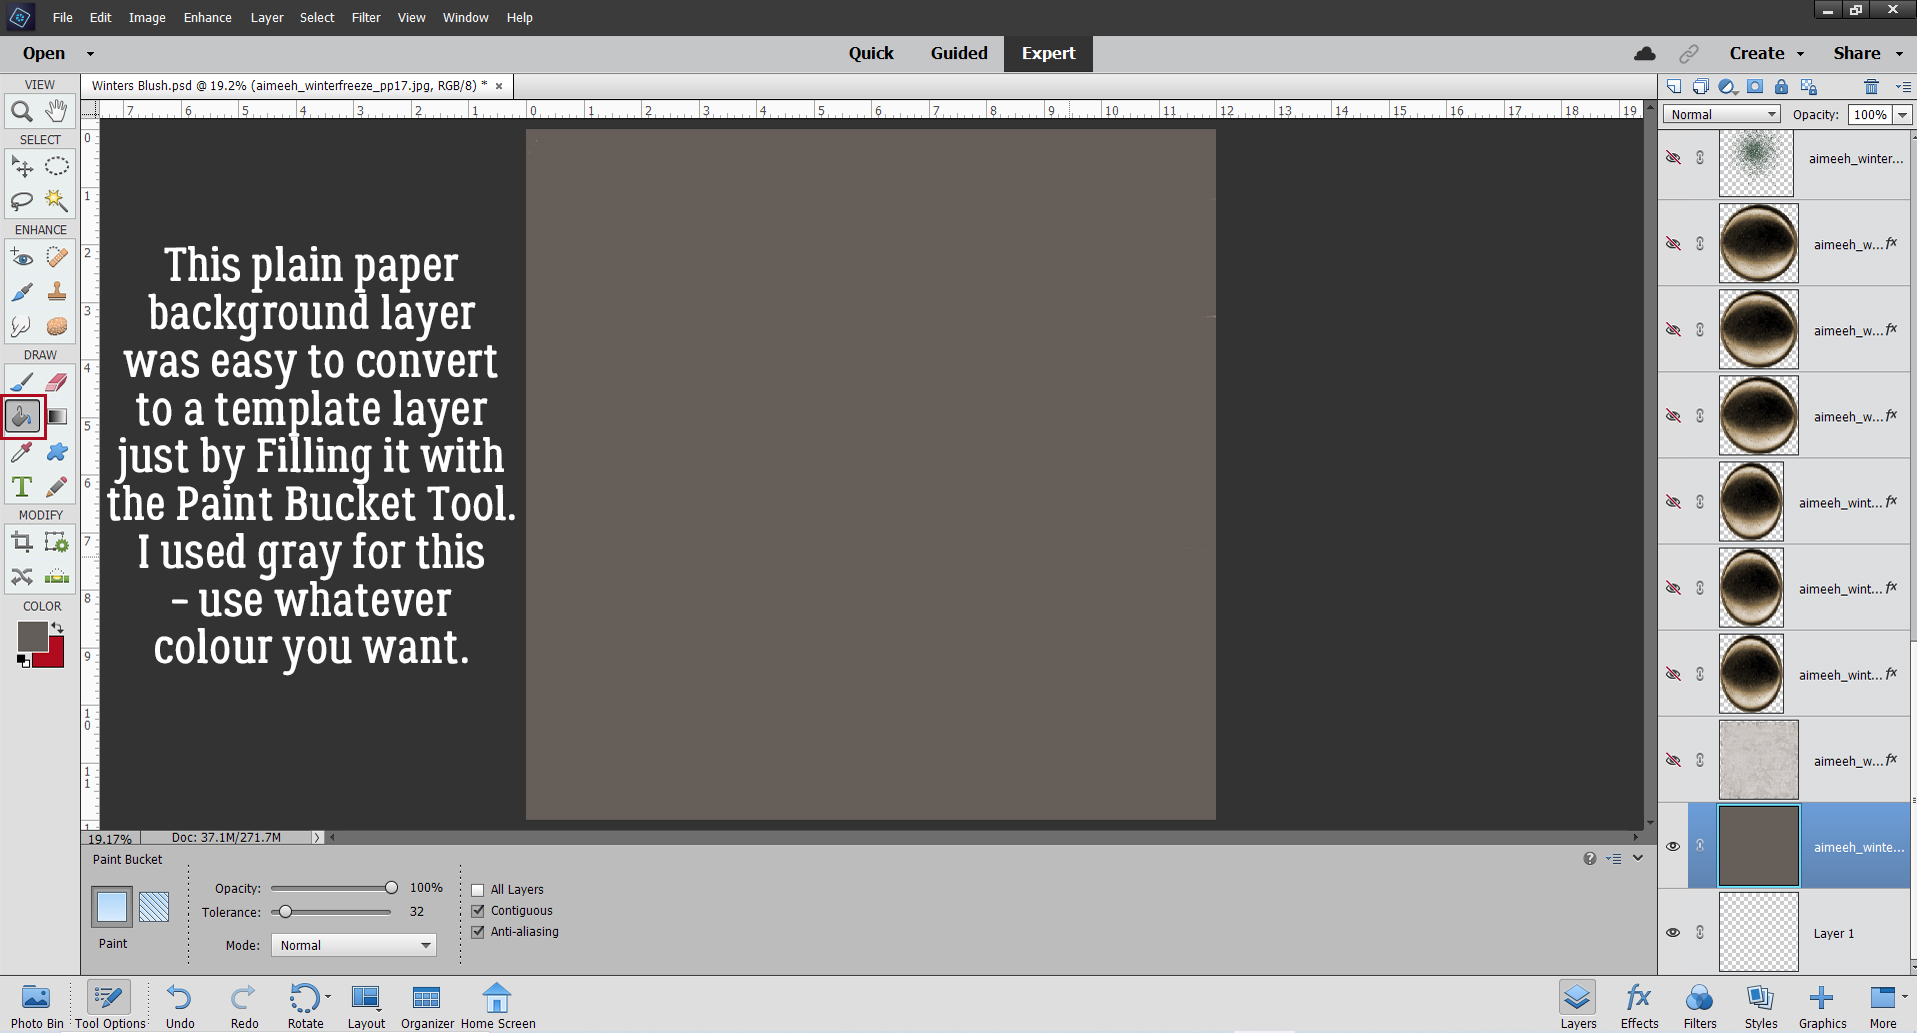
This background layer reads to Elements like it’s completely flat, so using the Paint Bucket to fill it with a solid gray worked out.
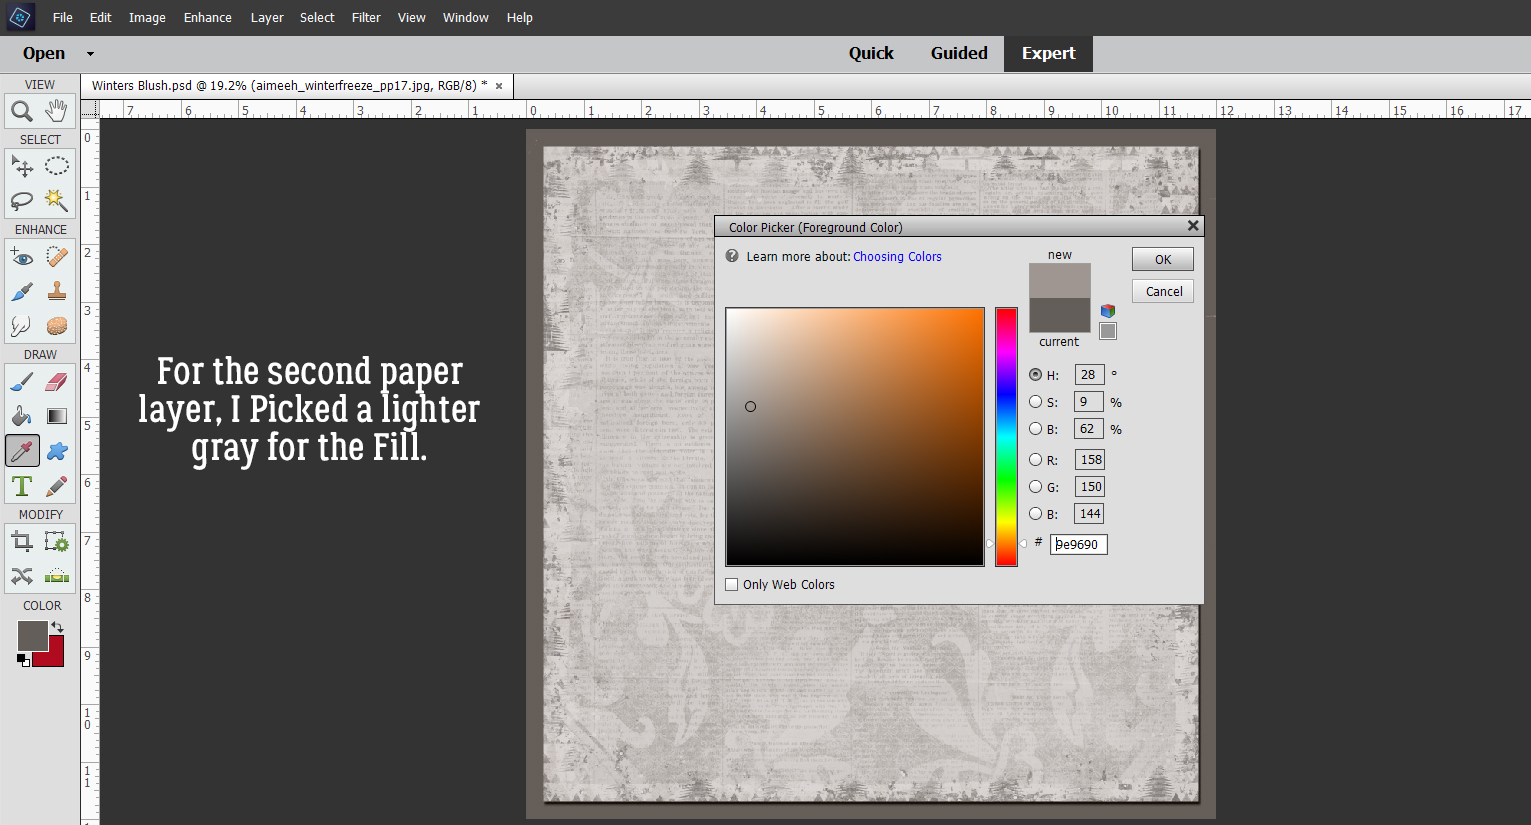
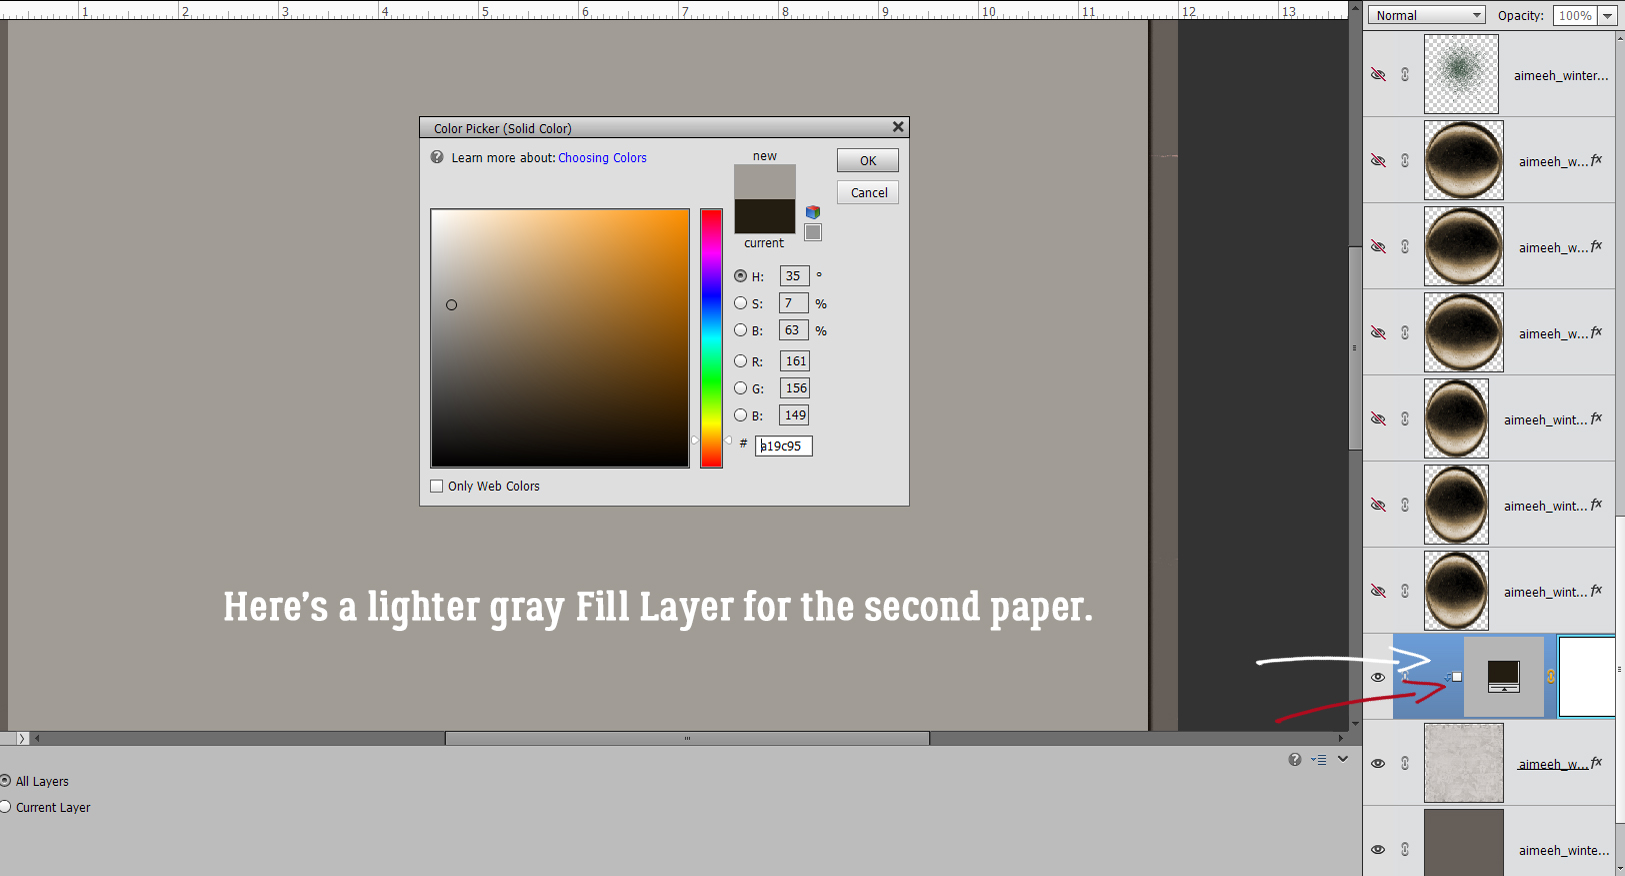
To make it easier on the eye to distinguish between paper layers, I chose a lighter gray for the second paper layer.
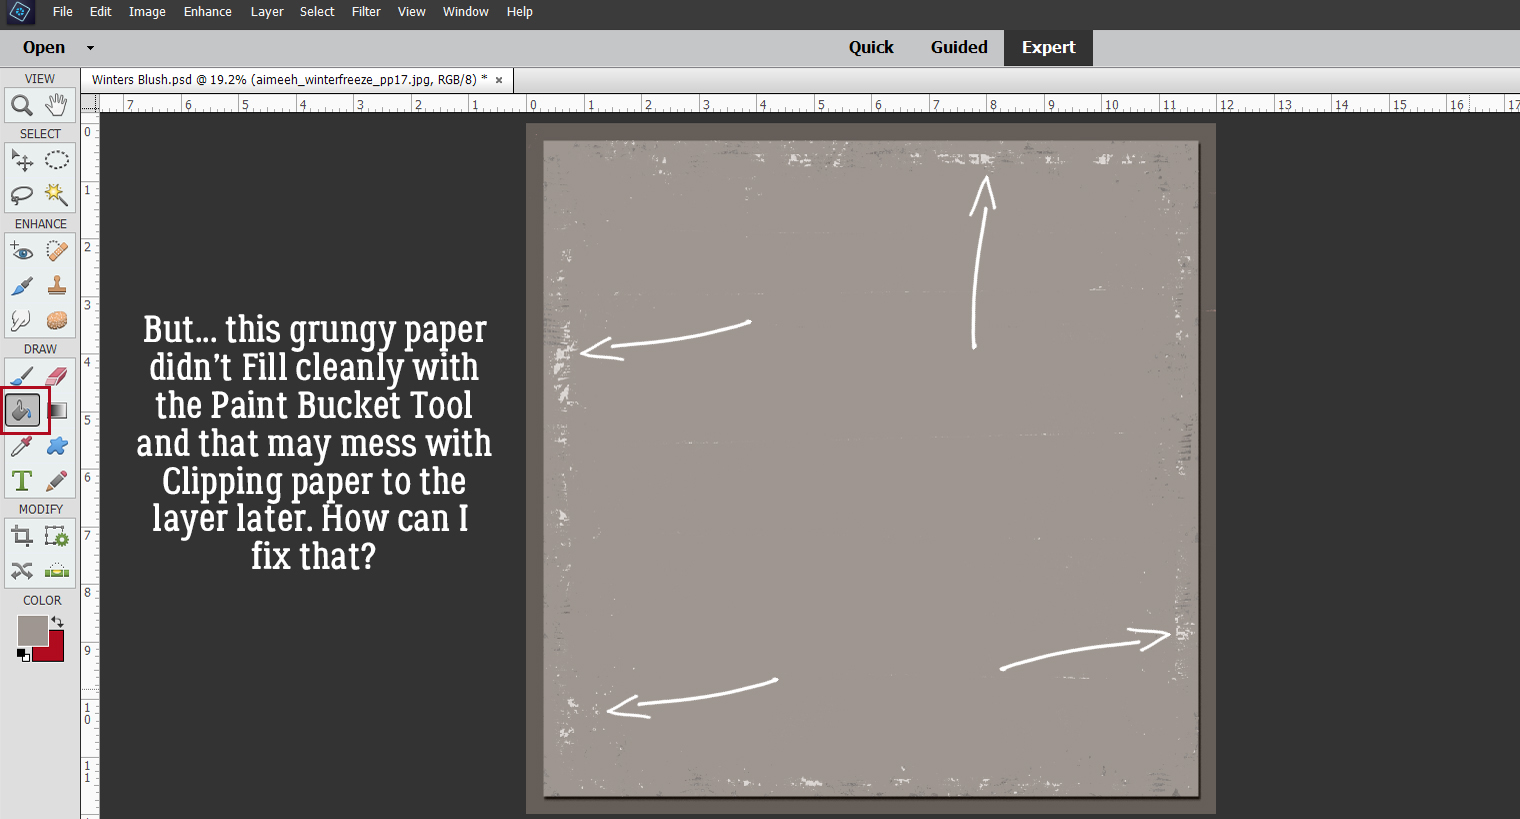
Wait. What?? Oh, the grungy paper doesn’t Fill completely and cleanly with the Paint Bucket. That could be a big issue later when I go to use the template. Clipping a paper to this could look really awful!
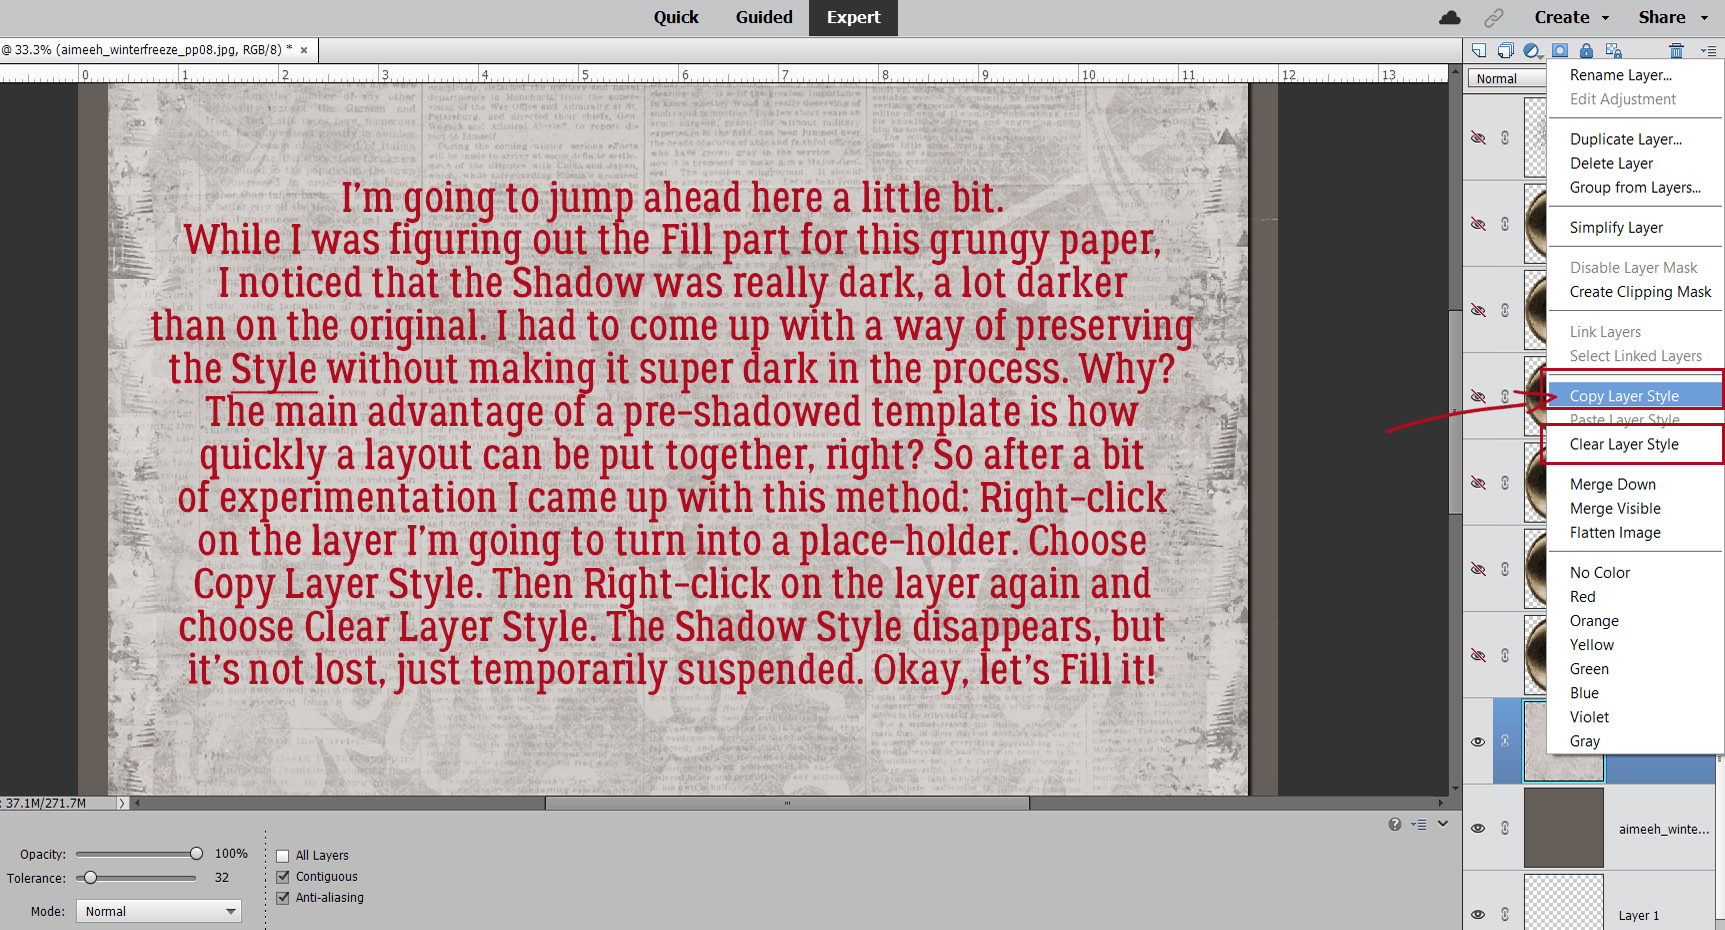
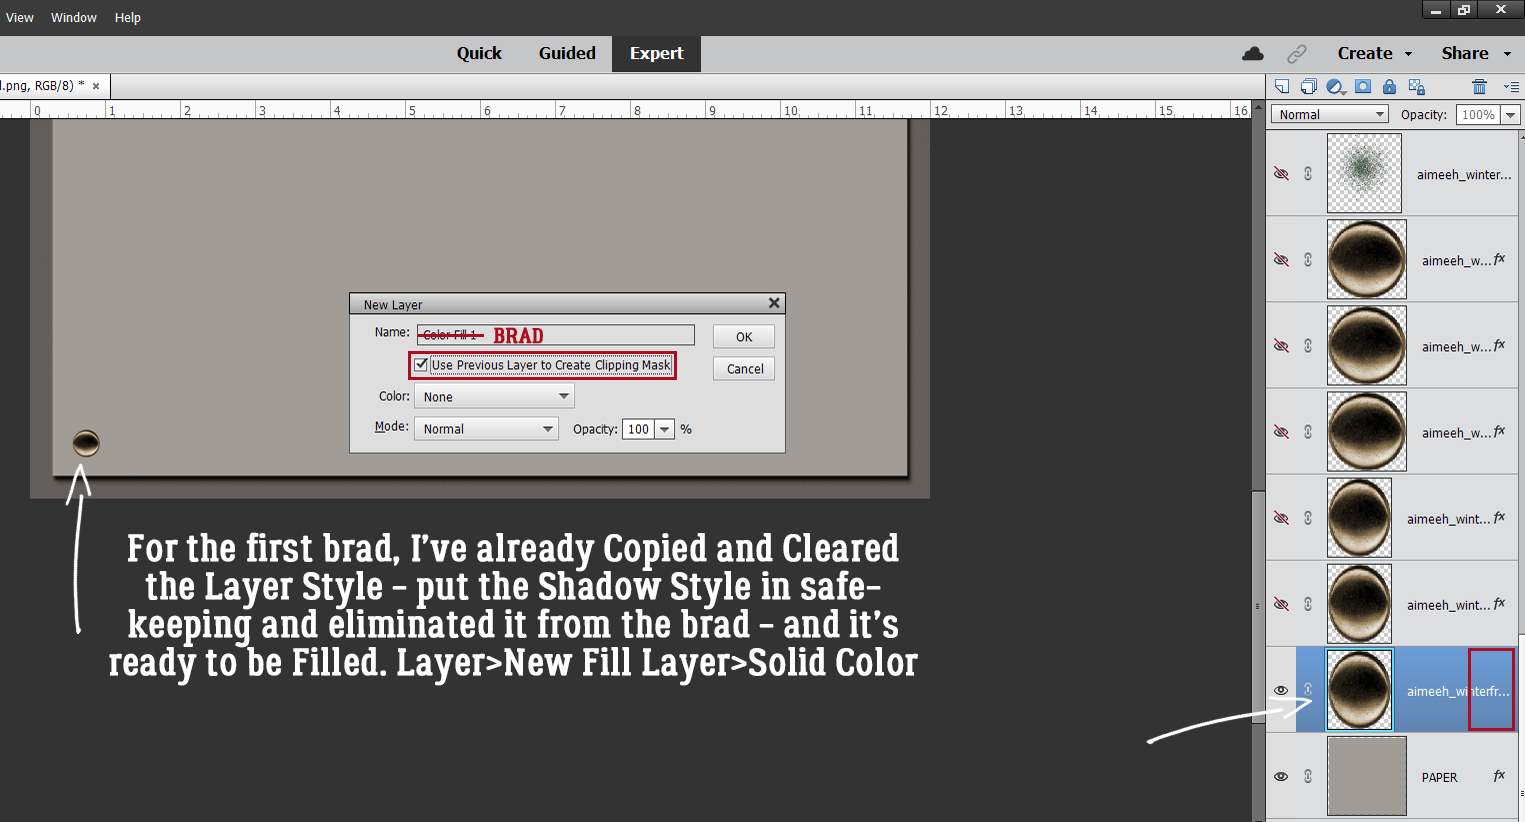
I’m going to take you on a little detour for a second. When I was experimenting with Filling layers and Merging them to simplify things, I discovered that once the layers are Merged, the Shadow Style on the base layer becomes embedded in the image but isn’t adjustable. Adding a Shadow Style to that makes for VERY dark and odd-looking shadows. So I experimented some more and came up with this. Before I Fill the layer to create a place-holder, I Right-click on the layer and choose Copy Layer Style. Then I Right-click on the layer again and choose Clear Layer Style. That removes the Style from the layer, but puts it in safe-keeping for later.
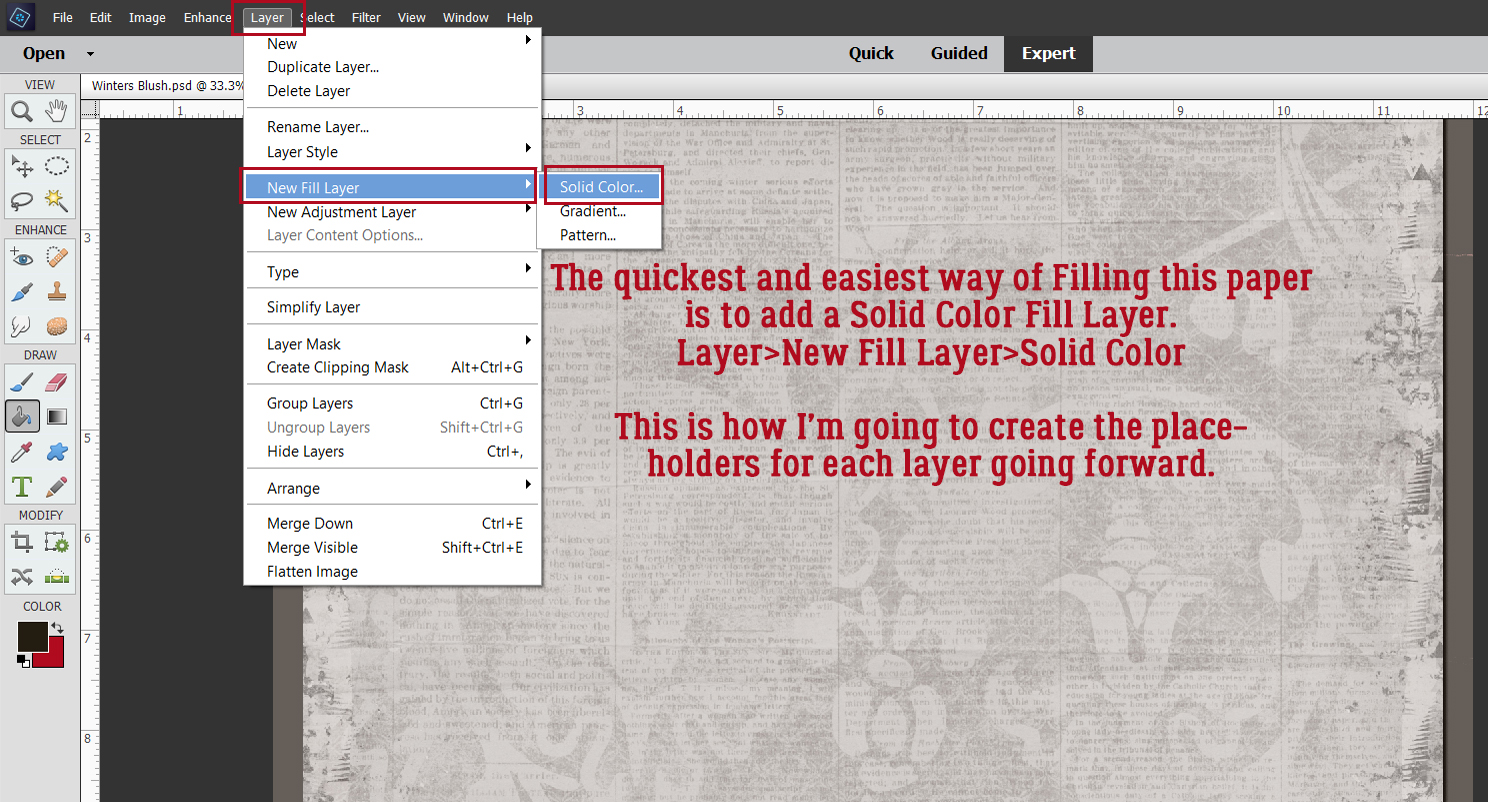
To achieve a solid Fill on this paper, I’m going to use the Layer>New Fill Layer>Solid Color command. Each of the place-holder layers will be created the same way. (You’ll get lots of practice, and it’ll be almost automatic by the time you’re done!)
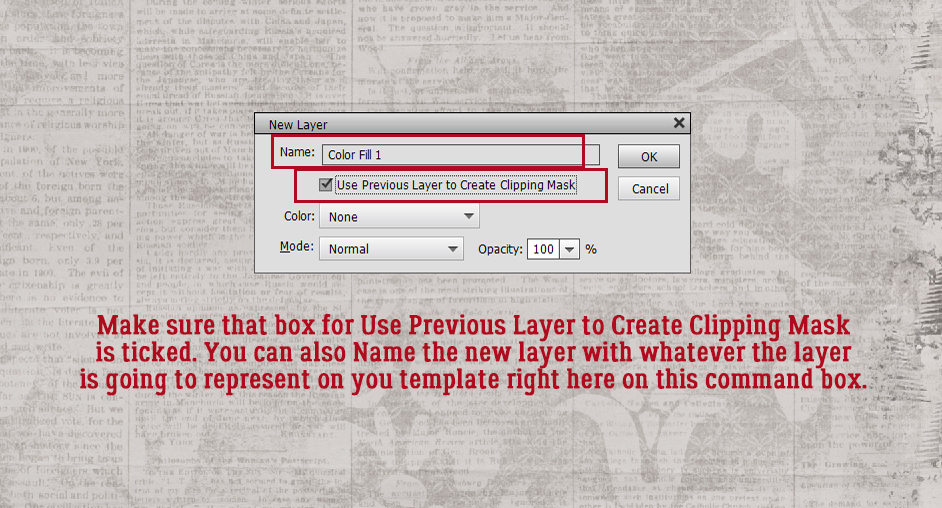
This command prompt opens up; make sure Use Previous Layer to Create Clipping Mask is ticked. That tells Elements to Fill ONLY what’s on the layer under it. You can Name the layer with the type of object you’re creating a place-holder for right here. Just delete that Color Fill 1 and type in your object. (Pardon the typo on the screenshot. Sleep is in short supply here at the moment.)
Here’s what happens when you’ve clicked OK. The Color Picker opens and the image on the workspace shows a preview of the end result. See how it’s now a Clipped layer above the patterned paper?
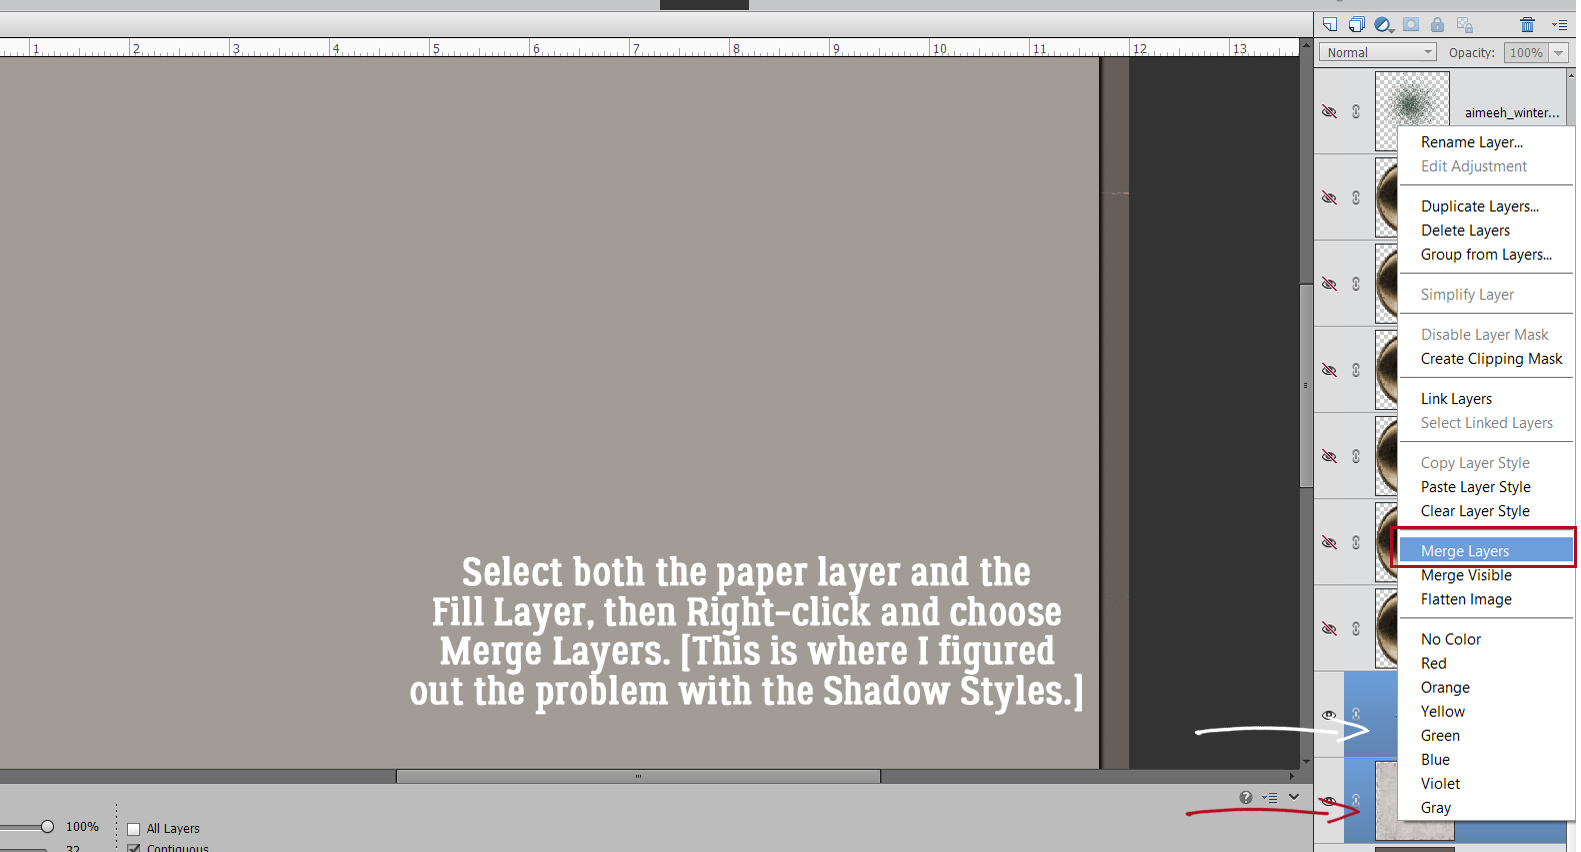
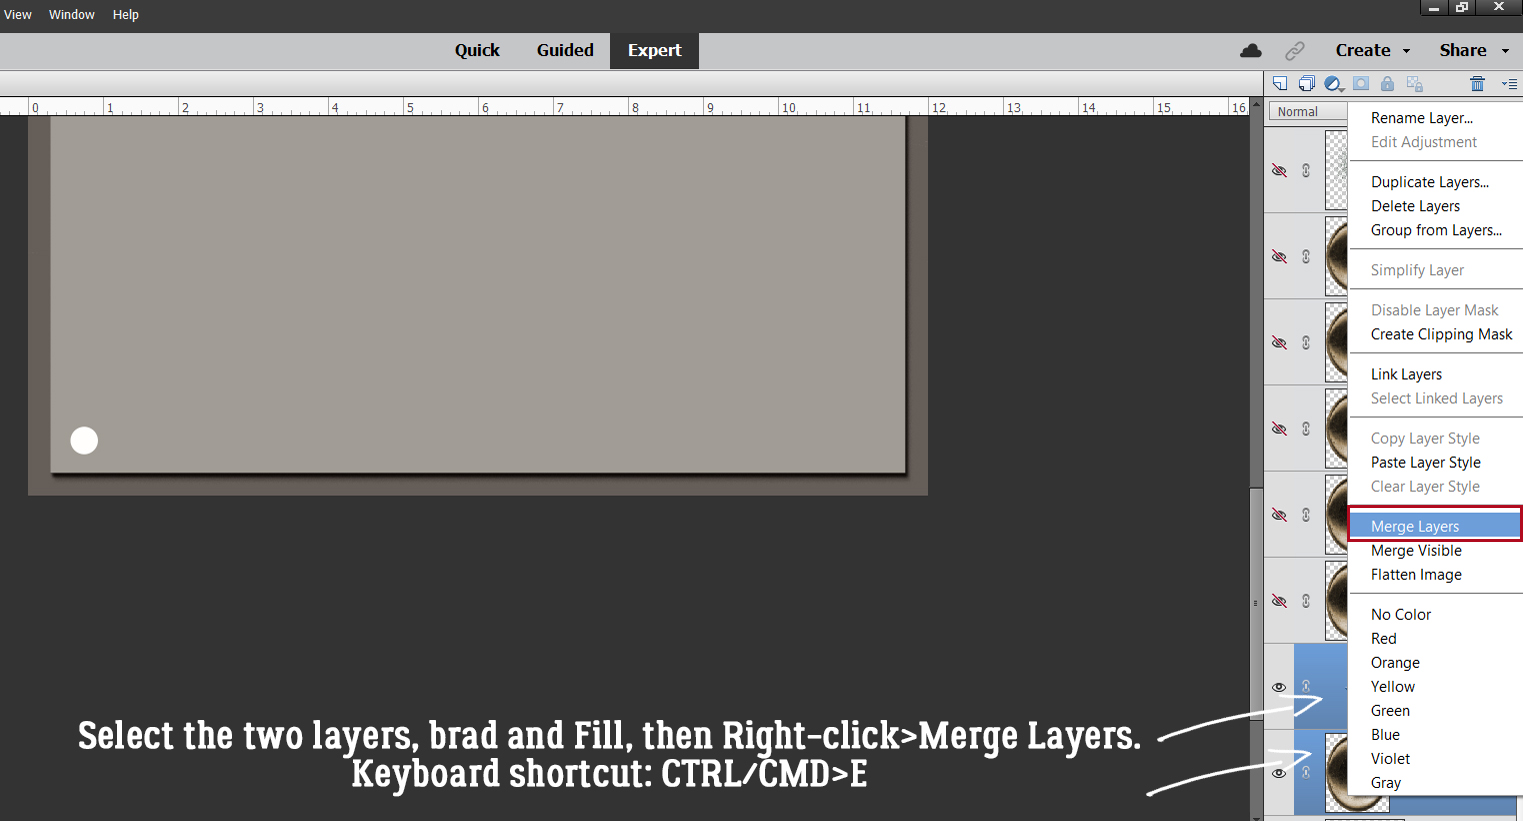
The utility of your template will be greatly enhanced by Selecting both the base layer and the Fill layer then Merging them. Click>SHIFT>Click on the layers then Right-click and choose Merge Layers. The keyboard shortcut is CTRL/CMD>E.
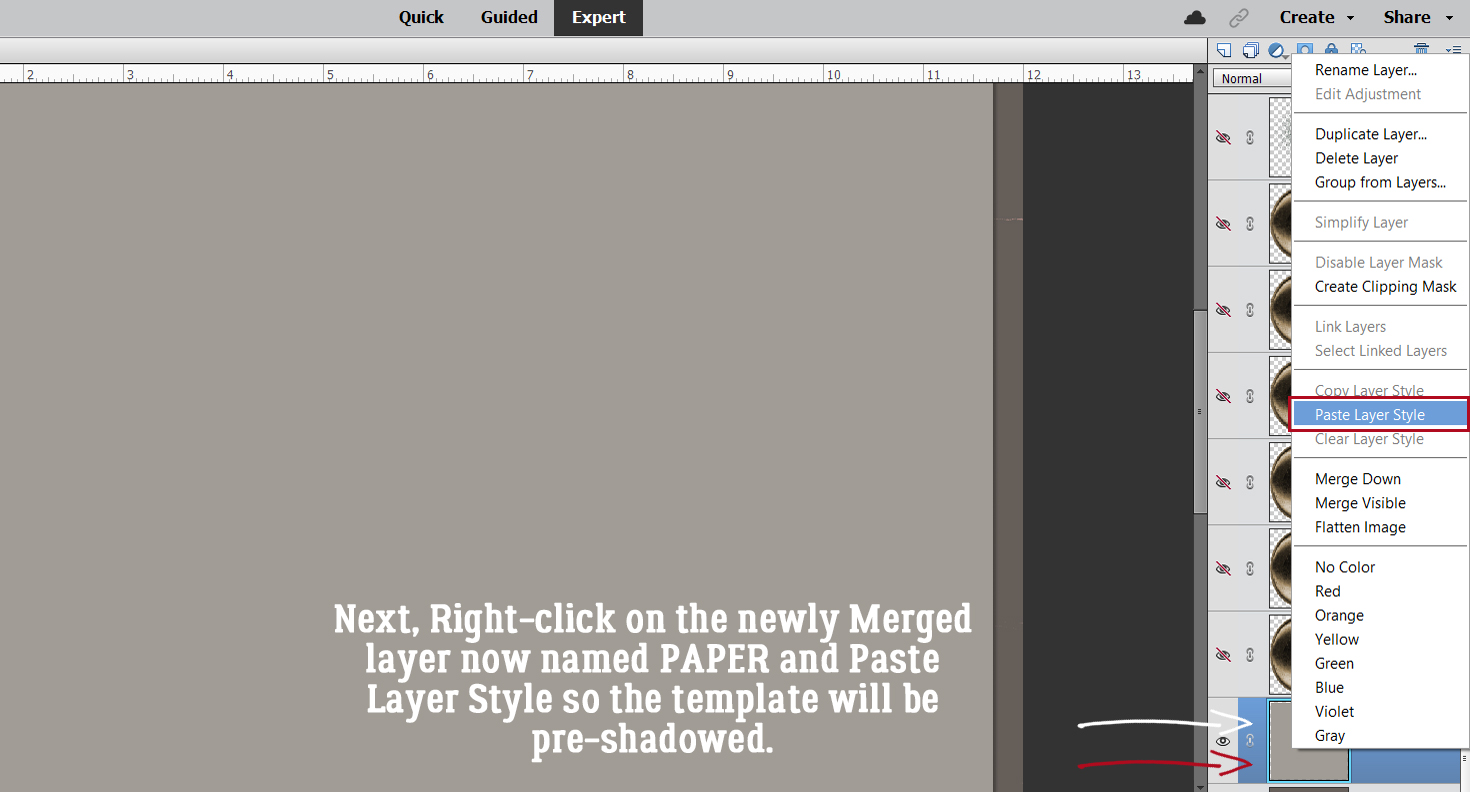
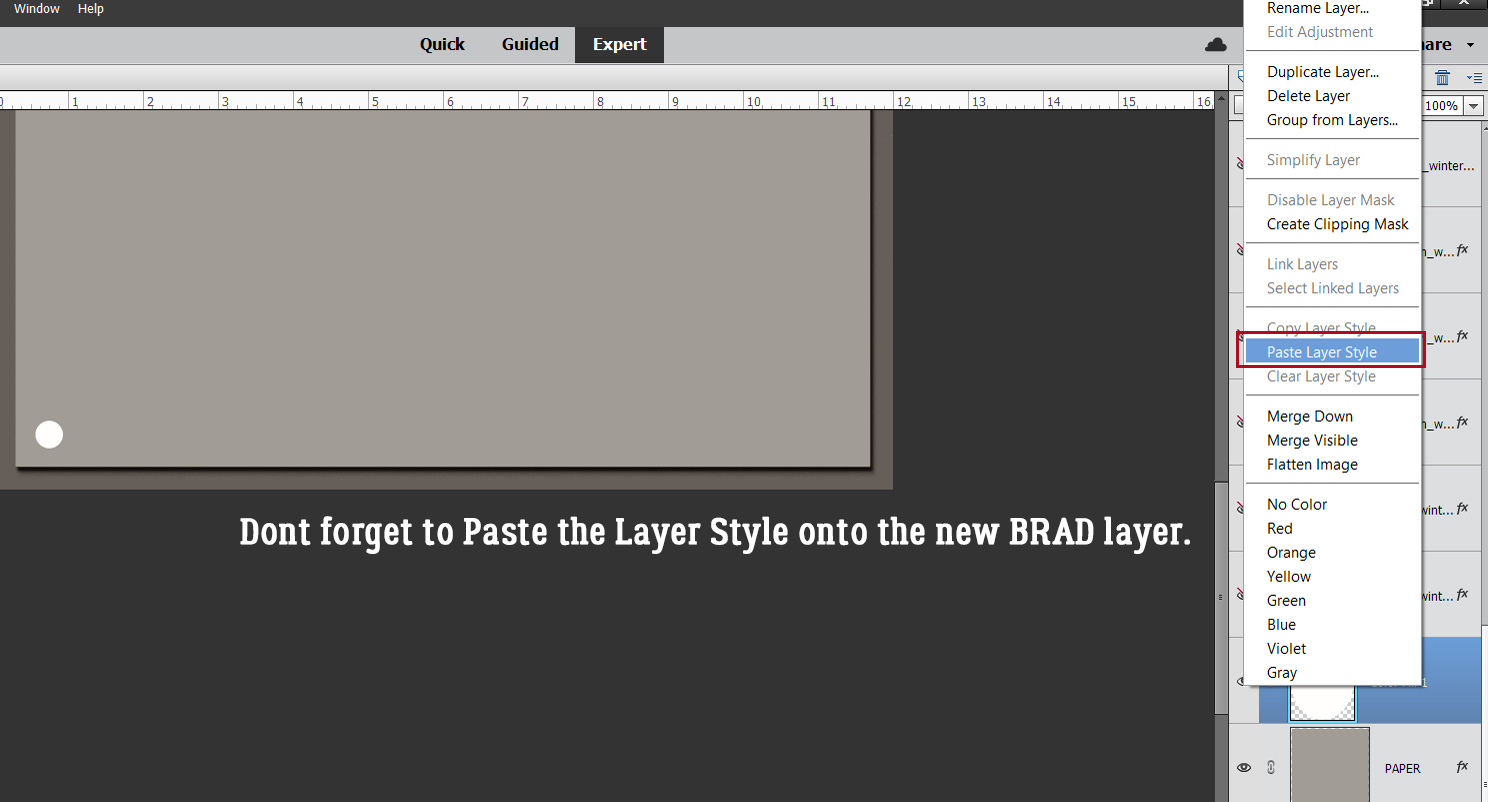
Time to add back the Shadow Style. Right-click on the layer and choose Paste Layer Style.
Now let’s do some BRADS. The process for each layer will be the same: Copy Layer Style, Clear Layer Style, Layer>New Fill Layer>Solid Color, Merge Layers, Paste Layer Style.
Merge the layers and now you’ve got a BRAD place-holder. CTRL/CMD>E
Don’t forget to Paste the Layer Style back onto the place-holder.
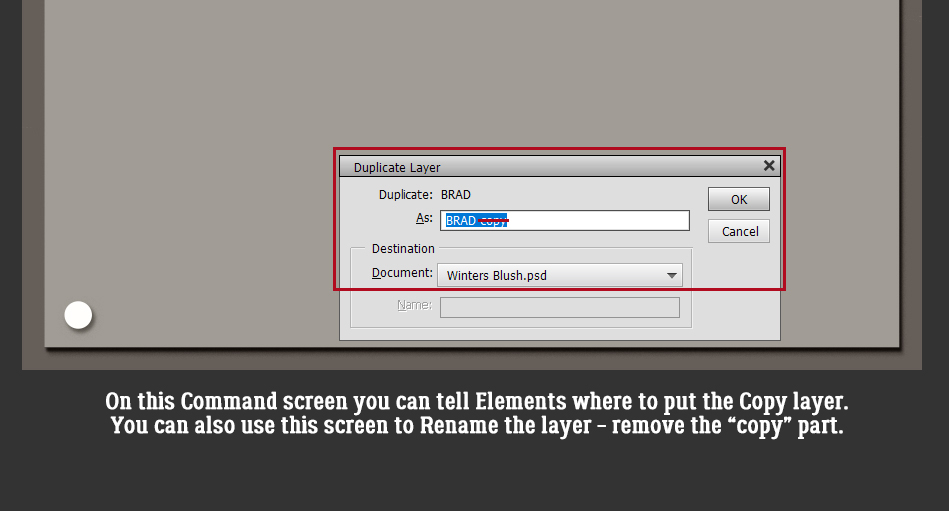
Here’s where we get into the real Work Smart Not Hard groove. When you have multiple identical elements on your layout, don’t make extra work for yourself. You’ve already done the work, now just make Copies! Either Right-click on the layer and choose Duplicate Layer or CTRL/CMD>J. When the Command prompt opens, remove the “copy” part of the name and click OK.
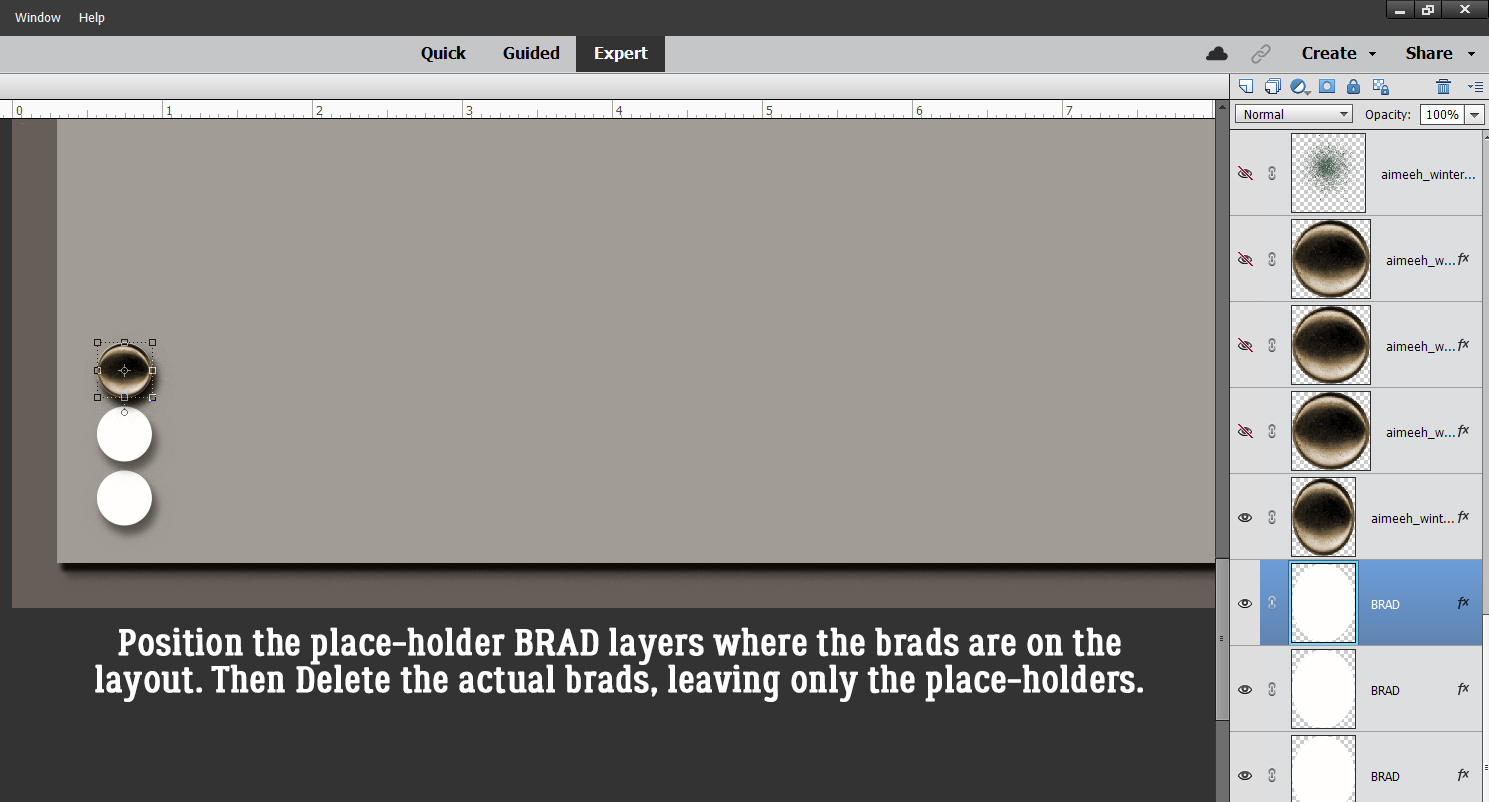
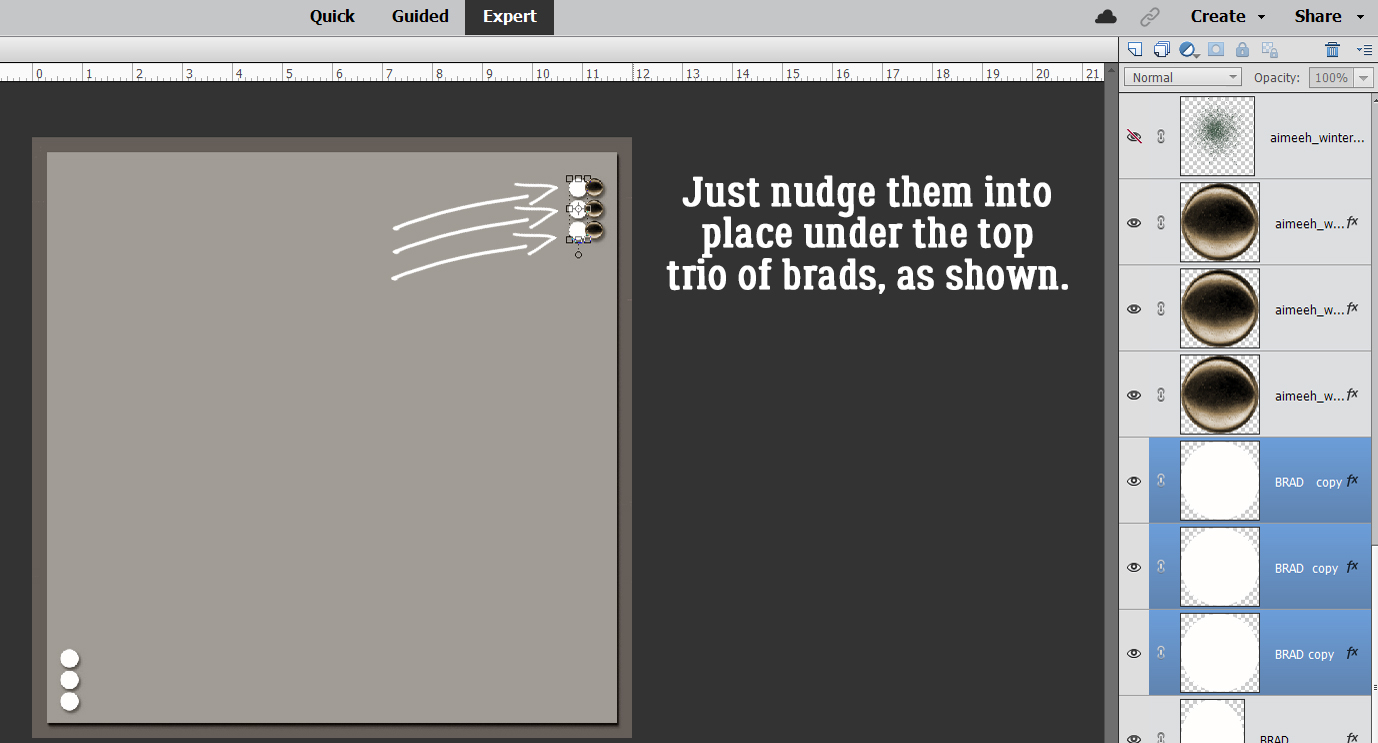
For each of the identical elements, make a Copy and move it into place. Once you’ve got them into position you can Delete the original layers. Your place-holders are on the job.
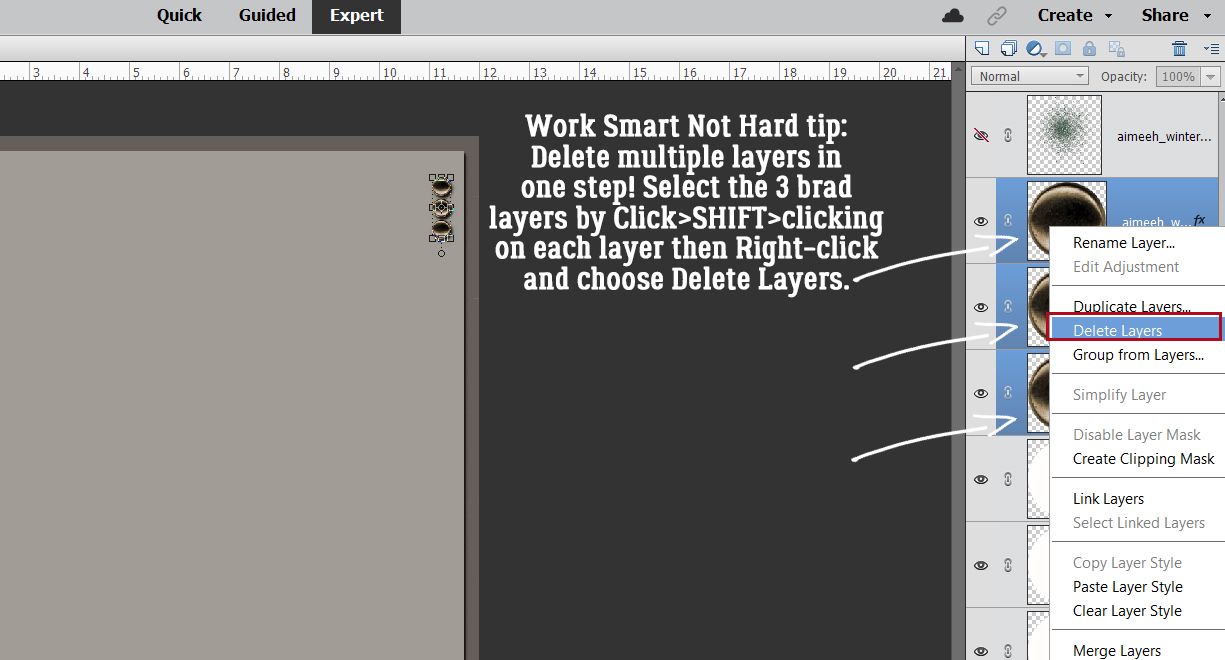
But wait! Don’t make more work for the second grouping of brads. Select all three BRAD layers and Duplicate them!!
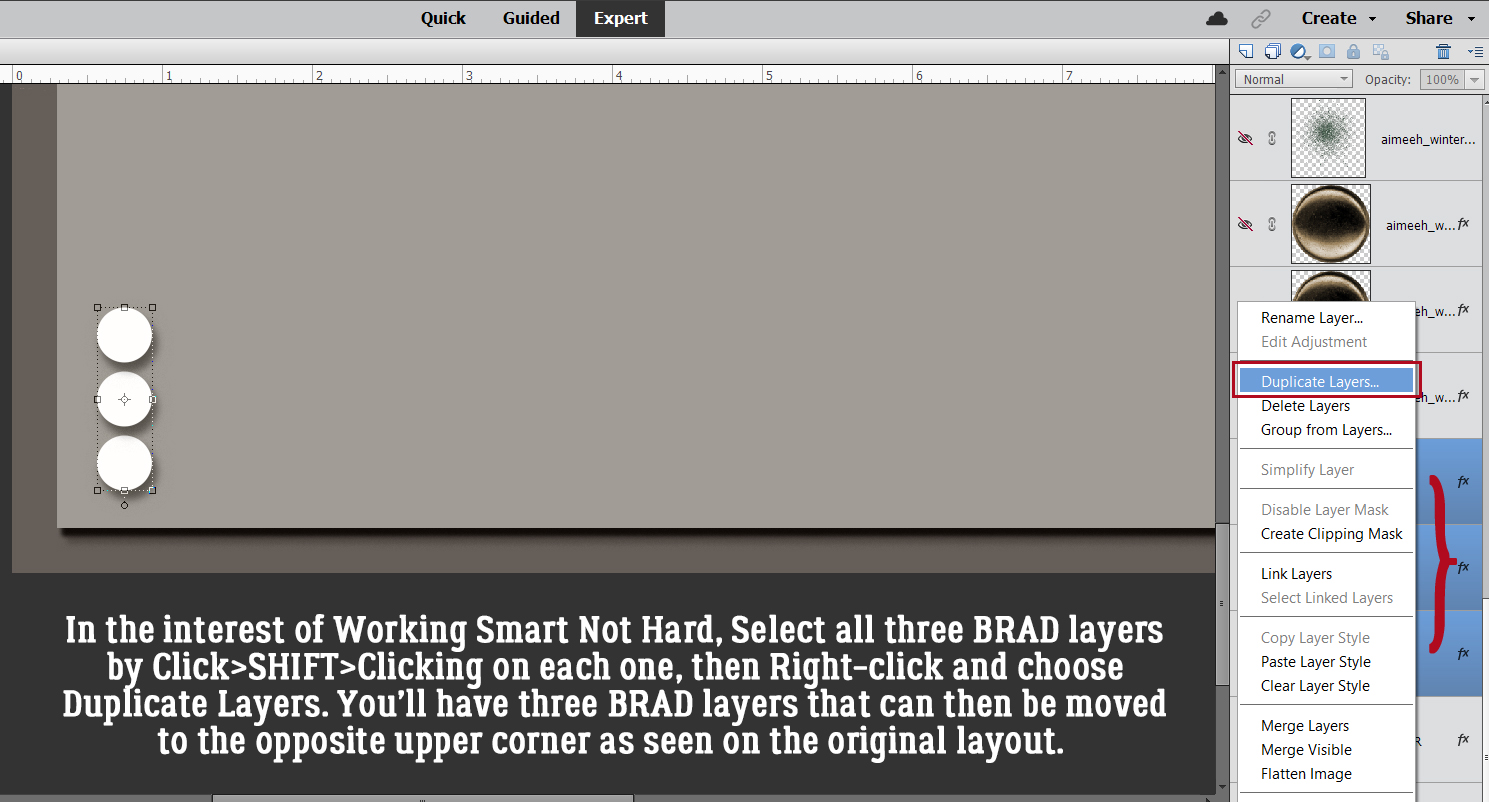
Then move the place-holder versions into position.
You can also Delete multiple layers in a single step. Select them all, then Right-click>Delete Layers or simply click the Delete key.
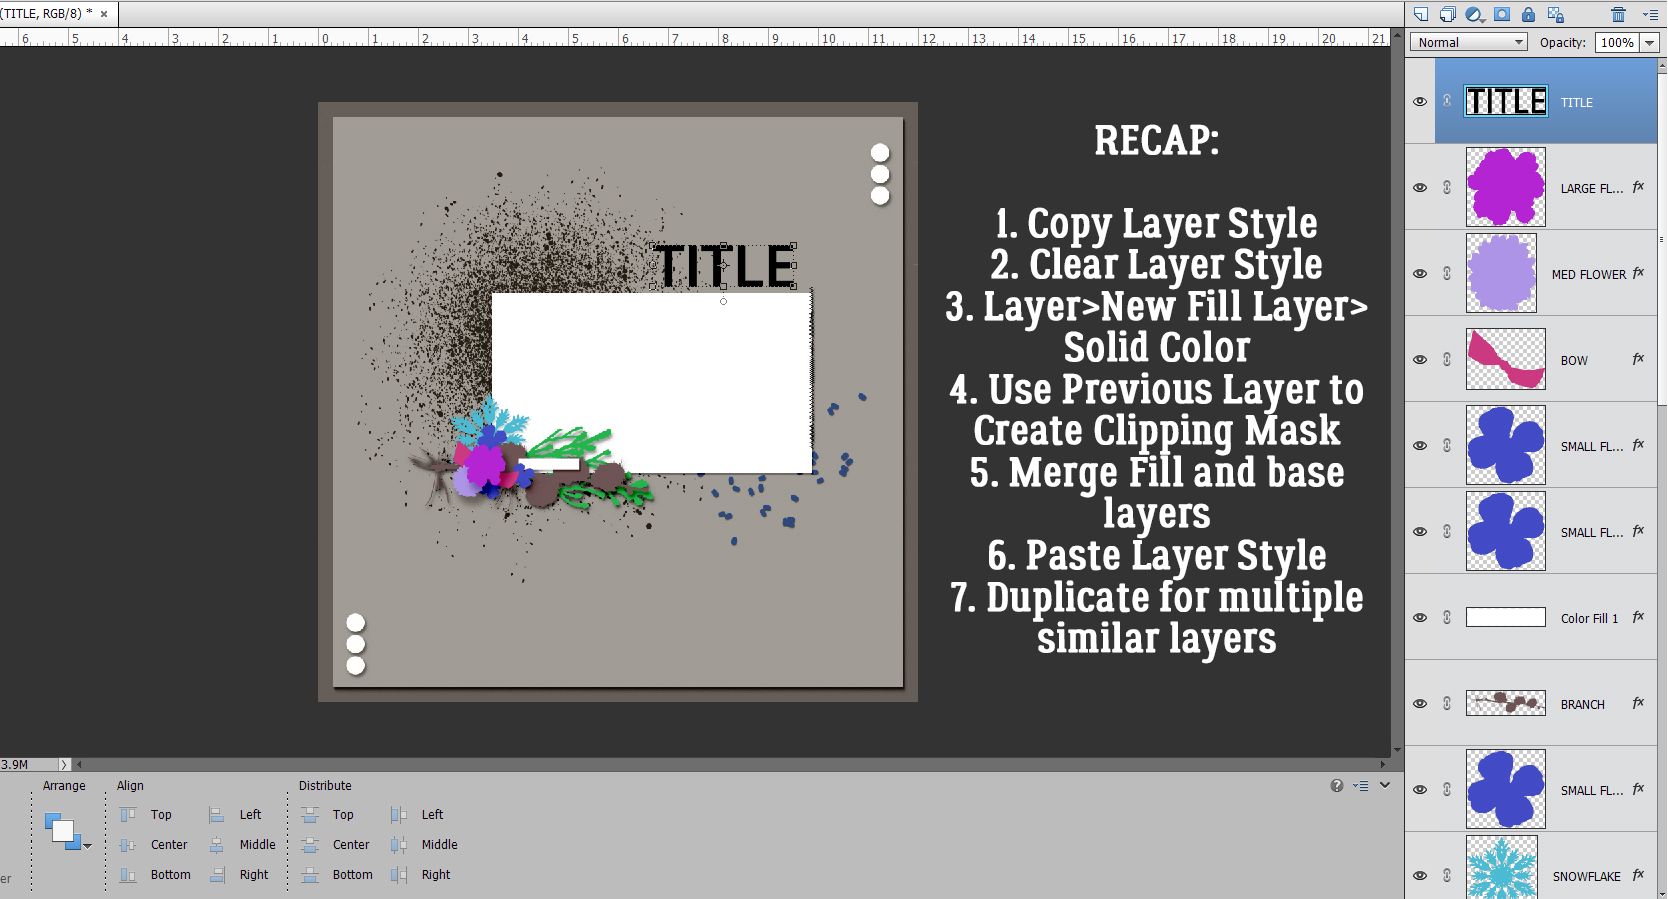
Here’s my finished template, with a recap of all the steps to create the place-holder layers.
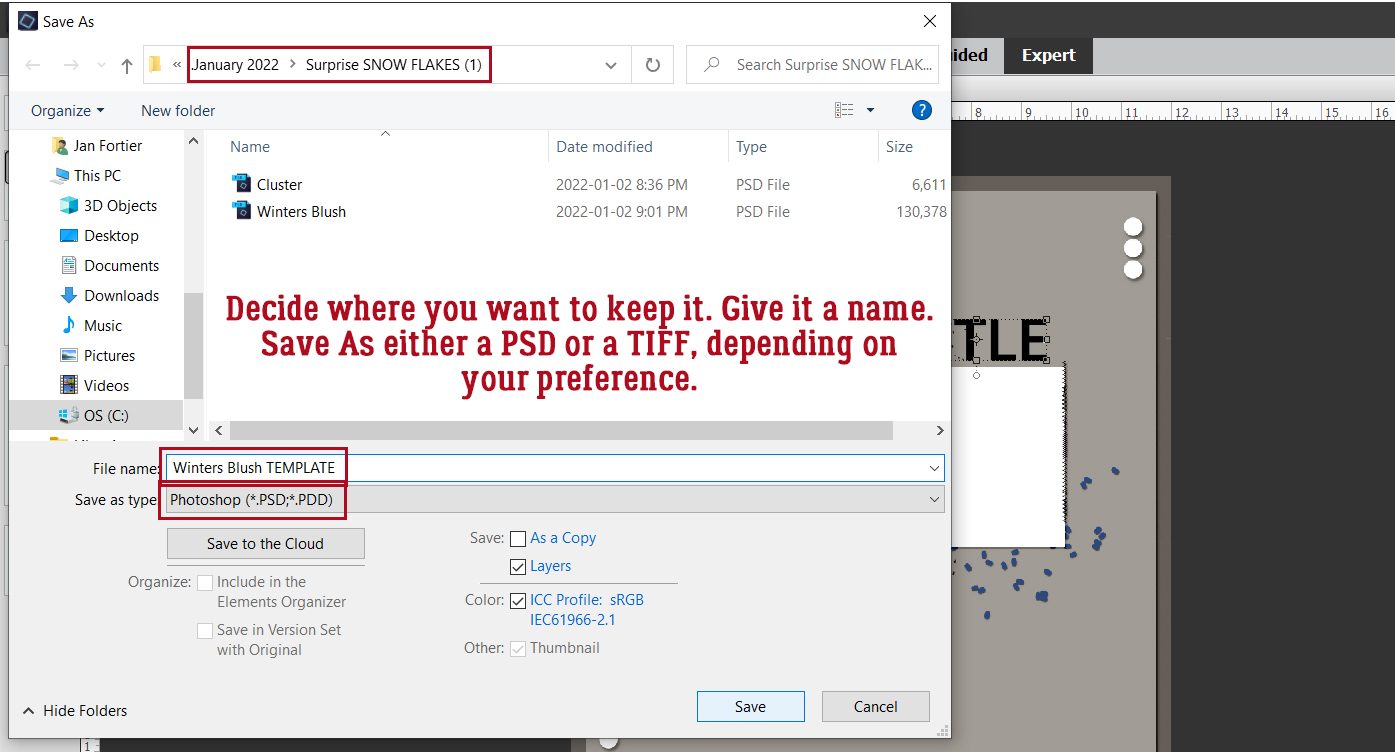
Now to Save it! You can Save As either a PSD or a TIFF, whichever is your preference. Your Layers and Layer Styles will be preserved with either format for use again whenever you want.
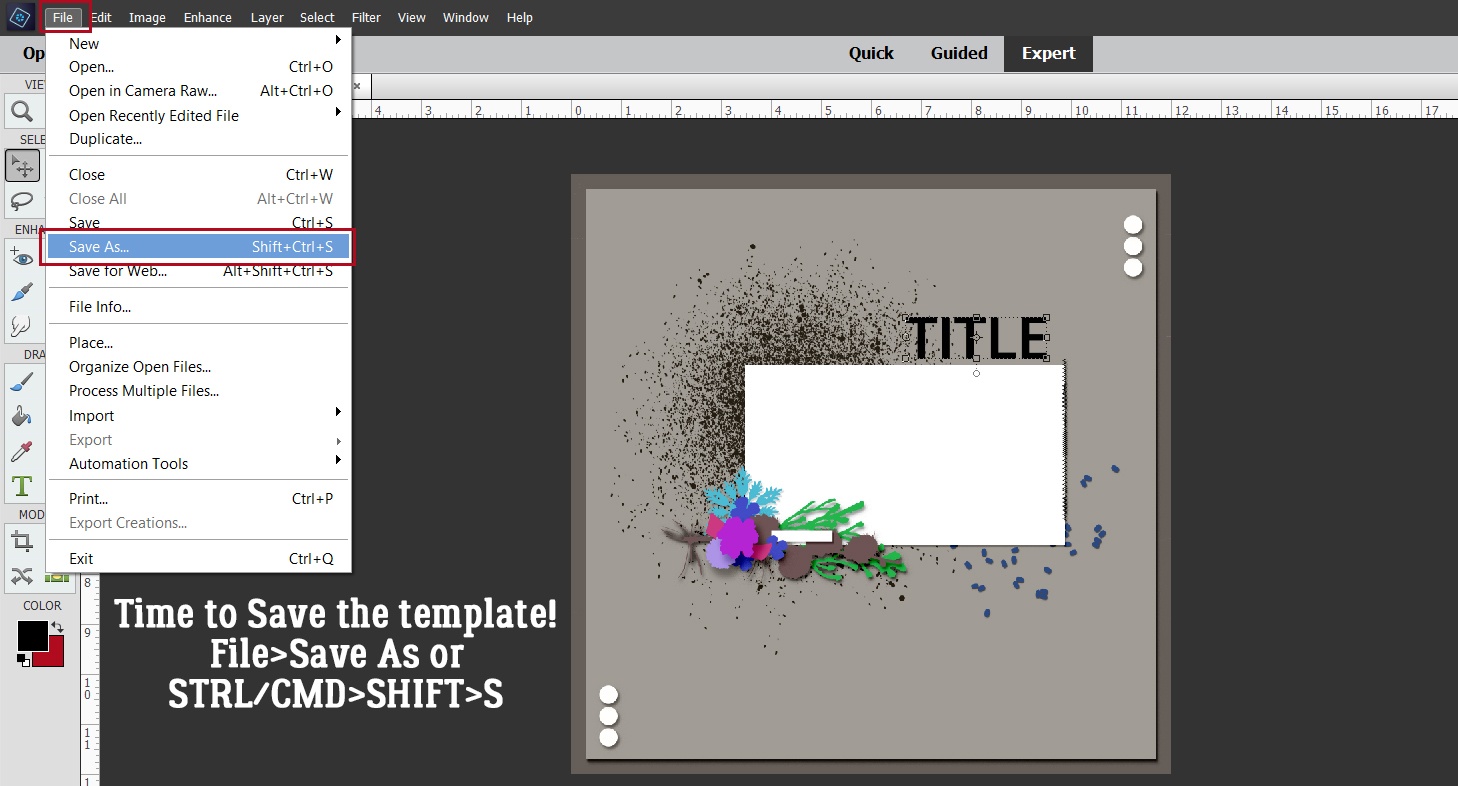
Figure out where you’re going to keep it, give it a unique name and choose your format. All done!
This is only one way of creating a template. To me it seems the easiest. Another way would be to use the Custom Shapes tool and replace each element on the layout with one that represents it. I may try that method and see if there are efficiencies. If I do, I’ll let you know!
Next week I’ll be doing a Challenge Spotlight. Did you see the new ones? How accommodating that we’ve been given so many more options!!
PDF Version: https://bit.ly/3txC2Bx
![]()
[…] 246. Build-Your-Own-TEMPLATE! […]