Using Alphas for Titles – a Technique Tweak
![]()
PDF Version : https://bit.ly/3LJ2wZo
A newish GingerScrapper whose user name is rmcd100 asked this question in the Forum:
“I am looking for a tutorial on how to easily add alphas to a layout. It seems really cumbersome inserting each letter individually and then trying to place them all on the page in a uniform manner. There has got to be an easier way than the way I am doing it.”
I replied with some links to some tutorials I’ve already posted and gave her a brief description of my workflow. But then I got to thinking about it and recognized that my technique has been fine-tuned quite a bit since those tutorials were new. I also want to be sure she understood what I was saying, so today’s tutorial is an updated alphas-for-titles workflow breakdown.
I knew exactly what she meant by “cumbersome” and could feel her frustration, because I’ve been that person! Elements can make it so much harder, because it seems to drop objects where IT wants them and not where I want them, especially the newer versions. This title technique grew out of all of that.
When I’m planning a title, I usually have an idea of what I’ll call my layout before I even choose photos, template or kit to work with. I choose the photos first, then a template that will work with the number, orientation and importance of my photos. Only then do I choose a kit. I love using alphas and have quite a stash of them so I can always count on having an appropriate one on hand. For my Back It Up Challenge layout, the prescribed theme is books/reading/library so that helped with making my choices. I opted for the GingerBread Ladies Must Love Books kit. I had 4 photos I wanted to use and chose a retired template from Connie Prince as my basic layout.

As you can see, the template’s title spot is a good-sized rectangular area, which makes the process a LOT easier! I like to work BIG, so I can see easily what’s going on; resizing later is a snap. I also like to reduce repetition if possible. So I’ve created a bunch of preset project formats: a 12×12″ Scrapbooking canvas, a 6×1.5″ Title Strip and a 6×3″ Large Title canvas are some of them. So when I click New>Document [CTRL/CMD>N] I can choose one of them. I’ve planned a two-word stacked title so I’m going to use the Large Title canvas. One important note: ALWAYS work on a TRANSPARENT BACKGROUND when creating titles with alphas using this technique.

So here’s the canvas. I’ve opened all the letters I’ll use for my title into the Photo Bin.

Then I started dragging and dropping the letters onto the canvas. Remember I mentioned that Elements does what Elements wants? Well, I can guarantee at least one letter will be out of order. It’s just a rule. 😉 Before you move on, check to see that the letters are all where they should be. Elements will stack from bottom up, and it’s easier to move one or two letters than rearrange all of them. Also take note that all the letters are aligned by the centre of the letter. That’s easy to address.

Before we continue, if you want your title to have a wandering baseline, you can skip a step – the one where we Align the letters’ bottoms. Also, if you want some letters to overlap others, you can adjust your workflow accordingly. For MY title, I want the baseline to be a single straight line. So I’ve activated all the letter layers except the “g” – it extends below the baseline and will need special attention. To quickly activate multiple layers, click on either the top layer or the bottom. Then hold down the SHIFT key and click on the layer at the other end of the stack. BINGO!

Using the Move Tool, Align the letters at their bottoms. If you don’t see the Arrange, Align and Distribute menu, click on Tool Options at the lower left of your workspace.

Now the “g” can be nudged into place. I use the top edge of another lower case letter as my guide for this part. Nudging with the up and down arrow keys is the most accurate method for this.

This is a step I’ve recently added to my technique, and it’s made a big difference. Activate all letter layers again – click>SHIFT>click – and move the whole bloc of letters all the way over to the left. The first letter of your word will be along the left border. Don’t worry about the size of the letters just yet.

Activate the very top letter layer (or the last letter in your word, if you’ve rearranged them) and using the left and right arrow keys, move it to the right until you can see the entire edge of the letter right next to it. My word is Raising; see the “g” and the “n” are no longer overlapping. Decide how much of a gap you like between your letters.

To start moving the second-last letter along with the last one, hold down the CTRL/CMD key and click on the layer. Now both letters are active and can be moved to the right until the third letter from the end is entirely visible. Pick up the third letter, the fourth letter, then the fifth letter in the same way. Move the train of letters over as one piece until they’re all nicely separated. If you have room! 😀 Now I can see that the letters are indeed much too big.

To fix that, activate all the letter layers again then estimate how much to shrink them. Then using one of the corner handles on the Bounding Box, move the handle toward the letters until you’ve got the size close enough to fitting. I’ll just go with 75% for now, and ensure I’ve Constrained Proportions.

There! All my letters are neatly spaced. Since my title is going to be two stacked words, I’ll move them all to the top of the canvas and turn off Visibility to eliminate distractions. Click on the little eyeball icons.
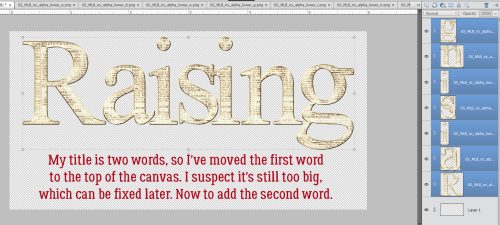
I took a little detour here. My title is alliterative, so I want to see how I like it with just a single GIGANTIC “R” at the beginning of each word.
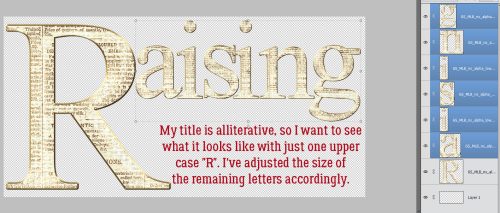
I’ll use the same drag-drop-align process for the second word. I’ve got “eaders” here to go with my giant R and have ensured the letters are in the correct order.

None of these letters extend past the baseline so I can Align all of them. Then, while they’re all still active, I Resized them to the same 75% I used before. They may need further adjustment later.

Hmm. Let me show you another way to make the title fit inside the canvas by Resizing the Canvas! Image>Resize>Canvas Size… or CTRL/CMD>ALT/OPT>C

The dialog box shows the Current Size, New Size, Anchor point and Canvas Extension Color. I want to make my canvas wider, but the height is fine. Remember, the background must be transparent here too.

I’ll just change that “6” to a “7” and make any tweaks as needed.

Alrighty. Everything fits on the canvas but it doesn’t look right yet.

So I activated all the letters for “aising” and moved them in a group to the left. That looks better.

***If you’ve chosen to have your letters overlap, you’ll need to add shadows to your individual letters at this point. You can later shadow the whole title on the layout but where those letters overlap, the shadow style isn’t going to get the overlapping areas and it’ll look funny.***
Now to get the title onto the layout! If you don’t think you’ll need to do anything other than some resizing, you can activate all the layers [click>SHIFT>click] right-click and choose Merge [CTRL/CMD>E]. Then the entire title is a single layer and can be dragged and dropped onto your template/layout.

Alternatively, you can choose instead to Link Layers… but you’ll still only be able to resize it on the layout.

All that’s left is to slide it into place, adjust the size to fit your chosen space and make any other minor adjustments you want. Add a shadow to your title layer and you’re done! It sounds like a long process but you’ll be surprised how well it flows and once you’ve done it this way a few times, you’ll never go back.
Next week is the Challenge Spotlight. Will you see YOUR layout here? Swing by and see!!
![]()


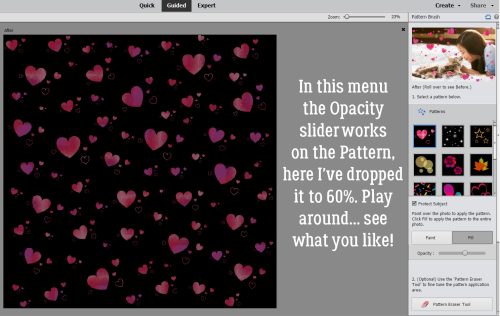


 In Expert mode, you can see the new layers Elements has added to the paper. The top and bottom layers are the only ones that matter. You can activate that pattern layer at the top and add a Layer>New Fill Layer>Solid>Clip to change colour, or you can play with the Blend Mode for that layer to see what works best for you.
 Here’s a close-up of the pattern so you’ll easily see the Blend Mode change.