Magical Scraps Galore


The year is just winging by, isn’t it? It was my great pleasure to chat with Marina, aka Magical Scraps Galore, over a cold drink recently. It’s her turn in the GingerScraps Designer Spotlight so let’s get to know her better.
J: Let’s start with the bread-and-butter stuff. How long have you been designing?
M: I’ve been designing for 11 years now!
J: That’s a long time in the digi-world. What made you decide to design?
M: I started creating my own digital papers and embellishments for scrapping our second trip to Disney World, since the digital offerings were very limited back then. It didn’t take long to realize that scrapbook design was my passion, and I started participating in the design challenges hosted by MouseScrappers. I opened my first shop in 2013 and I’ve been part of the wonderful GingerScraps family since 2014.
J: There’s nothing better than creating exactly what you want but can’t find. What tools do you use to create your designs?
M: I use Photoshop, Illustrator, Procreate and ArtRage.
J: Kudos to you for blending all those platforms! I have enough trouble with just one. Can you describe your design workplace?
M: I design in my studio at home, with my two cats sleeping by my computer or on my lap. Sometimes they like to sleep ON my computer and they mess with my designs, LOL! I have to be very careful!
J: Too funny! My dogs see me pick up my laptop and go somewhere else. What kinds of things motivate and inspire you as a designer? I mean, other than Disney… 😉
M: My main motivation and inspiration are my kids and my trips around the world.
J: Those two things seem to be the launch pads for many of the designers I’ve chatted with. What is your favorite kit currently in your GS store and why?
M: It’s hard to pick just one, that’s mean, it’s like choosing your favorite child, LOL … I have several kits that I love, especially my travel collection, but one of my favorite kits is Magical Memories, it’s all about my happy place and it’s a reminder of all the magical moments I spent there with my family.

J: That’s how I feel about Ireland. I’d move there if I could! If you were given a super power, what would you like it to be?
M: Teleportation, so I can travel anywhere in no time and with no jet lag!
J: Wouldn’t that be amazing?! I used to wish I could teleport home from work after my 12 hour night shifts. Have you ever met anyone who’s famous?
M: Yes, I met Tom Felton (Draco Malfoy in the Harry Potter films)
J: I’m not much of a HP fan, but I know who he is. That must have been a special moment. You clearly enjoy things that relate or appeal to children. What did you want to be when you were small?
M: I wanted to be a flight attendant or a rock star.
J: I can’t sing or play an instrument so I never dreamed of being a rock star, but I did want to be a flight attendant for awhile. They work pretty hard and put up with a lot. I think my sarcastic evil twin would take over and I’d be fired. If you had a warning label, what would yours say?
M: Warning: Crazy cat lady!! LOL! I’m a huge cat lover, and if my family would let me, I’d have 10 cats or more!
J: Ooh. That would be overwhelming to me. I have enough trouble keeping track of two dogs. Thank you so much for taking the time to visit with me; I’m just going to fill our readers in on all the awesome August goodies you’re a part of before I finish up.
Of course, Marina is hosting the Designer Spotlight Challenge this month. She’s also the Daily Download Diva for August, so make sure you look for the links here every day or two. (Links are active for 5 days, so you can condense your time:effort if you want to.) If you don’t have time or miss some pieces, the kit will be for sale next month in the Shop. AND… Marina is permanent host of the monthly Surprise Challenge! If all of that isn’t enough, she’s offering a lovely coupon that’s good for the whole month. Be sure to check all of this out. You won’t be disappointed, I promise.

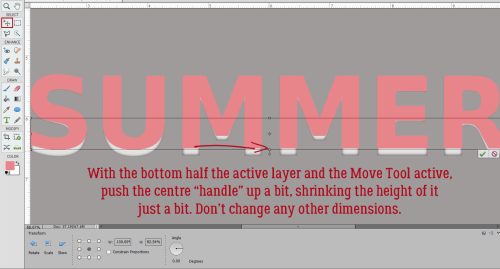
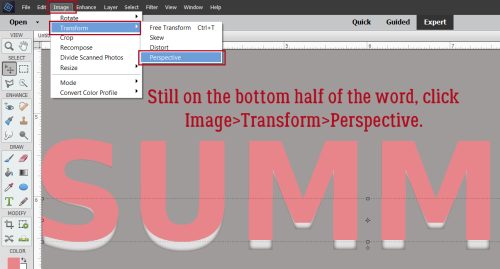
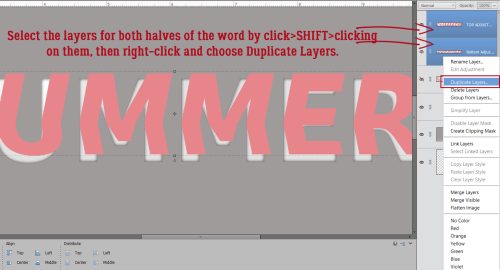
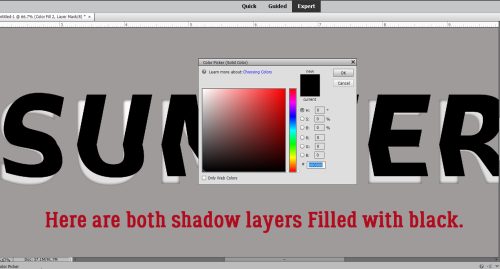
![]()