Tutorial Tuesday (Photoshop Elements)

Effect? Affect? What’s the Difference?

Today’s tutorial has some common elements with last week’s. I’m going to show you how to turn a photo into a work of art, and to blend it into a layout. But that’s where the similarities end! I played around for quite awhile before I got the look I was after, but lucky for you, I kept track of what I did so you can skip the experimentation and go right to the good part.

There are so many ways to make Photoshop Elements do fantastic things. I first played with the Filter Gallery, but didn’t get what I wanted. So then I started looking at the Effects Gallery. There’s where I found the pot of gold.

First I made a copy layer of my photo. (I actually tried to work right on the background photo layer but didn’t like where I ended up – no control!)

Then I clicked on the Effects button down at the bottom right of the work space. From the Effects Gallery I chose Vintage and then Pencil Sketch. (Yes, I’ve done a couple of sketch tutorials before, but this one is different. And a lot easier!)

One click and this is where I went.

Elements has created another Copy layer and then added the Sketch effect to yet another separate layer.

I tried out each of the Blend Modes until I found one I liked – Hard Light. It brought back some of the colour but kept the sketchy look.

I made another copy, of the very topmost layer and it lightened up the image and blew out some highlights.

Blend Mode change to the rescue! I changed it to Multiply, and got a really arty looking image. I Merged all the layers and saved my new image as Sketch Edit.

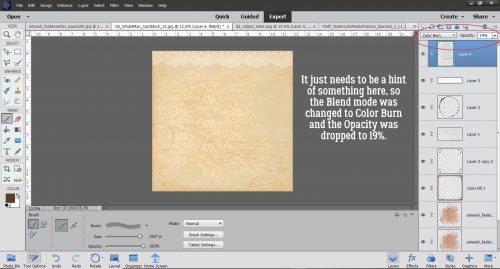
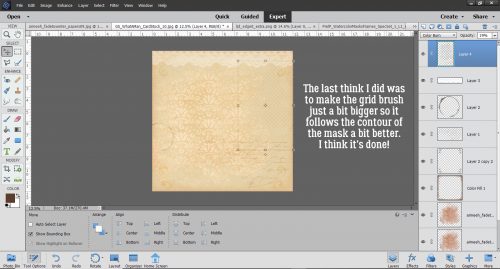
I don’t think anybody can guess what I did when I added the Sketch Edit copy of the photo to this blended template from Heartstrings Scrap Art. I decided to try some Blend Modes and settled on Luminosity. I love how it turned out.

I hope you’re having as much fun as I am when you try my techniques. But I feel it’s only fair that I let you know I may be MIA a bit in the next while. We’re closing on our brand-new house (in another province) next Tuesday!! It’s been a long haul since we signed the construction contract, and in some ways it feels a little surreal now that it’s finally done. We’ll be out of town tying up all those loose ends next week but I’ll try to have something for you for the following week… even if it’s just photos of the new house. We won’t be moving for a few weeks yet, and I’ll make sure you have a heads-up for that. Thank you for supporting me in this amazing hobby we share!


Sneak Peeks February 6th 2020

Happy Thursday! Our designers have some great new releases to get you in the mood for Valentine’s Day. Let’s take a peek!

From Miss Fish

From Down This Road

From Tinci

From Lindsay Jane

From Dagilicous

From Craft-tastrophic

Tutorial Tuesday (Photoshop Elements)

A-Tinting We Will Go 

How did it get to be February already? The older I get the faster time flies. The last week has really kicked my butt, let me tell you. So I thought we’d try something very simple but incredibly beautiful today. I love this photo (from Pixabay) but I think it could be even prettier in black and white. With a little hint of tint…

In Photoshop Elements there are several ways you can convert a colour photo to black and white. Probably the easiest is to click on Enhance>Convert to Black and White (CTRL/CMD>ALT>B) as shown. Or you could use Enhance>Adjust Color>Adjust Hue/Saturation then pull the Saturation slider all the way to the left. But… using the method shown gives you some added options that don’t involve fiddling.

When you use the Enhance>Convert to Black and White tool, this menu opens. The default setting is for Scenic Landscape, but there are multiple style options you can choose from.

There’s a slight but visible difference when I change the style to Portrait. The image is a little sharper and the contrast is a little higher. For this technique, that’s perfect.

I plan to blend this photo into the paper shown below. It’s from January 2020’s Daily Download, Toujours from Key Lime Digi Designs and The Cherry on Top. I’m going to choose a colour from it to tint my photo.

I decided that the soft green would be lovely, so I grabbed my Eye Dropper tool and clicked on the spot shown.

Next I clicked Layer>New Fill Layer>Solid Color. The green that I chose is the foreground colour so it will be the colour used.

I made sure the Use Previous Layer to Create Clipping Mask was selected.

The Color Picker still opened so I had the chance to verify the green is what I want.

And there it is… the Fill Layer. Now what?? As you can see there are two separate layers there, with the colour layer on top. I changed the Blend Mode to Color.

If you’re of a certain age, you might remember the days when the colour on those old tube TVs would go wonky and everything was really green. Look familiar?

So I lowered the Opacity of the Fill Layer to 51%. Now there’s just a faint green glow.

I had already chosen a masked template that would work nicely with this photo. It was a freebie from Promethean Concepts in the A Love for Layout Templates Facebook group in December 2019.

Here’s a tip for ensuring the part of your photo you most want included within a mask makes it onto your layout. Rather than dragging and dropping it ON TOP of the mask, clipping and fiddling with it, try dragging and dropping it UNDERNEATH the mask and moving it around.

It isn’t exactly perfect, and I know I don’t want any harsh edges visible. I didn’t know this trick until just recently, but when using a mask like this it’s possible to use the Clone Stamp tool to extend a photo out to the edges of your mask.

I wanted more of the pearls and her hair inside the mask, so before I started playing with the Clone Stamp, I clicked Image>Transform>Skew to adjust the shape of the mask just a bit by pulling the lower left corner down and to the left, the lower right corner just over more to the right.

Then I moved the photo layer ON TOP of the mask and clipped it in place. I’m going to Clone the window, curtains and the top of her head to cover up all that pink that’s still visible from the mask. Once I’ve done that, I’ll use the Healing Brush tool to make the Cloned areas less obvious.

And there’s my finished blend. I’m pretty pleased with it, and with how little time it actually took to get the effect. I’d say 20 minutes, tops!
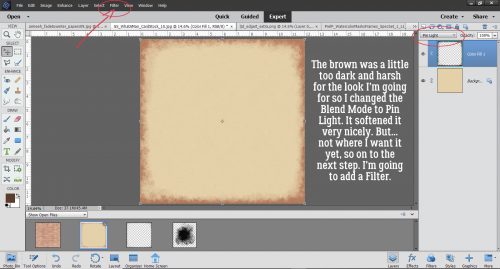
My finished layout looks like this:

Will you give this a try? Shout-out to Ulla-May for the inspiration.

Sneak Peeks January 30th 2019

Happy Thursday!! We are almost one month down! Our designers were not only busy with Friday’s releases, they have a brand new Buffet for you on Saturday! Let’s take a peek!
From Snickerdoodle Designs

From Aimee Harrison

From Heather Z

From L Drag

From Down this Road

And here’s a little peek at the new Buffet!

Tutorial Tuesday (Photoshop Elements)

It’s a Total Eclipse!

Greetings! As promised, today I’m going to show you a paper-to-digi technique that CalGirl (Steph) brought to my attention. It’s called the Eclipse Technique, and I’ll tell you, the digi version is a LOT less work than the paper one. To get this effect with paper, first the letters need to be cut from the foreground paper. Then several layers of each letter are cut from the background paper, stacked and glued together onto the back of the foreground paper letters. Then some foam adhesive pieces are added to the bottom of the stack, the stack is stuck into the cut-out areas and it looks like this card created by Amy Koenders from Stampin’ Up. It’s a really pretty look, and so simple to obtain digitally.
I think the best choice for a background paper for this technique will be a solid, but a paper with a tiny print might work well too. To look really fabulous, the foreground paper should have some sort of design. In the card image above, the pine branches and cones were stamped onto the foreground paper. Digitally, that’s a step you can skip unless you really want to do it. When you see my finished layout you’ll know how I went on that. I planned to use a template for my layout so I did the process with the papers I planned to use, in the way I planned to use them. The solid is from the GingerBread Ladies Warm and Cozy January gift-with-purchase collab, and the foreground paper is from Ilonka DesignsRejoice kit.

The font I used is called Amadeust Regular. Choose a font that has some oomph to it, so you get the full effect. (Although we’re not gluing together skinny little strips of paper so I bet it would be fine to go with something more scripty or delicate too.) Make sure you have two copies of your foreground paper before you go on to the following steps. Turn the visibility of your top layer off so you can see what’s happening.

You can use any colour you want for your text because that layer is going to be deleted later. This it the title for my layout. At this stage, your text layer needs to be underneath your lower paper layer; I’ve made it visible here just for clarity.

Now Select your text by CTRL/CMD>clicking on the Layer Thumbnail. That will turn on the marching ants.

Make sure your active layer is the lower paper layer now. You’re going to Edit>Cut the text out of your lower paper layer. Keyboard shortcut for this is CTRL/CMD>X.

With both the text layer and upper paper layer visibility turned off, you can see the background paper through the “holes”. When you add a drop shadow to that upper paper layer, the appearance of your cut-outs will change.

If you want to, you can move your text layer up to just underneath the upper paper layer, but it’s not essential. Again, Select the outline of your text the same way. CTRL/CMD>Click on the text layer thumbnail. But this time we’re going to shrink the selected area just a tiny bit. Select>Modify>Contract is shown.

In the dialog box for that task type in the number 2, which will move the marching ants toward the centre by 2 pixels. It doesn’t have to be much, just a wee little bit.

The next step is to Invert the Selection. Select>Inverse or CTRL/CMD>shift>I.

With this step we’re going to cut away everything BUT the letters themselves. Edit>Cut or CTRL/CMD>X.

Aha! See the red outline of my text? That’s exactly what I wanted to see.
The original text layer has served its purpose, so you can go ahead and delete it, or simply turn it off.

I made a copy of the INSIDE letter layer and will be working on the very topmost layer in the next step.

Here’s the fun part. We’re going to apply a Bevel Style to that topmost layer. Click on the Styles button at the lower right of your workspace and choose Bevels from the Styles menu.

I tried almost all of the Bevels on for size before settling on the Scalloped Edge style shown below.

It’s not exactly what I was looking for so I made some adjustments.

To adjust any Style or Effect on a layer, double-click on the fx to the far right of the layer in the layers panel. The menu box has several options you can change. I adjusted the Lighting Angle to 120°, which is the angle my template uses. The default setting for Bevels is 21 pixels, but that’s not the look I want so I decreased the amount of Bevel down to 5 pixels.

Then to make the offset look a little more obvious, I added a solid colour Fill Layer in the same turquoise as my background paper to the bottom letters-only layer. Layer>New Fill Layer>Solid Color.

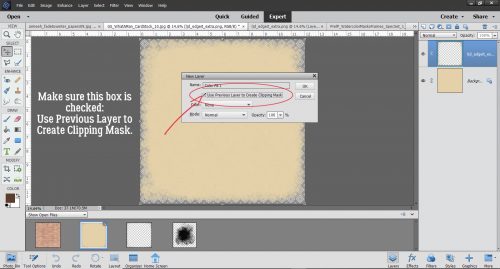
Ensure the box next to Use Previous Layer to Create Clipping Mask is checked and that the Opacity of the fill layer is 100%.

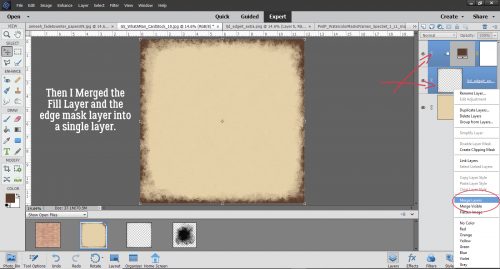
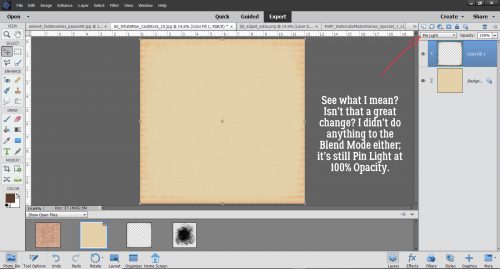
Then I Merged the two layers together.

Here the only layer not visible is the original text layer. I think it looks pretty awesome! I know it seems like even more work than the paper version, but it’s an illusion. Explaining it all makes it look like more work than it is.

When I put my layout together, I decided to add some brushes and some glossy glitter to the patterned paper layer. See how the white brush crosses the edge of the “O”? I love this technique and I think I’ll be using it a lot more.

Thanks Steph!

Sneak Peeks January 23rd 2020

Happy Thursday!! Our designers have a ton of new goodies for you this week! Let’s take a peek!

From Scrapping Serenity

From Tinci

From Neia

From Aimee Harrison

From Jb Studio

From Lindsay Jane

From LDrag

~~January Featured Designers~~

I know – it’s almost the end of January and I’m just now getting this posted. I don’t know about anyone else, but work has been absolutely crazy. I’ve worked enough hours the last two weeks to take a full week off. If only it worked that way.

I had the pleasure to have The Cherry on Top and Key Lime Digi Designs answer my questions. Let’s see what they have to say.

How long have you been designing?

TCOT: I’ve been designing around 5 years.

KLDD: Summer 2013

What made you decide to design?

TCOT: I’ve always loved being creative on all kinds of medium since I was kid. I went from a full time professional to a stay at home to take care of my handicapped sons and I needed some other fun outlet to feel whole.

KLDD: I was on many Creative Teams and Store Team at a large digi site starting beginning around 2007 I think….After a while I picked up enough knowledge and increased my skill set to want to try the next step.

What do you use to create your designs (program, additional tools, etc.)?

TCOT: I use PSE/PS/Procreate/a sketch book.

KLDD: I am still using the out of the box software from right before Adobe moved to subscription. As the saying goes, If it ain’t broke…

Describe your design workplace.

TCOT: Disgustingly neat and tidy. I cannot concentrate in a mess. A glass of wine or tea is as reckless as I get!

KLDD: Organized chaos. I am absolutely terrible at putting away and organizing. I constantly make “digital” post it notes to remind me to do something and then forget about it. I have 3 EHDs that I promise myself will be THE ONE that gets organized. As for my work space, I have from the beginning, and probably will always remain a desktop gal. I can’t do laptop.

What motivates and inspires you as a designer?

TCOT: Absolutely everything! Beauty is everywhere. In a cloud formation. The way the sun reflects on a gently flowing river. The cat napping in just the right position…

KLDD: I love good color harmony, so when I see it on a blouse at a store I will snapshot it or at least make a note of the colors that were in it and run home to make a palette of it.

What is your favorite kit currently in your GS store and why?

TCOT: Awe, man! It’s just cruel to make me choose! My favorite template pack, (I assume you mean our own and not another designers?) would be the Planner series. I really dig those realistic, mock up types of pages, currently.

Link to all of the Planned templates: https://store.gingerscraps.net/search.php?mode=search&page=1&keep_https=yes

KLDD: I Belong to the Sea. When I was making it, I was in my element. I live in a coastal area, actually on an island chain, so I guess while making it was like being home. Bonus factoid: That collection began with the colors in the Little Sailor Boy Tin element. A close second though, has to be Indigo Serenade..I mean you gotta check out the CT Layouts on that one. They make me swoon.

What was your first job?

TCOT: I worked at AARP everyday after school, weekends and summers. I started at 13.

KLDD: Counter girl at a deli…hated it and never did food service again…LOL!

Have you ever met anyone famous?

TCOT: The list is very long. I lived in Florida where many famous people can be found and I also worked as a bartender in a huge, popular club not too far from NYC. I guess the biggest names might be John Cougar, John McEnroe, Dawn Wells, Green Day, The Ramones, Hootie and the Blow Fish…

KLDD: I would say quite a few, especially because they are here to relax. The latest one was Norbert Leo Butz. He played the middle son in Netflix’s Bloodline (filmed here in the Keys) and was in original cast of Wicked. He joined the local guys at a jam one night about 3 years ago. He can sing! It was great to be in a small audience of 15 or so people.

What are you reading right now?

TCOT: I’m a super geek. I usually ready between 3-5 books at one time. Half fiction, the other half…dork material. Currently, on my nightstand and in the John is Outlander (#4), The 4th of July, The Great Cholesterol Myth and Marijuana Horticulture.

KLDD: I have been reading a series on the kindle- The Peridale Cafe Mysteries by Agatha Frost. They are easy to do in small bursts and am awaiting Book 20.

What is your favorite quote?

TCOT: “And in the end, it’s not the years in your life that count. It’s the life in your years.” Abraham Lincoln

KLDD: “I’ve learned that people will forget what you said, people will forget what you did, but people will never forget how you made them feel.” Maya Angelou

What is something you want to do in the next year that you’ve never done before?

TCOT: I’d love to stop shouting. Next year, any year…I’ve never gone a day without shouting.

KLDD: Become wealthy..haha.

You have your own latenight talk show, who do you invite as your first guest?

TCOT: Ozzy Osborne! He’s a riot!

KLDD: Jason Momoa (Aquaman) would be a fun personality to kick off with.

If you had to delete all but 3 apps from your smartphone, which ones would you keep?

TCOT: I’d need a phone with apps first…

KLDD: Email, banking and maybe one game.

If you could have someone follow you around all the time, like a personal assistant, what would you have them do?

TCOT: Take the darn dog out every time he wants to go outside!

KLDD: I would not as such, but I would welcome a “collaborator”. Life is a learning opportunity meant for sharing.

Would you rather travel back in time to meet your ancestors or to the future to meet your descendants?

TCOT: Family…I’m an ocean away for a reason…I’d rather just stay right here and deal.

KLDD: BACK-remember the disappointment Marty McFly had seeing his self-centered kids…LOL!

What commercial jingle gets stuck in your head all the time.

TCOT: “When it’s time to relax, we’ve got the beer. Miller Beer! If you’ve got the time, we’ve got the beer.”

KLDD: None, really

If you could turn the ocean into a liquid other than water, which one would you pick?

TCOT: Check out last answer…

KLDD: I would not want to take from the sea creatures, so instead how about a kiddie pool of margaritas, like in The Last Man on Earth.

Such fun answers. Thank you ladies so much!!

Want to stalk them? Here are all the details:

The Cherry on Top: GS Store, Facebook Fan Page, Blog

Key Lime Digi Design: GS Store, Facebook Fan Page, Facebook Group

And make sure to grab the Daily Download. I know it’s late in the month. If you have missed the beginning links, you can always grab the full kit in the store next month.

Thanks for hanging out with me tonight!!

Tutorial Tuesday (Windows and Elements)

Following Up for Donna

Last week’s organization tips drew some great comments. Many of you have good systems for sorting and retrieving your digi goodies. But… there are some things that still prove elusive.

Donna had this to say: Dragging from all different folders from the finder is a pain in the ***, it was so much easier dragging from the searched results in photos.. Because I usually copy the files I plan to use and place them in a subfolder of my digiscrapping master folder, I hadn’t worked out a trick for that process that might streamline it a bit for those of you who prefer to drag-and-drop right from your folders into your scrapping software. Read on!

First I’ve shown my folder method using the search box in Windows. (Sorry, I’m not a Mac girl so I don’t have any tips for that platform.) I ran a simple search for “buttons“. The search box is at the upper right of the window and the progress bar runs from left to right as Windows does the work for you.

Once the search was done, I selected 4 buttons with a similar colour scheme, from 4 different folders. Remember, to make multiple selections, hold down the CTRL/CMD key while you’re clicking on the items you’re choosing.

Next, I Copied all 4 of the buttons.

Finally, I Pasted those buttons into a new Button folder I’d created within my Digiscrapping folder. Now, when I’m ready to use them in Elements, I can open that Button folder with the Open tool on the main screen. But that seems to be a little involved. Is there a way to select the same 4 buttons and open them in Elements without the extra steps? Work Smart, Not Hard, right??

OF COURSE!! I got Elements up and running. Then I activated that big Open button at the left of the main screen. But instead of having a dedicated folder with my buttons in it, I instead opened my Digikits folder and USED THE SEARCH BOX! It was something that had never occurred to me before. I typed “button” into the search box and waited.

Then I went through the results in the same way I would any other time. I Selected the same 4 buttons as before. (The image below shows the search results as a list. I did my selections using medium icons so I could see the actual images then I changed the display to a list so I could show you multiple selections.) When I had all 4 selected, I just hit that Open button at the bottom right of the menu.

And there they are! All from different folders and in fewer steps! I hope this is what Donna was looking for.

Her second organizational challenge reads like this: Having switched to using my cellphone as my primary camera these last few years has actually made it more difficult to group as events, etc because of all the random photos, notes, screenshots etc that I also take photos of. Open to any suggestions there…? This one is actually an easy fix. Both iPhone and Android have the ability to build albums with our photos. My Android phone creates some of its own albums, but I can make more to suit myself. Moving photos into the albums is as easy as clicking on them, going to the gallery menu and moving or copying the selected photos over. The key here is to sort them soon after you take them so it doesn’t become an all-day job. If you’re planning to use a group of photos taken on a specific day, make an album for that day. Sending the photos to the platform upon which you do your scrapping is the same process as whatever you’re doing now. If you’re using the iCloud, Dropbox or Google Drive or some other cyber-sharing device, that will allow you access to all your phone folders. Give it a try and see if it makes life easier!

Next week I’ll be showing you another paper-to-digi technique courtesy of Steph Barry. I think you’re going to love it!

Sneak Peeks January 16th 2019

Happy Thursday! It’s a holiday weekend here in the states! And there’s a cold front coming in which means its the perfect weather to stay home and get some scrapping done! Our designers have been busy creating new goodies to scrap this weekend!

From Down This Road

From Miss Fish

From JB Studio

From Snickerdoodle Designs

From Dagilicious

From Tinci


From CathyK

From Aimee Harrison

Tutorial Tuesday (Potpourri)

Decluttering Isn’t Just for Homes

It’s January. It’s bone-chillingly cold in some parts of the world (like HERE!) and unseasonably warm in others. The holidays are over, and winter stretches out in front of us like a long and bumpy road. There’re no truly exciting events on the horizon, so what’s a girl to do? Well, the flyers are filled with supplies for organizing our stuff… But for digiscrappers, we don’t need to buy anything. It’s all right in front of us! I think now is a good time to talk about organizing our stuff, and maybe actually making some effort to get ‘er done. This is how I do it, but I know y’all have your own way of doing things, The important part is to DO it!

It’s not as important where we start as that we actually DO start. For me, the place to begin will be with all the new kits I’ve amassed but haven’t unzipped. This is actually my New Year’s Resolution, to unzip and relocate my supplies as soon as I download them. I was keeping up just fine until my dogs started fighting in the house and I had to spend a lot of time keeping them away from each other. I have a backlog, and I WILL attend to it ASAP. I use Extract Now, a free rapid unzipping app that makes the unzipping part pretty easy. I make folders within my download folder into which I unzip the new goodies, which eliminates a couple of steps in the process, and it works pretty well. I still go through each of the subfolders, deleting all the duplicate previews and things I know I’m not going to use (like alpha sheets!). If the kit is templates, I delete the PNG files and the TIFF files, and I add to the name of the previews to include single or double and the number of photo spots the template includes. That lets me put a keyword like “single4” in the search bar and Windows will find all the previews with 4 photo spots. Once I’ve arranged my folders the way I like them, I move them en bloc to my digikit folder for the store or designer as appropriate. Then my download folder should be empty. Until I fill it up again!

The way I sort my digikits is primarily by store or by designer’s creative team, with the exception of Heartstrings Scrap Arts… I have so many of Bryony’s kits I need a separate folder just for them. Having said that, my GingerScraps folder is ENORMOUS!  (24.6GB without the kits sitting in my downloads folder. Thank heaven I have a 2TB drive on this laptop!) I rename each kit’s folder: DesignerNameKitName, unless it’s a Buffet kit, then it’s MonthYearBufDesignerNameKitName. That makes it easier when I’m doing a store challenge.

I try to organize my photos as I take them, so the job isn’t too daunting. I don’t care for the Organizer that comes with Photoshop Elements so I don’t use it. But it can be very useful for both organizing and retrieving your photos. The Help menu can give you some ideas about how to maximize your efficiency. The way I file my photos is in folders… what else? I create a new folder for the current year, and a subfolder for each month. I download a lot of photos from my daughter’s Tiny Beans album where she posts pics of my grandchildren. Those I rename with a suitable tag so I can run a keyword search later. If I’m looking for photos of Aaron, I just type in his name. These photos go into the folder for the month and year they were taken so I have some frame of reference later. I have a folder for the photos my friend Sandy takes and graciously allows me to ‘steal’ and one for the photos I download from Pixabay. My Pixabay folder is broken down into subfolders by topic: Kids, Insects/Flowers, Animals, Portraits, Scenic and such. This method of filing makes it a lot faster to find what I’m looking for.

I also organize my layouts. I have folders for each month’s challenges, with subfolders for the challenges themselves. When the year is over, they all collectively are filed in a folder for the whole year. Then again, I have some folders that have copies of the finished layouts for my daughters’ weddings, my grandkids’ first years, all of my Ireland layouts and for the creative teams I’m on. It’s all about finding things later!

Since I set up this new(ish) laptop back in September, I haven’t taken the time to go through my 1400+ fonts and retag them for MainType. That’s something I really need to get on with! It’s a daunting task, but you know what they say. Focus on the first step. I know the time I spend on it now will decrease the time it takes me to find the one font I’m looking for later. The best part of MainType is that I decide what my tags are, based on MY workflow – how I search for things. And like everything else, if I work at it as I add new fonts, the amount of time I spend on it will go way down. But just writing about it is giving me a rash, so let’s move on!

One caveat. If you’re going to delete duplicate files, make sure you only delete the ones you’re not going to want to search for later. I made the mistake of using a Windows utility and chose the wrong metric so it removed a LOT of my original templates and left me with the PSD files for the last layout I used them for. Retrieving the original template takes a lot of time but is necessary when I use the search feature to find previews for my desired number of photos.

I’m interested to hear how YOU organize your stuff. So please, share your secrets!!