Archives for September 2017

Fresh Baked: September 29, 2017

We are nearly to the end of September. So close to the end that Halloween was typed instead of September. Are you ready for October? I think the designers are going to make you VERY happy in a couple of days with the amazing products coming in the buffet. BUT, before we show off that, we have one more Fresh Baked for September. There are some GORGEOUS templates coming, and some super cute kits! Make sure you check them out!

Remember when you spend $10 in the store, you get a great new collab!

 fwp_thumb3_thumb
https://store.gingerscraps.net/GingerBread-Ladies-Collab-Spice-Of-Life.html

 tinci
Clustered: https://store.gingerscraps.net/Precious-album-4.-Clustered.html
Basic: https://store.gingerscraps.net/Precious-album-4.-Basic.html

aimee
Collection: https://store.gingerscraps.net/October-s-Opal-Collection-by-Aimee-Harrison.html
Kit: https://store.gingerscraps.net/October-s-Opal-Page-Kit-by-Aimee-Harrison.html
Alphas: https://store.gingerscraps.net/October-s-Opal-Alpha-Sets-by-Aimee-Harrison.html
Borders: https://store.gingerscraps.net/October-s-Opal-Borders-by-Aimee-Harrison.html
Date Tabs: https://store.gingerscraps.net/October-s-Opal-Date-Tabs-by-Aimee-Harrison.html
Messy Edges: https://store.gingerscraps.net/October-s-Opal-Messy-Edges-by-Aimee-Harrison.html
Glitters: https://store.gingerscraps.net/October-s-Opal-Shimmers-by-Aimee-Harrison.html

blueheart
Collection: https://store.gingerscraps.net/Be-A-Dreamer-Collection.html
Kit: https://store.gingerscraps.net/Be-A-Dreamer-Kit.html
Journal Cards: https://store.gingerscraps.net/Be-A-Dreamer-Journal-Cards.html
Ombre Papers: https://store.gingerscraps.net/Be-A-Dreamer-Ombre-Papers.html

boomers
https://store.gingerscraps.net/Her-First-Year-BGD.html

clever01
https://store.gingerscraps.net/My-Little-Pumpkin-Bundle-by-Clever-Monkey-Graphics.html

clever02
Kit https://store.gingerscraps.net/my-little-pumpkin-by-Clever-Monkey-Graphics.html
Journal Cards https://store.gingerscraps.net/my-little-pumpkin-jc-by-Clever-Monkey-Graphics.
Journal Cards Too https://store.gingerscraps.net/My-Little-Pumpkin-Journal-Cards-Too-by-Clever-Monkey-Graphics.html
Extra Paper Pack https://store.gingerscraps.net/My-Little-Pumpkin-ExtraPP-by-Clever-Monkey-Graphics.html

connie
Bundle Collection: https://store.gingerscraps.net/-2017-October-Bundle-Collection.html
Kit: https://store.gingerscraps.net/-2017-October-Kit.html
Date Pack: https://store.gingerscraps.net/-2017-October-Date-Pack.html
Inked Bits: https://store.gingerscraps.net/-2017-October-Inked-Bits.html
Messy Papers: https://store.gingerscraps.net/-2017-October-Messy-Papers.html
Border Clusters: https://store.gingerscraps.net/-2017-October-Border-Clusters.html
Templates: https://store.gingerscraps.net/-2017-October-12×12-Template-Pack-CU-Ok.html
Extra Papers: https://store.gingerscraps.net/-2017-October-Extra-Papers.html
Alpha Pack: https://store.gingerscraps.net/-2017-October-Alpha-Pack-AddOn.html
Word Art: https://store.gingerscraps.net/-2017-October-Word-Art-Pack.html
Flair: https://store.gingerscraps.net/-2017-October-Flair-Pack.html
Quick Pages: https://store.gingerscraps.net/-2017-October-Quick-Pages.html
Facebook Timeline Covers: https://store.gingerscraps.net/-2017-October-Facebook-Timeline-Covers.html

dearfriends
https://store.gingerscraps.net/Say-Cheese.html

heather01
Bundle – https://store.gingerscraps.net/The-District-BUNDLE-by-Heather-Z-Scraps.html
Kit – https://store.gingerscraps.net/The-District-KIT-by-Heather-Z-Scraps.html
Templates – https://store.gingerscraps.net/The-District-TEMPLATES-by-Heather-Z-Scraps.html
Weathered Wood – https://store.gingerscraps.net/The-District-WEATHERED-WOOD-by-Heather-Z-Scraps.html
Word Bits – https://store.gingerscraps.net/The-District-WORD-BITS-by-Heather-Z-Scraps.html

heather02
Bundle – https://store.gingerscraps.net/Caribbean-Cruise-BUNDLE-by-Heather-Z-Scraps.html
Kit – https://store.gingerscraps.net/Caribbean-Cruise-KIT-by-Heather-Z-Scraps.html
Templates – https://store.gingerscraps.net/Caribbean-Cruise-TEMPLATES-by-Heather-Z-Scraps.html

heather03
Bundle – https://store.gingerscraps.net/Pucker-Up-BUNDLE-by-Heather-Z-Scraps.html
Kit – https://store.gingerscraps.net/Pucker-Up-KIT-by-Heather-Z-Scraps.html
Accents – https://store.gingerscraps.net/Pucker-Up-ACCENTS-by-Heather-Z-Scraps.html
Weathered Wood – https://store.gingerscraps.net/Pucker-Up-WEATHERED-WOOD-by-Heather-Z-Scraps.html

jocee01
https://store.gingerscraps.net/Days-Of-The-Week-Photo-Templates.html

jocee02
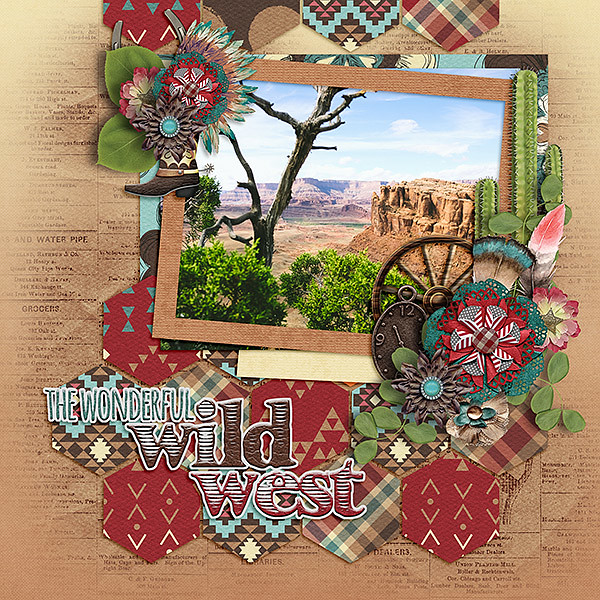
Bundle: https://store.gingerscraps.net/Wonderful-Wild-West-Bundle.html
Kit: https://store.gingerscraps.net/Wonderful-Wild-West-Kit.html
Fun Element Pack: https://store.gingerscraps.net/Wonderful-Wild-West-Fun.html
Title Pack: https://store.gingerscraps.net/Wonderful-Wild-West-Title-Pack.html
Ombre Papers: https://store.gingerscraps.net/Wonderful-Wild-West-Ombre-Papers.html
Basics: https://store.gingerscraps.net/Wonderful-Wild-West-Basics.html

kristmess01
https://store.gingerscraps.net/Kristmess/

kristmess02
https://store.gingerscraps.net/Kristmess/

kristmess03
https://store.gingerscraps.net/Kristmess/

lauries
https://store.gingerscraps.net/Change-Your-Fate-Bundle.html

missfish01
https://store.gingerscraps.net/Birthday-Blast-Templates.html

missfish02
https://store.gingerscraps.net/September-Clusters-Templates-by-Miss-Fish.html

missfish03
https://store.gingerscraps.net/Fall-Titles-by-Miss-Fish-Templates.html

ad01
https://goo.gl/UBQg62

Remember, if you complete 10 challenges, just ten, you get a free kit as well!!

cr_thumb3_thumb

I’m ready for school to start, and I think I’ll have to get my challenges done for this!

Save

Sneak Peeks September 28th, 2017

Happy Thursday! It’s the last Thursday in September!!!! We are almost at the end of the year!! And we will have a new Buffet on Sunday! We are also a week away from DSD!! Tune in next week to see a peek of all the fun happenings! This week our designers have some awesome products! Let’s take a look!

From Miss Fish

From Clever Monkey Graphics

From JoCee

From Aimee Harrison

Fom Tinci

From Heather Z Scraps

Tutorial Tuesday (Photoshop Elements 15)

A Few Quick Template and Shadow Tips

I’ve had a week to play with Elements 15 and found out the hard way that a speed scrap isn’t the best way to learn new software! There was a lot of CTRL/CMD>Z-ing on Saturday night. Along with some colourful language. But what caused my biggest headaches wasn’t the fault of the software… I had missed one tiny, crucial setting that had me questioning my sanity. I had overlooked the pixels/ centimeter setting that caused my layout to be ginormous, both in physical size and in file size. It should have been pixels/inch. Once I figured it out – long after the speed scrap was over and my layout was posted – I corrected my oversight and it was all good.

There are a couple of things I’ve discovered over the last few days that relate to scrapping with templates. I think we all agree that templates are amazing tools that actually stimulate our native creativity, rather than stifle it. So making version 15 template-friendly is high on my list.

First, as I mentioned in last week’s tutorial, PSE 15 doesn’t behave the way previous versions do when you drag-and-drop papers and objects onto the canvas. It has a habit of dropping things in seemingly random spots rather than on top of the last selected layer, meaning scrappers have to move their papers and objects up and down all the time. This is a serious time suck at first, and I’m all about working smart and not hard. So I played around a bit (a lot) to see how I could make it less labour-intensive.

I work the same way I would if I was paper-scrapping, bottom up. I wondered what would happen if I turned the visibility for all layers off but the background and then turned them back on one at a time as I worked my way up the template layers. That way I would know EXACTLY where my flowers, leaves, buttons, ribbons and assorted other bits were supposed to go. It would take away the whole trying-to-line-up-the-object-with-a-layered-place-holder-I-could-only-see-a-bit-of…-and-missing thing. I hoped. And for the most part, it worked perfectly. There were a couple of papers I missed with, but over all it reduced the layer moving by about 90%. If you’re the kind of scrapper who likes to put your photos in place first, this workaround would be easy to modify. Turn off everything but your photos, move them onto the layout and then carry on.

Clipping papers and photos to place-holders is still a work-in-progress while I reeducate my fingers. I know it’ll become a rote movement once muscle memory takes over. Did you know we require about 1,000 repetitions of a movement before it becomes automatic? We had to abandon the notion of teaching our son to use a motorized wheelchair when we realized he was never going to get enough practice in a short enough period of time for his motor planning to be good… he ran over his teaching assistant’s foot, knocked over several garbage cans, plowed straight into a bank of lockers and scraped paint from 3 different doorways all in the same day! Teaching my fingers CTRL/CMD>ALT/OPTION>G automatically is going to take me a while, but no one should get hurt.

While I’m on the subject of that keyboard shortcut, I stumbled on a way to make groups work for me while scrapping with a template. Sometimes the template designer will use paper place holders that would look best if they’re all cut from the same paper, but she’s put them on separate layers. The Tinci Designs template I used for my Buffet challenge layout is like that. As an experiment, I grouped three layers together using the CTRL/CMD>G keyboard shortcut, then put a paper on top of the spot in the layers panel where the group appeared and CTRL/CMD>ALT/Option>G’d it. The paper was clipped to all three layers in one move! I’m going to play around with that some more.

Pam and I have the same problem with seeing the edges of the bounding box. My excuse is that my eyes are old. The only solution – if we’re going to call it that – is that the arrows for resizing and rotating are so much bigger that when the mouse rolls over the box, they pop up and are easy to see. And that huge + sign is another good clue.

Another thing I observed, which may be my imagination (or wishful thinking) is that when I created shadows on their own layers using the second method I showed you, Elements seemed to blur the edges a little for me. I’m pretty sure it didn’t, but it sure looked like it! [The steps for creating a shadow on its own layer are: 1) Create a new layer UNDER the object you’re shadowing. CTRL/CMD click on the single sheet of paper icon. 2) Click on the layer thumbnail of the object you’re shadowing to select the edges. 3) Fill the selected area in your new layer with your shadow colour. 2C1902 is a good one to use. 4) Deselect the object. CTRL/CMD>D 5) Nudge the shadow layer to where it needs to be to match the other shadows on your layout. 6) Use a Gaussian blur filter to soften the edges. 7) Decrease the opacity of your shadow layer until it looks right. 8) Change the Blend mode for your shadow to Linear Burn. Then you can warp it to suit your self.]

I was really pleased to see so many comments on last week’s tutorial, and all the questions. Keep them coming!

September Challenge Wrap-Up

Can you believe it’s almost the end of September? I thought I would take today to remind you that you still have a little over 5 days to complete your challenges for September. Each month that you complete 10 challenges, you get a full kit from our store designers made just for the challenge reward. To make it easy, I’m giving you all the links to the challenges in the forum below – then I’ll give you a sneak peek of this month’s challenge reward.

Blue Heart Scraps: A Year of Blessings! {2017}

Brush Challenge

Buffet Challenge

Color Challenge

Connie Prince: #2017

Daily Download Challenge

Designer Spotlight Challenge

Desktop Challenge

Font Challenge

Inspiration Challenge

Mini Kit Challenge

Mix It Up Mystery Challenge

Pretty in Green: Back It Up

Project 365-52 Challenge
1- 2017: Week 36: Sept 03 – 09
2- 2017: Week 37: Sept 10-16
3- 2017: Week 38: Sept 17-23
4- 2017: Week 39: Sept 24-30

Recipe Challenge

Scraplift Challenge

Signature Challenge

Template Challenge
1- September 2017 – Template Challenge 1
2- September 2017 Template Challenge 2

Wordart Challenge

So many ways to get to your 10 challenges.

Had a slow scrapping month and didn’t make all 10? Never fear, just complete the rest during the next month. You will receive the reward collab the month in which you finish your 10th challenge – whether it takes 1, 2 or 5 months to do it. Make sure you start a post and keep it updated in the Cookie Jar thread. Our own Miss Damsel (Missi) keeps track of each month and knows when you have hit 10 completed challenges.

Here is a sneak peek of the reward collab for September.

Happy scrapping my friends!!

Fresh Baked: September 22, 2017

I hope you all enjoyed our birthday celebration week! The party might be over, but the fun never stops here at GingerScraps! Our designers have been creating away, making some delicious goodies for you!

Remember if you spend over $10.00 in the shop you get this amazing collab for FREE!

FWPSept

https://store.gingerscraps.net/GingerBread-Ladies-Collab-Spice-Of-Life.html

[Read more…]

Sneak Peeks September 21st, 2017

Happy Last Day of Summer! Are you ready for the leaves to change and the temps to get cooler? Our designers have some great releases this week to get you in that fall spirit!

From Miss Mis Designs

From Miss Fish

From JoCee


From Heather Z

From Dagi


From Aimee Harrison

From Heart Strings Scrap Art

From Tinci

Tutorial Tuesday (Photoshop Elements)

The TutOR Becomes the TutEE

I finally did it. I upgraded from PSE 12 to PSE 15. And discovered there was a significant learning curve to jumping over 2 editions!! But coincidentally it allowed me to figure out a problem brought to me by Lisa (slfam), who uses PSE 14. She had downloaded a free template and was diligently following my instructions for clipping photos and papers to the various shape layers, only it wasn’t behaving for her. I downloaded the same template so I could see exactly what was happening and maybe help her out. Her first question related to this pop-up.

I opened a bunch of photos to play with and started working my way through adding some photos, which was the root of Lisa’s second issue. And almost right away I had a problem. When I dragged my photo onto the template with the layer I wanted to clip to selected in the Layers panel, it didn’t go where I expected, but landed in some random spot nowhere close to its target destination. And it happened over and over and over. Totally random, at least to my eyes. Geez Louise! Off to Google I went. There I learned that in order to have an item go to the layer you want, you have to drag it over the area where that layer shows in the template.  In the screenshot you can see the grayed-out photo sitting over the #6 photo spot. When I did that, it went onto the layer where I expected to find it. The software still dropped it right into the centre of the workspace, but it was on the right layer.

Being a WSNH scrapper, I used the (CTRL/CMD>G) keyboard shortcut  I’ve been telling y’all to use to create a clipping mask, only to have THIS happen. It seems Adobe added some features that have always been available in the full Photoshop to Elements in version 14, and now that shortcut, rather than clipping, creates a “Group” of layers. I wasn’t sure how this was going to make my life better, and for the moment it was really a pain! (I’ll also confess to some confusion – no one had mentioned to me in the comments that there’s been this shortcut overhaul.)

The easiest cure for that was to CTRL/CMD>Z my way back to safety, but I thought, “Why don’t you see what else can happen here?” So I right-clicked on that Group layer.

Faced with the menu shown below, I had to decide how to proceed.

Once I’d gotten rid of the Group, I used the more-steps method to clip my photo to the spot, right-clicking on the photo then selecting Create Clipping Mask. It worked. But I like my keyboard shortcuts, so I went into the Layer menu tab to find it. And there it was, CTRL/CMD>ALT>G … and it worked! So now I need to teach my fingers some new moves.

The next photo I dragged and dropped went to the top of the Layers panel because I forgot to hit the target with it. Heavy sigh.

And look, I’ve got another Group layer in there. So even when I used the CORRECT shortcut, I ended up with something I really didn’t want. Gah!

Time to get serious. Lisa had described using the CTRL/CMD>G shortcut then right-clicked for the Clipping Mask on photos she’d stacked above the Group layer and having bits of other photos overlapping onto several photo spots. To figure out how to correct that, I had to first make it happen.

I did what it sounded like Lisa had done, adding more than one photo to the Layers panel then clipping them. And now I knew what was happening, because it happened for me too.

Once I had it figured out my next task was to figure out a work-around. And that meant a lot of extra steps, moving photos down the stack of layers to the spot I wanted them in and then clipping them. Um. No.

Since I was taking this opportunity to learn some new things, I just kept trying different things. (I play Words with Friends the same way. And make some really weird words just by trying combinations of letters.) I love a good speed scrap and I hate having to start over because something I wasn’t expecting has happened. Neverland Scraps is hosting one on Thursday, so I had to get this sorted out.

Of course, there were bumps in the road that I had to puzzle through. I did some research into Groups and found that they are very useful, especially when you’re working with LOTS of layers. You can select all similar layers – let’s use a paper stack as an example where you’ve clipped papers to shapes – and then CTRL/CMD>G Group them into a folder. They’re all still there but they’re not all individually taking up a spot on your Layers panel. However, in the early stages of working with a template, Groups‘re only in the way.

After I deleted the Group layer, taking what I’d learned about positioning my paper/photo/element over the spot on the template where I wanted it to go, I placed all of my photos successfully onto the template.

I was back in charge!

From that point on things went the way I wanted them to, the way I was used to them going. I felt confident that I could go on to work with a much more complex template and git ‘er done.

All my photos are place and cropped to their best advantage and I’m happy. Now I could Group all those photos and photo spots together so they take up less real estate on my Layers panel.

I know there’s a lot more I’m going to learn as I get comfortable with PSE 15; there are new options in the Preferences menu now so let’s look at those. To get there you’ll click on the Edit tab then choose Preferences from the drop-down. In the first General Preferences menu there’s an option that says Disable the creation of Smart Objects when creating new layers. Smart Objects can be resized without losing any of the pixels in the initial image. That’s important when you’re shrinking an object then want later on to enlarge it again. For me though, I found Smart Objects to be a major PITA. Dragging from the Project Bin onto the Workspace in PSE 12 made every item the same size as the canvas… 12×12 buttons, for example. Then I’d need to shrink to fit. The work around for that was to drag them OFF the Workspace and onto the layout in the Project Bin. Extra steps. Most of the time I’m shrinking things and not making them bigger, so in PSE 15, I disabled Smart Objects.

Skipping down to the Display and Cursors menu, another new option appears. It’s for high-density display users. My new laptop has a high-resolution monitor and the recommended setting is 1920×1080 pixels. But software created before the advent of high-resolution monitors shows up with all the text in an itsy-bitsy-teeny-tiny-hard-to-read size that can be a big problem for people not really familiar with their Workspace. (You might have noticed that in last week’s tutorial. I didn’t know how to fix it… now I do.) Adobe added this option to increase the UI Scale Factor to 200% to make the text easier to read. I find the enlarged images worse, so I don’t use this option. I know where things are on the screen so when I’m scrapping for me, I leave it as is. If I’m working on a tut and want you to be able to see what I’m doing, I change the screen resolution in the Control Panel to 1600×900 while I’m working, then put it back when I’m finished.

For the Transparency setting, I chose the smallest grid size available. It’s less distracting and makes a few tricks easier to perform. I always work with a transparent background – you do what works for you.

I still prefer to work in Standard measures for most things; although I’ve almost always lived in Canada and we went officially metric decades ago, I find myself doing conversions in my head all the time. So I’m glad Elements gives me the option of setting my Units and Rulers to inches. I use Points for text because it’s easier to understand than pixels. And Resolution is important for printing when you want the crispest, clearest images possible so most people work at 300 pixels per inch. For working purposes though, 72 pixels per inch – what you see on your screen – is good enough.

This menu is for the more… er… particular scrapper who likes symmetry, geometry and order. It also is handy for speed scrapping where the instructions might say, “Place your large photo 1/2 inch from the left edge of your layout and 2 1/4 inches down from the top.” I’ve shown you how to use the Guide before.

Last but not least, if you’re interested in trying some text modifications, make sure you’ve checked the Show Asian Text Options box. That will let you warp text and also to use the alternate characters included with some fonts.

And then there are the Guided Edits! Even the Basic ones can be quite handy.

These ones offer some quick ways of improving the colour of our photos with only a few steps.

Can’t forget about Black and White! Sometimes a black and white photo has much more visual interest than a colour one. It’s also a good choice when your photo’s colours don’t work with your layout.

More quick-and-easy edit options! Fewer steps, great outcomes… the essence of WSNH!

Stunning visual effects! Awesome for those artsy layouts.

This set of tools will really let your photos shine. They’re especially good for those sightseeing photos where you just can’t keep people from getting into your shot. You can take several shots a second or two apart then merge the unobstructed portions into one clean image. Or you can take those group shots where everybody but Uncle Joe looks good and merge them with that shot where Uncle Joe looks great but cousin Mary has her eyes closed. The possibilities!!

I can see lots of ideas for future tutorials here while I teach myself to use these powerful tools! If there’s something you want me to try, let me know and I’ll take it on.

*Note* The template used in this tutorial was created by ForeverJoy Designs https://www.foreverjoydesigns.com/2017/08/15-minute-memory-challenge-august.html

September Bake Sale

Happy Monday!! There is just a few days left in our September Bake Sale. Don’t forget to look in the store and find out all the wonderful kits that our designers have for you this month. Each of these items are only $1 through Wednesday September 20th.

And that’s not all that’s going on this week at GingerScraps. Make sure you are playing along with all the fun sales and games in the forum for our 9th birthday.

Good morning GingerScrap’s scrappers! I don’t know about you, but here in the southern part of the States, it is starting to look a lot like Autumn! It is my favorite time of the year. From cooler weather, changing colors, holidays, and pumpkins. All these things make this season the best! We should of course scrap it, right? Never fear. GingerScraps has so much to offer when it comes to scrapping seasons. Autumn is no exception. There is even a whole category dedicated to it. Today, we are going to take a look at just a few of those items. Get ready for all things Autumn! (items linked to the store).

Crunching leaves beneath your feet… cool, crisp air swirling around… I love Autumn! This Harvest Sunrise Kit has deep colors and beautiful elements that will be perfect for your harvest memories.


A beautiful Autumn collection! Autumn Beauty


Hello Fall!! Pumpkins, changing leaves, autumn flowers and little woodland animals are here to welcome fall in this digital scrapbooking collection. Everything you need to scrap the start, middle, and end of all things Fall…and more!


Leaves changing color, cool breezes, pumpkin-flavored everything for sale… It can only mean one thing: it’s officially fall! Hello Autumn captures the colors of the season perfectly, combining rich reds and oranges with crisp yellows and tans, complemented by subdued green and twilight hues of violet and blue. This bold, celebratory kit welcomes in the new season with thematic elements galore, including changing leaves, pumpkins, and the cutest little owls in scarves. Doodled alphas, playful journal cards, flairs, and flowers galore add an extra pop of fun to your scrapbook pages. Whether your favorite parts of fall are the leaves, the breeze, or the pumpkin treats, it’s time to scrap those stories with Hello Autumn.


Fall Fun – Kit by Connie Prince.


Nothing shouts autumn more than the myriad of colorful leaves that coat the ground each fall. I love the crack and crackle of them as I walk along in the parks and my yard.


Autumn Splendour – Digital Scrapbooking Kit by Ponytails Designs It’s the time of year that everything around you turns from verdant greens to the brilliant colours of autumn. Crisp, foggy mornings and warm, golden afternoons… simply splendid!


This pumpkin spice themed kit from Joyful Expressions is full of fall fixings that you can use to bake up fantastic fall scrapbooking pages.


You blink and it’s suddenly September. Celebrate the joy of the seasons changing, air cooling, and leaves getting ready to fall with My Life… September. The latest installment in the series draws on the rich hues of autumn to perfectly complement this moment in time. Featured motifs include woodland creatures like squirrels, owls, and birds; changing leaves, acorns, and scarecrows; vintage ephemera, butterflies, and flowers. This kit has everything you need to streamline your scrapping too, including perfectly coordinated patterned papers, thematic word strips, and a full alpha. With so much jammed into this kit, you can spend less time searching your stash and more time scrapping.

As you can see, not everything is about pumpkins. There is such a great variety of goods to scrap your Autumn pages. Make sure you check out these past Buffets!  There is so much more autumn goodness to be had. I will link those up for you here to help out.


https://gingerscraps.net/gsblog/2017/09/21036/

It’s Gingerscraps’ BIRTHDAY!

So much is happening this week! It’s time to celebrate the 9th birthday of Gingerscraps! Scavenger hunts! Games in the forums! Grab Bags for $5! An awesome kit when you spend $20 in the store! SO MUCH going on!

001

[Read more…]