Redirecting Text on your Embellishments
![]()
PDF Version : https://bit.ly/3DRkm8M
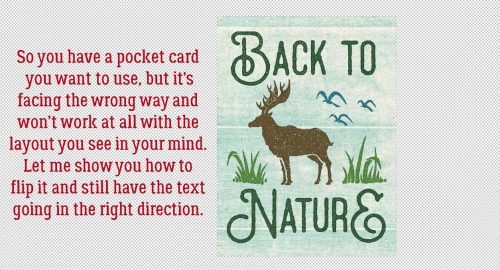
I’m never sure how complex I should go with tutorials that land on the first of a new month. There’s already so much going on and it’s easy to become overwhelmed with it all. So this month I went simple, but still very useful. Have you ever had an embellishment – think pocket card or fancy word strip – that you really wanted to use but it faces the wrong way to really work with the rest of the layout? You know flipping it won’t help because then the text would be backwards. And others notice that kind of thing… Well, here’s a fix!
My example will use a pocket card from CathyK Designs‘ Back to Nature kit. I want to put the card on the left of my photo and I want the deer looking AT the photo.
First, I’ll make a Copy Layer of the card. There are several ways to do this. You can click on the Layer tab at the top of the work space and select Duplicate Layer>OK. You can right-click on the layer in the Layers Panel and choose Duplicate Layer>OK. Or you can use a keyboard shortcut: CTRL/CMD>J. [Editor’s note: Keyboard shortcuts work with both Windows and Mac; Windows uses CTRL and Mac CMD.]

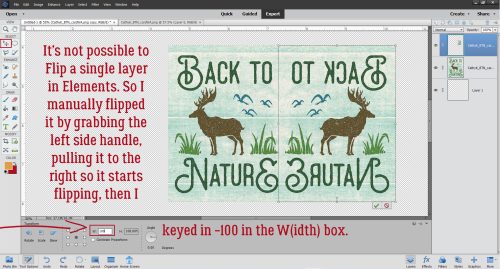
Now to flip the card so the deer is facing to the right. When using Photoshop CC you can flip single layers. In Photoshop Elements you can’t. So the easiest way to do it is to use the Move Tool, grab one of the “handles” on the side of the Bounding Box and drag it either vertically or horizontally. I get the flip process started this way, then I go to the dimensions box in the Tool Options toolkit and type in -100. For this one, the -100 went in the W(idth) box as shown. I do the same when I want to change the direction a spray of leaves or a ribbon is curving too.
The cards need to be stacked precisely with the backwards one on top of the original. Let your software do the work! Select both card layers (Click>Shift>Click).

Then go to the Align section of the Move Tool Options toolkit. Click on Left (side) and bingo, the top and bottom layers will be perfectly stacked.

Just like this!
Now, with only the top, backwards text layer active, I’ll add a Layer Mask to it by clicking on the icon at the top of the Layers Panel that looks like a blue sheet of paper with a white circle in the middle, as shown.

The Layer Mask sits to the right of the thumbnail on the Layers Panel. It’s simply a white box at this stage. You’ll know you’re working on the Mask and not the actual object when there’s a blue box outlining the Mask. Now I’ll activate my Eraser Tool.

Layer Masks are really useful when you’re removing parts of an object because it only makes the parts you’re removing invisible – they’re still there, just hidden. If you make a mistake – or the touchpad on your laptop is possessed and does its own thing – you can easily “paint” the part removed in error back in by switching foreground colours. Keep this mnemonic in mind: Black conceals, white reveals. What it’s referring to though is the layer UNDERNEATH! Black will hide the layer underneath, white will let it show. You’ll notice that your Color Picker is now set to black and white. While you’re removing parts of your object, you can toggle between removing and replacing by clicking the X key. Okay, on to removing the top line of text. My foreground colour is white and the layer underneath is temporarily turned off. I’ll turn it on and off to check my work a couple of times while I’m removing.

Here you can see that the lower layer is on, and the backwards text on the top line is gone. In its place is a line of text going the right way.

Now I’ve removed both lines of backwards text.

With both card layers you can see I’ve successfully turned the deer and birds around. To incorporate the Layer Mask with the top layer, right-click on the layer and choose Simplify Layer. This step isn’t completely necessary in this instance because when I Merge the two cards in the next step, the Layer Mask will automatically be Simplified. But if I wasn’t Merging layers, I would definitely want to Simplify that object layer.

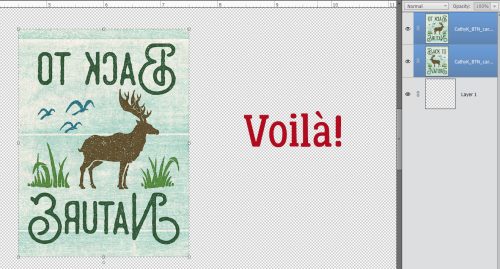
To make it easy to use the modified card, I’ll select the two card layers (Click>Shift>Click) then right-click and choose Merge Layers. The keyboard shortcut is CTRL/CMD>E. And that’s it! You can’t even see where I’ve made the changes. (If you look closely though, you can see there’s a little nibble taken out of the bottom line of text at the lower swirly part of the N in Nature.)

I think this will give us some more options with our kits. I have some great ideas for upcoming tutorials that will be more complex than this one. Stay tuned!
PDF Version : https://bit.ly/3DRkm8M
![]()