Archives for January 2023

Tutorial Tuesday (Photoshop Elements)

Loading Those Styles Files

PDF Version : https://bit.ly/3RxUyDK

Back a couple of weeks, I said I’d put together a quick tut on how to load Styles into Elements. That’s where we’re going today. It’s really easy, but I can complicate anything! I’ll show you the easy way, and the more complicated way then let you decide how you’ll do it. Sound good?

But first, let’s talk about Styles a little bit. What are they, anyway? Essentially, they’re little automatic scripts that allow you to alter and enhance individual layers in your Photoshop Elements layouts. They include things like shadows, glitter, metal, fabric, gel, wood, cork, texture… so many different Styles exist and more are being created all the time. Several GingerScraps designers create Styles that coordinate with their kits. In fact, many of the GingerBread Ladies‘ collabs have Styles files in them, so you’ve probably got a bunch you aren’t even aware of! Let’s get you up to speed!

There are two ways to access your Styles portfolio. One is to click the Window tab along the top of the workspace then choose Styles from the drop-down menu. The second way – the one I use because it’s right there – is to click on the Styles button at the bottom of the Layers Panel. Once you’ve accessed them, there’s a Style Picker bar at the top of the Layers Panel.

Here’s the Style Picker. It will let you see all the Styles that are already Loaded. Elements includes several default Styles embedded in the software (Bevels, Complex, Drop Shadows, Glass Buttons, Image Effects, Inner Glows, Inner Shadows, Outer Glows, Patterns and more) That little stack of lines to the right of it is where the actual Styles Menu hides.

Let’s click on the stack of lines. Now choose Load Styles.

Here’s where I can complexify things… I learned how to find where my computer puts things and have worked out my own workflow using that knowledge. With Styles (and Brushes, which are Loaded in exactly the same way), I rename the files then move them into the folder where Elements will look for them first. I’ve outlined the path here. The path is C:\Program Files\Adobe\Photoshop Elements [Version #]\Presets\Styles. This makes it easier for me to find them later but it’s not the only way to manage them.

You can see that Styles files have the tag .ASL or .asl after the file name. Knowing that, you can let Windows search for your Styles. (Sorry Mac users, I know nothing about file searches in the Mac OS.)

Here you can see there’s at least one file I haven’t renamed. 😉 And it’s the file I’m going to use… To locate the folder it’s hiding in, I right-click on the file name and choose Open File Location from the drop-down.

Now I can go back to the Styles Menu, because I know where the file is, and retrieve it.

Click on the file and then Load. DONE!

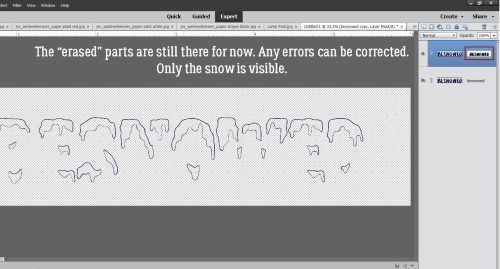
The set is there, open and waiting for me to decide which one I want to use. Hovering the cursor over the thumbnail will tell you what the Style has been named by the designer.

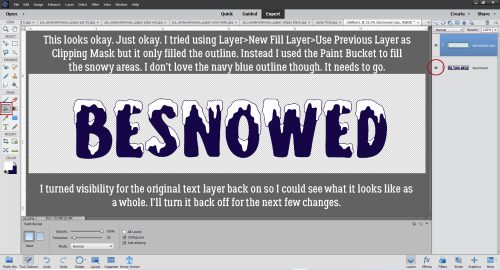
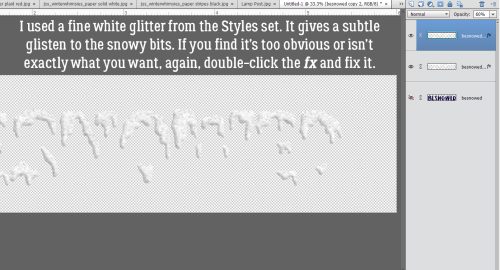
I tried the two blues, but liked the black best. As I’ve shown in other tuts, the Style can then be adjusted by double-clicking on the fx icon on the layer and playing with the settings.

There are lots of sources of free Styles online. Some Photoshop Styles will work with Elements and some won’t. Brusheezy, which I’ve shared before, is pretty good at separating them out. I’ve linked you up if you’d like to explore.

See you in February!


January 27, 2022: Fresh Baked

Happy Friday! I hope you have all had a great week. Can you believe we are at the end of January already? Do you have any  plans for the weekend? If so, I hope you are doing something fun.

Remember, if you spend $10 in the store, you’ll get this great kit for free!

Let’s take a look at some of the items the designers have for us this week.

Are you finishing up your challenges? Any 10 completed challenges (out of over 35) gets you this great reward!

Tutorial Tuesday (Photoshop Elements)

Quick Trick: Controlling Camera Shake

PDF Version : https://bit.ly/3wUBHtr

If you’re anything like me, you’ve got a lot of “nice” photos that miss being GREAT photos because they’re a little blurry. Sometimes it’s a focus issue, sometimes it’s camera shake. Because there are times when you can’t just whip out a tripod and get those magic moments captured perfectly, you’re okay with compromising on clarity for the sake of the memory. Well, I think I’ve got something that might make those “nice” shots a lot less woozy! This automatic enhancement was introduced with Elements 14; if you’re working with an earlier version, sorry. 🙁

Let me introduce you to one of my new neighbours. She and her family were some distance away and it was super-cold outside so I didn’t want to go outside to take photos. I used the zoom lens – which destabilizes the camera a bit – on one of my point-and-shoot digital cameras and shot them through the living room window. I knew they’d be soft and a bit fuzzy, and I accepted that.

I didn’t know about this trick until last night. It’s going to be VERY useful! Click on the Enhance tab and scroll down to Shake Reduction…

Elements will automatically make an adjustment to your photo. You’ll get a little preview of what will happen, and you can fine-tune it later. See the slider labeled Sensitivity? You can tweak that too, but be careful. A little goes a long way! Make it too sensitive and you’ll see a white outline around your subject.

The important part of the photo is her face, so I’ve drawn a box around her head and chest, and Elements starts working on it. See that thing in the middle of the box? It’s a progress bar, showing you where in the process your photo is currently. When it’s finished the icon disappears. Then, if you’re happy, click OK.

Here’s the Before image up close.

And the After image up close.

And a side-by-side… The change is subtle, but visible. You can see it even in the foliage.

Not bad for a couple of clicks!

January 20, 2022: Fresh Baked, Retirement Sale, and NEW Designer

Happy Friday. Boy do we have a great newsletter for you today.

First up is the Retiring Products Sale. Select items are 65% off. 

Remember, if you spend $10 in the store, you’ll get this great kit for free!

Let’s see what the designers have for us this week.

We are excited to announce that Adrienne Skelton Designs is permanently joining the GingerScraps family.

Remember, if you complete any 10 challenges, you’ll get this collab as a reward.

Tutorial Tuesday (Individual Style)

Challenge Spotlight: Real Moments

PDF Version : https://bit.ly/3DlA2Ay

Did you notice there are a couple of new Challenges for 2023? Today we’re going to check in on the Real Moments Challenge hosted by Cindy Ritter. This is how Cindy describes the Challenge: “There’s a quote that says “Life isn’t measured by time, it’s measured by moments.” and that’s what this new challenge is about, preserving those moments that stand out; the good, the bad and everything in between. Many of those moments in our lives are not accompanied by photos so feel free to experiment and think outside the box while making your layouts.

Each month I will give you a theme and prompt (it might be a quote, a song, a poem or something different) and you should create whatever you are moved to do.

This months theme is Change.
Please use the following quote to inspire your page.
“Sometimes change requires you to take a giant leap. But, you won’t be able to fly unless you are willing to transform.” ― Suzy Kassem

I love the idea of scrapping REAL moments, even the ordinary ones. Each of us has our own idea of what that means, and our Individual Style will guide how we approach the Challenge. I think as memory-keepers we tend to scrap the happy stuff and pretend the no-so-happy stuff even happened. But we all have REAL moments, and we shouldn’t shy away from them. The layouts in the Challenge Gallery cover the gamut; there are a couple of them that might be too REAL for some of our readers; if that’s you, no one will know if you skip over those ones. The layouts will appear in the order they were uploaded to the Gallery. You may notice that a number of them have been created using Cindy’s Real Moments – Metamorphosis collection, and each participant will be gifted a matching mini-kit. As always, each layout is linked to its spot in the Gallery so you can drop by and leave some love; just click on the member’s name. Ready?

First up is a layout by lulutoo; her journaling, paired with that Pinterest-worthy photo would fit in well with our discussion on resolutions, wouldn’t it? I love her vertical cluster and how she’s combined all the papers she’s stacked behind it. Tucking elements between papers always adds interest.

As a former military spouse, I found 01lousmith‘s journaling to be very familiar. Change can be really hard, and not always good. She’s created a beautiful but haunting photoless artsy layout.

We’re all our own worst critic! AJsRandom proves it. The smiles in her photos and the cheery-ness of her clusters is a little at odds with her journaling. But I commend her for taking such a personal approach to the Challenge.

I really think I need to buy this collection! This beautiful, simple layout from dkane has me really convinced. There’s so much warmth and optimism here.

Talk about making lemonade outta lemons! Look at how mafrerichs has transformed that dorm room! The colour palette of the kit coordinates beautifully with the photos and those clusters… total thirst trap for me.

This simple but celebratory layout from twizzle made me smile. Congratulations! Feeling good about oneself is the key to happiness.

How gorgeous is this?? I love the way kabrak1207 has blended the gold border into the background paper and how that stitched heart is SO 3D. The quote from Wicked really captures the theme of the Challenge without needing a photo.

As dorannmwin says, change can be scary. Kudos to her for going back to school! She looks so confident in her photo, and the way she’s surrounded it with ephemera and clusters keeps the feel-good going.

NHSoxGirl has infused some humour into her layout. I knew instantly what she was going to focus on when I saw those photos. In keeping with the  serious-but-still-funny-ish topic she kept her layout clean and linear.


Our own AimeeHarrison has chronicled a significant challenge that changed her whole life. Her layout reflects triumph and hope through the bouncy clustered swag and all the hearts. Strength is a good trait to have!

A-M kept her layout simple and clean. Downsizing is definitely a change! We UPsized… I can’t even imagine.

(Content-warning) Katherine Woodin has always been very open and comfortable with her journaling as she records daily life. She’s probably the most dedicated Project 365 scrapper I know. She doesn’t gloss over the tough stuff, and this layout is an example of that. Her beloved Fred passed on to his next life on Christmas Eve and she strips bare her feelings as she details the events of that day. My deepest condolences, Katherine.

I can’t even count all the ways basketladyaudrey has covered “change” in her layout. She chose the most perfect colour palette possible for her photos, which tell the story of becoming a grown-up. Love it!

Leaving home is one of the hardest changes we all go through. Blaise used a list as journaling, and her photo tells the rest of the story.

If you were to participate in this Challenge, what would be the change you feature? Seeing all these layouts has given me some ideas – on top of the absolute determination to acquire Cindy‘s kit. Off I go to sort through my photos…

January 13, 2022: Fresh Baked

Welcome to another Friday. I hope your week has been a good one. 

Remember, if you spend $10 in the store, you’ll get this great kit for free! I love all the sparkles this kit has.

Let’s take a peek at some of the new items in the store this week.

I hope your challenges are going well. If you complete any 10 challenges, you’ll get this collab as a reward.

Tutorial Tuesday (Photoshop Elements)

It’s the Snowy Season! (Fancifying a Font)

PDF Version : https://bit.ly/3jf6vBS

If you’ve thought about taking part in the Font Challenge this month, you probably live in North America and have lots of snowy photos you can work with. Snowy Season is a showy font with lots of visual interest. It’s an all-caps font with scaled lower-case characters, a full set of numerics and the most commonly-used punctuation, which makes it a great title option. I think it would make for difficult reading as a journaling font though. Today’s tutorial will show you how to make the snowy parts of the font look like actual snow! Read on…

Before we get into the meat of the tutorial I want to welcome all the new GingerScrappers who have joined us in the last while and give an overview of Tutorial Tuesday. The first two Tuesdays of the month will focus on techniques that elevate our 2 dimensional layouts into 3D masterpieces. The third Tuesday is Challenge Spotlight day, when I share YOUR layouts and discuss what makes them special and interesting. On the fourth Tuesday, I provide a Quick Trick that will speed up your workflow. When I create these tutorials I want them to be achievable by anyone, with any amount of experience with digital scrapping. To that end, I typically provide both written and visual instructions of every step in the process I’m demonstrating. If you already are proficient you have my blessing to skip over all the extra instruction. I try to use free or software default fonts and styles wherever possible so you’re not having to shop before you can play. Most tutorials are for Photoshop Elements, which is the most commonly used software and what I work with. There are usually multiple ways to accomplish a task. I like to Work Smart, Not Hard, so I’ll show you the easiest/fewest keystroke ways, and include keyboard shortcuts where they exist. I work in Windows but recognize that there are a lot of Mac people out there. So any keyboard shortcut will include the appropriate function keys for both PC and Mac. For example, the keyboard shortcut for Merge Layers is CTRL>E for PC users and CMD>E for Mac users. So when I include Merge Layers in a tutorial it will look like this: CTRL/CMD>E. The other function keys that are part of keyboard shortcuts are the ALT (PC) and OPT (Mac) keys. Make sense? Now for today’s tut!

Our winter began a full 6 weeks early than usual and brought us a LOT of snow. I like to think outside the box when it comes to titles for my layouts and sometimes will do a Google search for related words, phrases or synonyms. That’s how I came up with this one. Notice the transparency inside the snowy bits. If I just used the font as is, whatever is behind my title will show in the snowy areas. Not what I want!

Before I can manipulate this title, the text needs to be Simplified. The actual text itself will no longer be editable so make sure it’s spelled properly and it says what you want it to say before you Simplify. One way to do this is to click Layer tab on the taskbar that sits at the top of your workspace then choose Simplify Layer. Or right-click on the text layer and choose Simplify Layer from the drop-down menu.

I made a Copy Layer of the title so I could work on a Copy and not the original. There are several ways of doing this. Click Layer>Duplicate Layer… on the taskbar. Or right-click on the layer then choose Duplicate Layer… from the drop-down menu. Both these will open another menu where you’re asked where the duplicate layer will go. In this instance, it’ll go into this project, so all you’d need to do is click OK on that pop-up. Or easiest for copying layers within the same project, CTRL/CMD>J will just do it all.

Here’s the pop-up I mentioned above.

Now I’ve made the original title layer invisible so I can see what I’m doing to the Copy Layer. Just click on the eyeball to close it.

I’m going to remove everything but the snowy areas from the title. I added a Layer Mask to it by clicking on the icon at the top of the Layers Panel that looks like a gray circle in a blue square. Why a Layer Mask? It lets you hide parts of a layer but not make them actually disappear. It gives you the most control you can have over what happens to your image. More later.

This is where Elements puts the Layer Mask. You want to be sure you’re working on the MASK and not the LAYER itself. When you look at the Layers Panel you’ll see a blue line box around the active part of the layer. Be careful to make sure you’re on the MASK.

Next, activate the Eraser Tool. You’ll have another reminder that you’re working on a MASK because the Color Picker will show black and white. It there are any other colours there, you’re NOT on the mask. If you remember “White REVEALS and Black CONCEALS” it’ll help with your task… but this mnemonic is referring to what’s BEHIND the object you’re masking. The magic of Layer Masks is that it lets you erase things, but if you accidentally remove a part you wanted to keep, it’s not really gone. For example, sometimes my track-pad sticks and my cursor goes haywire, erasing EVERYTHING it touches. To recover that stuff, I just toggle my colour from white to black and reveal it again by rolling my cursor over the oops. Toggling between foreground and background colours is easy, just click the X key.

Make sure your snowy areas are completely enclosed with a thin border of your font colour. It’ll save you a lot of grief later.

This is what you’ll be left with on the Copy Layer once you’ve concealed all the non-snow areas. Zoom in and go over all of it while you still have the ability to correct any little issues. Once you’ve moved on to the next step it’ll be too late…

Now, to be able to play with this layer, the Layer Mask has to be integrated into the layer by Simplifying it. Same steps as for the initial title.

As soon as your Layer Mask was integrated, your Color Picker will have returned to whatever colours you’d had there before. Set your foreground colour to white: you can either click your cursor on the upper left corner of the palette or you can type “ffffff” into the hex code # box.

Now to fill the snowy areas with white. I tried my preferred method of New Fill Layer>Solid Color>Use Previous Layer as Clipping Mask but all it Filled was the outline. In retrospect, that might have worked just as well as what I ended up doing. Keep that in mind as we proceed. I used the Paint Bucket to click-and-fill the snowy areas. This method is imperfect, sometimes leaving areas unfilled around the edges. That can be overcome by Filling again. As you can see from the screenshot, there’s still a navy blue outline that detracts from the look I want. Here’s where it might have been better to use the Fill Layer process, THEN the Paint Bucket. Live and learn!! Instead, I worked unsmart…

I essentially did the same thing that using the Fill Layer>Paint Bucket method would have done but with WAY more steps. I covered up the blue outline with a Stroke. Edit>Stroke (Outline) Selection…

To expand on the EXTRA steps I took, I had to experiment to find the right size and location for the Stroke. I settled on 6 pixels and Inside to conform to the contours of each snowy shape.

Okay, that looks a lot better. Still a few areas where the Stroke didn’t quite cover the outline – another reason to advocate for using the Fill Layer>Paint Bucket route.

Now to add some dimension! I experimented to find the right combo for this step. Click the Styles button at the bottom of the Layers Panel then go up to the drop-down menu at the top of the Layers Panel and choose Bevels. These are stock Styles that came with the software.

I got the best results with the Simple Inner Bevel as shown. I know it makes the snow look like toothpaste, but Styles are adjustable! Double-click on the fx icon on the layer to open the adjustments menu then push the Size slider to the left until it stops looking like it’s sitting in your bathroom sink. To reduce the glaring shadows, decrease the Opacity of the beveled layer to 66% or so.

Now make another Copy Layer of the snow. We’ll add some glitter to it so it glistens like real snow. CTRL/CMD>J. (Learn the keyboard shortcuts! They’re amazing!!)

Ugh. Let’s get rid of the glop. Right-click on the layer then choose Clear Layer Style. That’ll remove the bevel from the Copy Layer.

You may already have some fine white glitter loaded into your Styles collection. I didn’t have the one I wanted so I went to my Styles folder by clicking on the stack of lines to the top left of the Styles Panel and chose Load Styles. This is where your software stores Styles; if you’ve purchased some to coordinate with your kits this is where Elements will look for them. I’ll put together a tutorial on managing Styles later. For right now I’ll just give you the bare bones.

Here’s the result of applying fine white glitter, then decreasing the Opacity of that layer to 60% so the contours of the layer below are visible.

The finished title! I’m really happy with how it looks. Next time I’ll learn from my errors and skip a few steps!

See you next week. Which Challenge will be in the Spotlight?


January 6, 2022: Fresh Baked

Welcome to the first Friday in 2023. Have you recovered from all the New Year’s celebrations? I was off of work for the holidays and it’s been rough getting back into the swing of things this week.

Spend $10 in the store and get this great kit for free! It’s perfect for all those photos from the New Year’s parties.

Now let’s see what goodies our designers have for us this week.

Have you started on your challenges? Complete 10 challenges and get this great kit as a reward.

Designer Spotlight: January 2023

Lisa Rosa Designs!

So here we are, kicking off a new year. I just don’t know where the time goes! Our first Designer Spotlight of 2023 is a relative newcomer to GingerScraps, Lisa Rosa Designs. Let’s see how our conversation went…

J: Hmm. You don’t want to talk about the mundane stuff, I guess, so let’s not. What is your favorite kit currently in your GS store and why?

L: Oh, Gosh… there are so many I really love and that I’m really proud of. But if I have to pick only one, I would say it is Never Give Up. I love its neutral colors… and I put a lot of me and the way I like to live in it.

J: It really has a shabby chic feel to it, don’t you think? What are your most favorite and least favorite colors?

L: Green and blue are my favorites… but I’m not really the biggest fan of yellow and purple.

J: Yeah, I don’t love yellow or orange, but do love purple! Are you more likely to dance or sing in the shower?

L: Sing, for sure. I’m not really a dancer. But I love to sing and every shower is like a live concert!

J: I thought that’s what you say. I seem to be the only one who dances in the shower. Maybe if more people had Bluetooth speakers in their bathrooms… If you could change one thing about yourself, what would it be?

L: My self criticism. I’m usually very kind to others… but when it comes to myself, I tend to be too harsh. I’m rarely satisfied with what I do, how I do… and my own results.

J: We really are our own worst enemies, aren’t we? Who would you want to play you in a movie of your life?

L: Diane Lane, hahaha

J: Oh, she’s gorgeous! You do kinda favour her. Good choice!! Do you have a green thumb? What do you grow?

L: Well… my thumb is not really green, but I try my best. Many plants have died in my watch, but most of them have thrived. I LOVE to grow new succulents, coleus and zamioculcas and give them as gifts to people around. I’ve tried to grow herbs gardens many times without success though.

J: I can grow lavender but kill parley EVERY time! What did you want to be when you were small?

L: A teacher or a seamstress. I LOVED sewing little clothes for my sister’s dolls when I was small. And I LOVED playing school with them on the weekends… my sister and her dolls were the students and I would teach them everything I learned at school during the week. Her dolls were always very well dressed for classes, hahaha.

J: I loved to create things out of nothing when I was a kid – we had pretty much nothing. I made several houses, complete with furniture, out of cardboard and fabric scraps. I learned how to sew when I was 11 and then started designing Barbie clothes. I think we would have been friends. If you had a warning label, what would yours say?

L: Don’t touch! I hate being touched by strangers or people I don’t have a close relationship with.

J: On, me too!!! I’m a hugger with people I know, but everybody else can just keep their mitts to themselves. If you could only eat one meal for the rest of your life, what would it be?

L: Some salad. I love salads.

J: I enjoy a good salad, but don’t usually take the time to make them. If time travel was possible, would you go back in time or ahead? Why?

L: Ahead! I would love to have a peek on what didn’t happen yet and on what I probably won’t be able to see… like how a place will look like in a hundred years… or if some music I love is still played on the radio, if people still know it.

J; Oh, I’m not sure I’d like to know what’s going to happen in the future. What if it’s something really horrible? Like another pandemic, or some extreme natural disaster… Aside from necessities, what one thing could you not go a day without?

L: Coffee, of course!

J: Hahahaha! I’ll refill your mug, just hold on a sec. Thanks for chatting with me!

Before we say goodbye to Lisa, I’ll remind you she’s providing this month’s Daily Download, links are found right here on the Blog. If you miss a few days, don’t worry, the whole kit will be available for purchase in the store in February. She’s also hosting the Designer Spotlight Challenge this month along with her usual Journaling Challenge. One last important thing to note is that she has discounted her store for the month by 23%! No coupon code required!!

Tutorial Tuesday (Potpourri)

I Do Hereby Firmly Resolve…

Are you a New Year’s resolution-making person? Do you choose “One Little Word” to set the tone for the coming year? Do you set intentions as part of your New Year’s Eve routine? Are you someone who begins the year with a ton of resolve to make your life perfect… only to quickly forget all about those dreams because they’re too much work before February arrives? And then you feel crushing guilt? This post is for you. And me.

“New year—a new chapter, new verse, or just the same old story? Ultimately we write it. The choice is ours.” Alex Morritt

Why do we put ourselves through this torture year after year? What makes us feel like we need to make huge changes in the way we live our lives? Especially when we know in our hearts of hearts that we’re not going to get there; lather, rinse, repeat. How many of us has resolved to lose 10 pounds by Easter… every year since we were 12? Part of the problem is that we internalize what OTHER PEOPLE think we should be or do.

“We spend January 1st walking through our lives, room by room, drawing up a list of work to be done, cracks to be patched. Maybe this year, to balance the list, we ought to walk through the rooms of our lives, not looking for flaws, but for potential.” Ellen Goodman

The thing about goals is that there are specific imperatives when setting them. They must be specific. They must be achievable. They must be measurable. And they must include a plan for getting there. If any of those imperatives isn’t there, it’s not a goal, it’s a wish. Let’s look at these in a bit more detail, using the 10 pounds as our goal. That’s specific. Is it achievable? It might be. It’s definitely measurable! So the plan… how will we get there? Will we cut out all the foods that bring us pleasure? Or will we work out for an hour 4 times a week but continue to eat what we like? It won’t be long before the first slip happens. The apple pie your mom made for Sunday dinner. The pizza that appears in the staff room. The day you have a long list of errands and are too tired to work out when you’re done. One slip leads to another and soon, the goal is no longer a goal. For change to become enduring, it needs to become habit. So maybe instead of setting a goal to lose 10 pounds, it might be more achievable to decide to take the stairs instead of the elevator if going up one or down two floors. That goal has all of the imperatives covered, and a side effect may be that you lose 10 pounds!

“Plant seeds every single day that you know who you are, you know what you’re about and you know what goals you’ve set for yourself.” Stephen Curry

When we don’t keep our resolutions, immediately the negative self-talk starts. “See, you never follow through. You’re doomed to fail! It might be better if you just didn’t even try.” Sound familiar? So the resolution goes in the waste basket and we’ve once again proven we’re not good enough. But is that true? Maybe a little. But at the heart of it, it isn’t. We can’t possibly be perfect, and striving for that is a huge waste of time and emotion. Look at the people you admire. Are they perfect? Nope. Do they have traits you’re not really a fan of? Probably. But there’s still much to admire, right? If we choose one small thing we’d like to change about ourselves and create a plan for that, we’re halfway to success! It’s when we stop trying that we fail; so today I ate the pie. Tomorrow I’ll try to do better.

“It is your right to choose what you do and don’t do, to choose what you believe in and don’t believe in. It is your right to curate your life and your own perspective.” Lady Gaga

I think we all spend too much time comparing our lives to those of others, while there really isn’t a level playing field for life. Most of us are just doing the best we can with what we have, and we’re often blind to the successes we’ve experienced. We let the great be the destroyer of the good. It’s human nature to look over the fence and wonder what life would be like if we were over there. Erma Bombeck wrote a book she called The Grass is Always Greener over the Septic Tank. She was right. It’s all an illusion.

“I’m deciding to be my own individual self, and it looks nothing like what anyone else is doing. There’s something so powerful about being unique.” Alicia Keys

Yes, we’re all unique individuals. But the human species is interconnected; we’re social animals but with intellect. Each of us has something to contribute, even when we don’t think we can. Even when we think we have nothing, we have ourselves! What they say about random acts of kindness is 100% true. Little gestures mean a lot. A friend of mine clears the snow off the sidewalk of his entire block every time it snows. His neighbours don’t know it’s him; he doesn’t do it for the recognition, he does it because he’s a nice person who has the time and the inclination. I started buying an extra bottle of dishwashing liquid when I’m getting groceries and putting it in the bin for the food bank – that’s one of the things not many people donate so I chose it as my contribution. Little things add up.

“We’re at our best when we support each other. Not when we cancel each other out for our past mistakes but when we help each other to grow.” Joaquin Phoenix

I guess what I’m trying to say is that you deserve to be happy, exactly as you are. If making resolutions makes you feel guilty or like a failure, don’t make resolutions! Pick one little thing you can work on. Work on it. Don’t expect it to be magic, because it won’t be. It’ll be work. When that thing is habit, pick another. The date on the calendar isn’t magic either. Don’t be buttonholed by the expectations of other people. You do you! Period.

“Happiness was always important to me, even at a young age. People would ask, ‘What do you want to be when you grow up?’ I’d tell them, ‘I just want to be happy.’” Goldie Hawn