Tutorial Tuesday (Individual Style)

Challenge Spotlight: Pinterest

Over the last week I’ve spent a lot of time browsing Pinterest in an effort to put myself to sleep. I clearly don’t see the same boards that Lisa Minor, host of our Pinterest Challenge, sees… This image would give me the most crushing anxiety!

This is what she had to say about it: “This pin truly made me LOL! Do you have an office out of the home? Would you just go ‘buck wild and decorate like this? I would “like” to think I just might! This pin says to me “at the office, decoration, going overboard, gingerbread house, Christmas Village and candy” So what does it say to you?” I’m going to let the participants speak for themselves this time.

As usual, the layouts are in the order they were uploaded to the Gallery. Each is linked to its spot in said Gallery, just click on the Scrapper‘s user name and you’ll fly right to it so you can get a closer look, or to leave a comment.

First up is msbrad. I gather her granddaughter interpreted the Pinterest image as a play fort… “She created her own after I showed her the original inspiration photo here.

Next is DianeInOz. Her Pinspiration: “Office party, Santa’s village, Christmas!

Tamsin McAtee seems to be on the same wavelength with me! “Here’s mine.. this is exactly what it says to me, its so busy its almost painful for me to look at, I get really bad sensory overload and this is very overwhelming to me.

I also think pinklily has a bit of pleasemakeitstop! “When I think of people going overboard, the Wiggles comes to mind, so I made this layout.

Grace. posted hers without comment, but she’s taken her Pinspiration from the overall Christmasy theme.

Last we have this one from Jill. “The Pinterest photo brought my local doctors’ centre to mind with all the Christmas doors.”

It looks like I’m in good company being crazybusy right now, given that only 6 layouts have been posted. As you’re reading this, I’m driving home from my parents’ house, a little over 2 1/4 hour drive from my house. I like to make a flying visit around this time, to take them a CARE package containing some Christmas treats and a nice bottle of local wine, as well as to wish my dad a happy birthday (the 21st). Last year the weather didn’t cooperate and it was the second week in January before I could make the drive safely. It was a crushing disappointment!

For those who are interested, my son’s new hospital bed is a huge hit with him! He hasn’t figured out that he can reach the controller yet, so we haven’t found him folded in half or standing on his head. Maybe he won’t notice? Thank you all again for your understanding and grace last week.

If you’re celebrating Christmas, I hope you have enough. Enough time with the ones you love. Enough good food to fill your bellies. Enough opportunities to have some fun. Enough help with the dishes… 😉

If this time of year is difficult for you, I hope you find a quiet place away from the frazzle where you can be whatever you need to be. That you have someone you can turn to for solace. That you have understanding people around you who won’t press you to put on a happy face. I hope you’re comfortable using your scrapping to release some of your anguish. You have support here.

I’ll be back on the 26th with a Quick Trick, but don’t feel like you have to read it!

Tutorial Tuesday (Individual Style)

Challenge Spotlight: Pinterest

This month, Lisa Minor chose this fall wedding photo as her Pinterest Challenge inspiration.

Her description of the photo is “it’s all about the colors!”, “floral fall colors” and her Challenge is to use the photo to scrap what the Pin says to you. So far, eleven scrappers have taken her up on it. They mostly seem to have chosen the same theme for their layouts, as you’ll see. As with each month’s Challenge Spotlight, these layouts appear in the order they were uploaded. I’ll point out the aspects that caught my eye, and each layout is linked to the Gallery so you can pop over and offer some praise. Just click on the scrapper’s user name and you’ll fly over to the Gallery.

First up is B2N2Scraps. She’s got the fall theme, the colours from the photo and the flowers. She didn’t miss a trick! Her simple layout puts the focus on the smiles in her photo.

KarenDiamond has the fall theme as well, with a bit more of the blue from the Pin. I see she’s anonymized the child in the circular photo as a silhouette. This technique works perfectly in a backlit photo, instead of just blurring features.

DianeInOz went for the colour palette, creating a whimsical layout with a clever nod to autumn. I love that wood-look cow cutout!

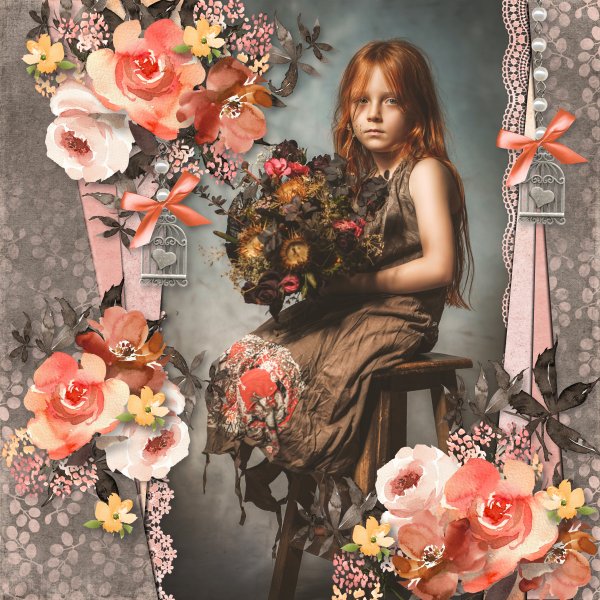
This stunning layout is from greenfiend27. Her choice of soft oranges and corals against a gray, dusty background, with ample floral elements, provides the perfect foil for that beautiful photo. The result is elegantly grungy. I think this is my favourite of the bunch.

Windswept has all the colours in there, and chose our major autumn celebration as her theme. Her focal photo is so cute!

The pocket style of zippyoh‘s layout works so well with all those pumpkin photos. The harvest/autumn theme is obvious but not in-your-face. She accents all the orange in the photos very nicely with touches of purple, gold and white. Aren’t those little foxes just too sweet?

For her layout, pinklily chose to document a week of her late fall activities from last year. (I’ve been to that mall… just sayin’. Winkwink!) The colour palette was what inspired her here.
Route66 pulled only 4 of the dozen colours in the Pin for her layout. Looks like somebody’s been playing with title tuts. 😉

The subject of this layout from gmae is a somber one. It could be seen as a play on “fall”, and a clever one at that. She has pulled a few of the fall colours from the Pin, and added some floral elements. Possibly the only flowers these resting places see these days…

Pippin went all in on individual style here. Her sole connections to Lisa‘s comments are her floral clusters and the pinks and blues from the Pin photo. This is a layout after my own heart.


Last up is this very autumnal layout from snojewel. She has some subtle hints of gorgeous teal stamped in her background. The oranges, browns, golds and burgundies complement her photos of Ben very well.

Next week I’ll have a Quick Trick for you. I haven’t decided which one from my little list of topics… we’ll all find out together!

Given what’s happening around the world these days, I hope this has given you a brief break from fear and worry. I also hope the people you love are safe and healthy. And that we all stay out of harm’s way.

Tutorial Tuesday (Individual Style)

Challenge Spotlight: PINTEREST CHALLENGE

The Pinterest Challenge is a new-to-you-in-’22 challenge, brought to us by Lisa Minor. I’ll confess, when I first read the premise for this challenge I wasn’t sure how it would work, although I LOVE Pinterest and have to actively discipline myself or I’d never get anything done. I digress. The August 2022 Pinterest Challenge Gallery shows us how well the challenge works – really well. It works really well. Let’s have a look. In no particular order… the scrappers’ names are linked to their layouts in the Gallery, in case you’re inclined to leave them a comment.

The basic premise is that Lisa provides a pin (or several) she’s saved to one of her Pinterest boards as inspiration, with a brief description of what she’d like to see contained in the layouts participants create. For August 2022, she provided this image, followed by: “This pin says to me “beach, seaside, vacation time, travel, elegant, relax and make memories”. So what does it say to you? Scrap it!” 

First out of the box is this layout by garrynkim. Can you see which aspects of the pin were chosen? Of course you can… the mood, the water and the colour palette are right there.

This layout from bkasko also features water, and the theme of rest and relaxation. I really like how her photos all have the waterfall in them, and how she’s masked her large group photo.

Oh look! B2N2Scraps has water photos too! I sense a trend. She’s also incorporated the colour palette from Lisa‘s photo. I just love the water droplets in the background here.

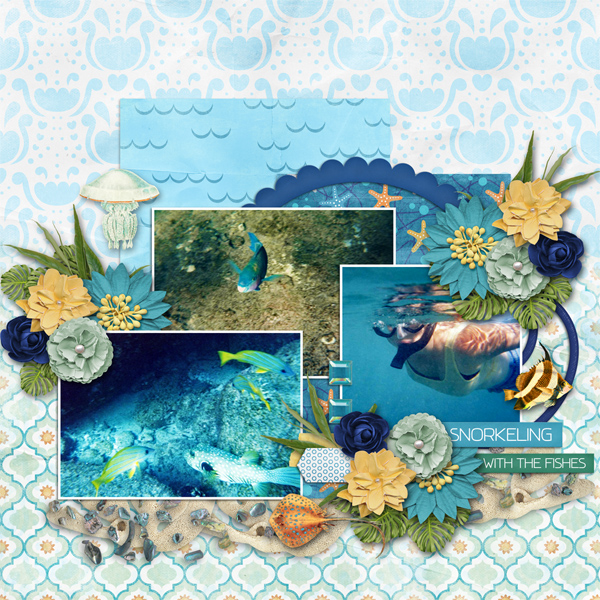
More water! These underwater photos are amazing!! The tropical sea elements robinoes66 has clustered around her photos mesh really well with the topic of the photos and she’s also pulled colour from Lisa‘s image. Strong work!

I’m starting to think water is an integral part of vacation… if I only had these layouts to define the word, that would be the most obvious aspect, amirite? I’ve gotta say kristal, that’s one HUGE pond! The colours from Lisa‘s image are there too.

Water sets the scene for basketladyaudrey too. She was inspired by the making memories part of Lisa‘s impressions. That woodgrain paper reminds me of a dock, and she’s pulled colour from her photos into her choice of papers and elements.

Even mary-lynne has included water in her layout, but more as a backdrop to their leisurely breakfast. Her colour choices echo her photo beautifully and she’s masked her large photo perfectly.

pjm117 took her inspiration from both the watery view and to a lesser extent, the colour palette. I love the quotes she’s used for her word strips… as I wiggle my bare toes.

Ah! A layout that was inspired by the food in the image… both are focused on breakfast. route66 kept it simple, with the breakfast photos taking the spotlight.

KarenDiamond really understood the assignment! Beach, vacation, relax, memories… they’re all in there – without literal water – and the kit she used screams summer and heat.

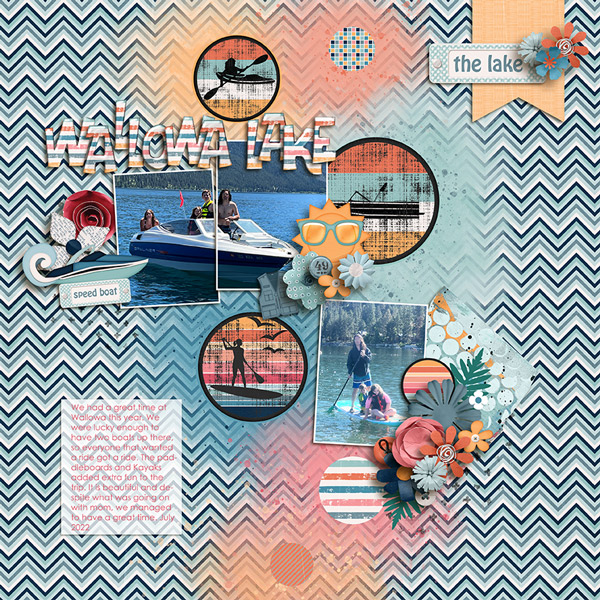
The summery colour palette of grannyNKy‘s layout, and  yes… water, meet the criteria for the challenge too. They look like they really had a great time on the lake.

Last, but not least, this layout from DianeInOz went all the way down the vacation-making-memories path. The incorporation of a lot of photos tells a story of a busy, fun-filled day and the few elements she used to embellish them kept the overall impact from being overwhelming. Truly a case of less-is-more!

What would your layout look like if you took up this challenge? I’m not a beach person, but I do enjoy breakfast overlooking a scenic view.

Tutorial Tuesday (Photoshop Elements)

Another Paper-to-Digi Technique: Partial Cutouts


Anybody own a Cricut? This tutorial is based on a Cricut Joy video sent to me by CalGirl (aka Steph). She asked if I could see a way to make a similar version using only digi-supplies. I’m not going to minimize the amount of work involved in recreating the folded hearts using Elements – my first attempt was so complicated that I couldn’t possibly turn it into a tutorial. CONTENT WARNING!! There are many steps to this, and it’s definitely not as quick or easy as a Cricut technique where somebody else has done the heavy lifting and all you have to do is push a button. But if you’re intrigued and think you might want to try it, read on! [Editor’s note: Read all the way through before you attempt this stunt. You’ll Work Smarter than Jan did!]

I like to start big and resize later. I want to be able to see what I’m doing and work as smartly as I can. Having said that, there are LOTS of things inside the Photoshop Elements Toolbox that I haven’t explored yet, and there are probably much better and easier ways to accomplish a lot of things. Today isn’t the day for experimenting with that, so we’ll start with a 12×12 canvas with a transparent background.

Some of these steps can be rearranged; I’m showing them to you as I figured them out so please bear with me. 😉 This is one that could wait but that isn’t how I worked it through. I chose the Custom Shape Tool (aka “cookie cutter”) and looked at All Elements Shapes to decide which shape I’d use for my demo.

I was thrilled to see this outlined heart, so similar to the shape used in the Cricut video. Remember that when working with Custom Shapes, they will need to be Simplified before you can manipulate them. Later versions of Elements include a button in the Tool Options to make it quicker. If your version doesn’t have it, then you’ll need to right-click on the layer in the Layers Palette and choose  Simplify Layer.

The next seven (yes, SEVEN) steps are optional, but they will make the rest of the technique go more smoothly by providing placement assistance. On a new blank layer I dragged out a 6 inch circle using the Elliptical Marquee Tool and centred it on the canvas.

Next I added a black Stroke to outline the circle. Edit>Stroke (Outline) Selection.

To make sure it’s visible, I used 10 pixels and put it on the Outside of the Selection.

I want to turn it into a wagon wheel. The Cricut version has eight hearts, so I’ll make my wheel with eight spokes. Adding in the spokes is easier when I have the Grid visible. View>Grid or CTRL/CMD>’

Drawing straight lines is easy when you know how.

Click on the starting point. Hold down the SHIFT key and click on the end point. Easy-peasy!

Then the Grid can go away. (Pssst… this is also how you can turn on and off the Guides : CTRL/CMD>; ) If you think there might be a time when this wheel could come in handy later, Save it right now as a PNG. That’ll preserve the transparent background for you.

Now I made my first outlined heart shape. I made it symmetrical by setting Fixed Size>3 in by 3 in. It can go anywhere on the canvas to start out, then moved into position once it’s been Simplified.

Then I used the wheel to position. In retrospect, I’d put the first heart on the vertical axis and save some steps later. I always figure these things out AFTER the fact. <sigh> I made some Copy Layers. Right-click>Duplicate Layer>OK will drop the Copy right on the canvas. Or use the keyboard shortcut CTRL/CMD>J.

Because this is a demo and I didn’t want it to be too complicated, I decided I’d put four hearts in my circle, not eight. And then there’s my first stab at this, where I had eight, but it was a dumpster fire!

This is something I hope you’ll internalize, because it can really be a big time saver. Whenever I’m making something up as I go along, I make Copy layers so that if I mess up later, I’ll still have the steps that worked properly somewhere in my stack. I just tuck it away by turning Visibility off.

I chose two pink papers from Ooh La La Scraps Birthday Wishes Girl for my demo. I dragged the lighter pink on top of the hearts layers. You can see the darker one at the bottom of the stack, tucked away for later. I also CTRL/CMD>Clicked on the hearts Layer Thumbnail to Select the edges of the hearts.

I wanted to Cut out the hearts from the light pink paper, so first I had to tell Elements to Invert the Selection. Select>Inverse or CTRL/CMD>SHIFT>I

Then I could Edit>Cut [CTRL/CMD>X] the rest of the paper away. (Once you Cut paper with a Cricut, it’s too late to change your mind.)

Before I moved on and made a mistake I couldn’t Edit>Undo [CTRL/CMD>Z] I made a Copy of the pink heart layer and tucked it away. If I don’t end up needing it I can always Delete it later. Here’s where you see the results of NOT positioning the first heart on the vertical axis… I’m Rotating the whole set of four hearts so the first one is… on the vertical axis. 😮

If you’re wondering if the next few steps are necessary, I assure you… I tried NOT to have to do this, but it was an abject failure. Using the Rectangle Marquee Tool, I dragged out a rectangle over half the heart, with one edge exactly over the pointed parts and carefully avoiding the other heart near it. It means I’ll have to repeat this step to remove the rest of that half, but there isn’t a good way around that.

Next, I Cut that bit inside the box away. Edit>Cut [CTRL/CMD>X] then drew another box and Cut again to get the rest out of there.

I Cut away the same side of each of the hearts, leaving this. Make a Copy of this layer and tuck it away. You’ll thank me later!

Again, this step would have been unnecessary if I’d only put that first heart on the vertical axis, or if I Rotated and left everything that way. Hindsight, y’know!

Each pink half-heart needs to be on its own layer so they can be individually manipulated. So again, I used the Rectangle Marquee to Select one of the halves.

Only this time I Cut and Pasted the paper piece. First Edit>Cut [CTRL/CMD>X]

Then Edit>Paste [CTRL/CMD>V]

Elements will keep the Pasted piece in the same orientation but will drop it on the centre of the canvas. So it’ll need to be nudged back into its rightful place. Having that original layer tucked away helps a lot with this! Do these steps for each of the hearts.

Now to create the appearance of a folded-over, lifted half. I tried a few tricks for this and found using Image>Transform>Distort worked best.

Grab the handle on the Bounding Box that’s closest to the curved part of the image. Push it up a little and in toward the centre a little to create the illusion that it’s lifted off the page. Take care not to move the cut edges where the “fold” is happening. Work this magic on all the pieces.

How’s that? The original hearts layer really helps with visualizing the effect, don’t you think? It’s starting to take shape.

I tucked the original hearts layer away again and turned the visibility of the dark pink paper back on. Time to add some custom shadows. [Editor’s note: If you’re already comfortable with custom shadowing, feel free to skip ahead.] First step is to add a new blank layer UNDER the object you’re going to shadow. Hold down the CTRL/CMD key and click on the “blank page” icon at the top left of the Layers Panel. Then with that layer your active layer, CTRL/CMD>Click inside the Layer Thumbnail of the object to be shadowed to Select its shape. Then using the Paint Bucket Tool and a “shadowy” foreground colour, Fill the shape with the shadow colour. You can use black [000000] or something like an umber [2c1902] for your shadows.

Adjusting the shadow to help with the illusion the paper is lifted is easily accomplished with the Smudge Tool. The icon looks like a hand with a finger rubbing on the paper. More on using the Smudge Tool in a minute. When you’re creating shadows, think about where the light is coming from, how much light will get under the object, and how diffuse it might be.

Shadows that are too harsh will always look out-of-place, so adding a Filter>Blur>Gaussian Blur… will soften the edges even more than Smudging does.

If the Preview box is empty when you get to this screen, click your cursor over the edge of your shadow layer somewhere and it’ll show up. Then you can watch the effect in action in both the Preview box and on your canvas. I decided this shadow needed a 12.5 pixel Radius Blur.

OMG. I shouldn’t have put the CNN documentary on Carole King and James Taylor on the TV. I’m so distracted, singing along! To make the shadow look most realistic the Blend Mode needs to be changed to either Multiply or Linear Burn. Those modes make the shadow layer more transparent so the colour underneath the shadow shows through. Last step is to decrease the Opacity of the shadow layer until it looks natural. I dropped it to 45%.

And it’ll look like this. Follow the shadowing steps for each of the half-hearts.

As promised, more info on using the Smudge Tool. This little thing is pretty powerful and it’s too easy to go overboard! I’ve found that using a large “fingertip” and gentle pushes gives me the best results. Sometimes there’s a lag between making an adjustment and it being visible, so try not to be in a rush or CTRL/CMD>Z will get a workout.

Once all the halves have been shadowed, on to the rest of the technique.

I dragged another light pink paper onto the canvas underneath all the heart layers. It looks interesting, but we’re not there yet.

I flouted my own rule and didn’t make a Copy of the unaltered half-hearts, so I had to go back and recreate that set of steps. Here’s where you’d want that Copy I mentioned back about 18 screenshots… CTRL/CMD>Click on the Layer Thumbnail of the unaltered halves, and with your uppermost light pink paper layer active, Edit>Cut [CTRL/CMD>X] the half-hearts out.

I decided I really needed to have the uncut halves to be recognized, and the best way I could think to make it visible but unobtrusive was to Emboss it. First, I had to show Elements what it was Embossing. I created a new blank layer on top of the pink layer from the last step – just Click on the blank sheet of paper icon at the top left of the Layers Panel. On this layer, I CTRL/CMD>Clicked on the original hearts Layer Thumbnail to Select the edges to which I’ll add a thin little Stroke.

It doesn’t have to be too obvious, so I went with a 2 pixel black Stroke Centered on the edges.

It was pretty in-my-face so I decreased the Opacity to 26%. See it?

I didn’t want the WHOLE outline to be Embossed so I used the Eraser to eliminate the line on the inside opposite the “folded” edge and all around the “folded” half’s edge, just leaving the line on the outside of the uncut side.

There’s a quick way to get to the Simple Emboss command. Click on More down in the bottom right under the Layers Panel, then choose the Favorites tab from the pop-up. Simple Emboss is right there.

The default settings aren’t going to be right for this, so I double-clicked on the fx icon to the right side of the Stroke layer to access the Command menu. Make sure the Lighting Angle matches your shadows, then adjust the amount of Bevel the effect gives. I decided 35 pixels Down looked right.

Alrighty! Now it’s looking like something. But it’s missing something.

The light pink paper needs a Drop Shadow! But I won’t make you do a custom job for this one. Styles>Drop Shadows>Soft will work.

It’s a little too harsh for me, so I double-clicked on the fx icon for that layer to access the Drop Shadow controls then moved the sliders until it looked right to me.

Last thing I did was to add some flourish-y brushes between the hearts. The finished product looks similar enough to the video for me!

I’ll be back in a day or so with the transcript of my chat with our two February Spotlight Designers. There’s too much going on here today and I don’t want our chat to be lost in the pile! Next week, I think I’ll have mercy on all of us and go for something simple, with only a few steps. Until then…

PDF Version : https://bit.ly/3sZnHMv


Tutorial Tuesday – GingerScraps

New Year, New Challenges!

2021 has gotten off to a smashing start at GingerScraps. There have been a lot of “new” ladies joining our Facebook group and that tells me we’re doing something right. I truly believe GingerScraps IS the “friendliest place in the Digi Scrapping world“. Participation in our Forum has grown so much over the last year, especially in the Welcome! subforum. Of course, each of us is looking for something specific when we embark on a new adventure. For me, I came to GS as a creative team member for one of the GingerBread Ladies; this was my “assigned” store. I spent some time looking around, trying to find a way to engage myself and discovered the GingerScraps Challenges. Bonanza!!!

For those of you who have been GingerScrapping for awhile, you probably already have an established Challenge routine and likely won’t feel the need to read on. That’s cool… no pressure! But if you’re still getting comfortable here, you might not have looked into the Challenges and could maybe use some pointers. AND……. there are NEW challenges beginning this month so I want everybody to know about them.

Let’s begin with some general Challenge info. Challenges are one of the best ways of building your skills, and they also provide a framework to build them on by giving specific guidance such as a topic, a technique, a template or a word art. They’re also a good kick-start when you’re not really sure what you’re going to scrap, or when you’ve lost your mojo. But at GS, Challenges also provide a method of growing your stash! Several of the Challenges include access to high-quality freebies, such as brushes, mini-kits, templates and word art – you just have to download them! Even better than that though is the Challenge Reward! These Rewards are mega-kits created in collaboration by several of the GingerBread Ladies and there’s a new one every month. The January Reward looks like this:

Missi (missdamsel) does a really good job of explaining how Challenge Rewards work in the Cookie Jar – the Challenge tracking thread where you link to the layouts you’ve created for the Challenges. More about that later. But I’ll give you a little recap: You must create a different layout for each Challenge. Your Challenge layouts generally must contain at least 50% GingerScraps content – things available in the GS store – although the Designer Spotlight Challenge has a higher required content rule, 90% to be product from the Spotlight Designer(s) only. Another must is that you also post your layout in the Challenge thread. When you upload your layout to the Gallery, please also include the Challenge category in your description so it goes into that Challenge’s Gallery too. There’s a detailed set of instructions for this process in the tutorial A Road Map for Newbies. (**Just had a thought when I was talking to my hubby about this tut… MAKE SURE YOU’RE UPLOADING TO THE CORRECT YEAR’S CHALLENGE GALLERY!) When you’ve completed TEN Challenges and recorded them in your Cookie Jar, you’ll receive the Challenge Reward kit for the month you hit that milestone. Missi keeps track of all the Cookie Jar entries and sends out a Private Message with the coupon code for the Reward to the scrappers who qualify. One thing that can be confusing is that if you go OVER ten layouts in a given month, those “extra” ones aren’t carried over for the next month. If you create ten layouts every month, you get all the Rewards! Okay, that’s the important 411 on general Challenge stuff. Now let’s talk about some of the new ones!! (Each of the Challenges will be linked in the description so you can just click on the red text and go right to the Challenge. All coloured, bold text in this tutorial has a link attached.)

The Challenges are listed in the Forum in alphabetical order, so that’s how I’m going to discuss them. First up is Jumpstart Your Layouts: with Jumpstart Designs. GingerBread Lady Sheri provides each Challenger with a free product – this month it’s a really cute mini-kit – and the “rules” for the Challenge, which will change each month. For January she wants each scrapper to scrap their inner thoughts about the coming year, and include a selfie somewhere on the page. For some of us, the selfie IS the challenge!

Connie Prince has changed the focus of her monthly Challenge so I’m considering it to be a new one. Life Chronicled is a way to scrap about the more ordinary parts of our lives to give our future generations glimpses of our lives as they were every day, to let them into our heads a little so they “know” us. She gives some talking points to help decide where the layout will go. She also includes a mini-kit, that coordinates with one of her larger kits, for inspiration. (It’s not a required component, though.)

Marina brings us our third new challenge, Magical Scraps Galore’s Surprise Challenge. Each month the focus of the Challenge will be a complete surprise. For January she’s requiring a ten-item overlapping cluster on your layout with a list of each of the 10 objects included when you post your layout to the thread. Clusters can be really intimidating to new scrappers, and if you need some support, there’s a tut for that: Creating Clusters… Not Clutter

While it’s technically not new, the Mix It Up Challenge is now being hosted by Mish Fish every month. It’s similar to the Surprise Challenge in the sense that every month the goals will be a surprise. For January, Juli has given us a 1-2-3-4 list of ingredients for our layouts. 1 word title, 2 photos, 3 flower/element clusters (clusters again!) and 4 (or more) lines of journaling. Piece of cake, right?

This next one is bound to be a huge hit. My Favorite Things with CathyK is another opportunity for personal layouts, focusing on YOU and what you take pleasure in. Cathy would like us to think about, then scrap, some positive moment from 2020 for her inaugural Challenge. It wasn’t the most uplifting of years for far too many people, but there’s always at least some good mixed in with the bad. When I read Cathy’s post, I knew immediately where my layout will go.

Scraps N Pieces is bringing us a Pinterest Challenge. (Don’t worry, you don’t have to get into Pinterest, she’s done it for you!) Each month she’ll provide a mood board created from images she’s pinned, each with a related theme, to provide you with some inspiration. Your layout can take its cues from any aspect of the pinned images that pop into your head. January’s images are about food and how we relate to it. Who hasn’t started a new weight loss plan in January?

And the final new Challenge for 2021 is the Quote Challenge with BoomersGirl Designs. Each month Lori will provide us with a quotation she’s found meaningful. The challenge is to use it as a basis for a layout, but it doesn’t have to INCLUDE the quote. January’s quote is about the gift of time, and what we do with it. Layouts will end up related, but unique, because our personal stories will take us each in a different direction.

I have my personal favourites when it comes to Challenges and I have my own process for doing them. Having worked as an ICU nurse for 25 years, process for me is like breathing! It helps me organize myself and keep myself on track. I start off at the beginning of the month by looking at each of the Challenges I enjoy doing to see if they spark anything. If they do, I right away create a folder for them. (I have folders for everything!) The folder’s name will include the Challenge name and some clues about the topic so I can see at a glance what I should be looking for later when I’m ready to work. If the Challenge includes a freebie like a brush or a mini-kit, I extract the zipped folder right into my Challenge folder. Then when I’m ready to create, I Copy all the photos, elements, paper and whatever else I expect to use into the folder too so it’s all in one place. Once the layout is finished and I’ve posted it to the Gallery, I change the name of the folder by adding a simple hyphen at the front of it that tells me it’s complete. You can see in the screenshot (you had to know there’d be a screenshot!) none of the folders have a hyphen… I haven’t done any work yet. But I’m going to start right away, because I WANT the Challenge Reward!! You might also have noticed that half of those folders are for the new Challenges. Because they’re awesome!

On a more tutorial note, my plan for the coming year going forward is to have the tutorials available as PDF files. It’s a work-in-progress as Ginger and I try to work out the logistics, but we wanted you to know the work is happening to make it a reality! Unfortunately, the amount of time required to convert all 200 previous tutorials would be huge, so they won’t be converted. Stay tuned!


Here is a link to this tutorial in PDF version! https://bit.ly/3biN5FP

Tutorial Tuesday (Photoshop Elements 2018)

Double Indemnity? Nope, Double Exposure!

Here we are, at the very end of 2019!! I hope you all had some wonderful times with family and friends over the holidays. If you’re celebrating tonight, stay safe!!

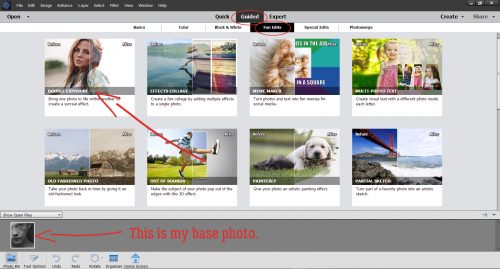
Are you ready for another Guided Edit? This one was only introduced with the 2018 version, but I LOVE it!! It’s under the Fun Edits tab and it creates a double exposure almost automatically. It caught my interest when I started seeing lots of double-exposure photos popping up on my Pinterest feed after I Googled PSE techniques. All the how-to’s were for Photoshop‘s full version and try as I might, I wasn’t getting the results I hoped for when I tried to find a work-around. Then I tried this. I know you’re going to love it. I’m playing with photos I downloaded from Pixabay and chose a black-and-white close-up portrait as my base photo.

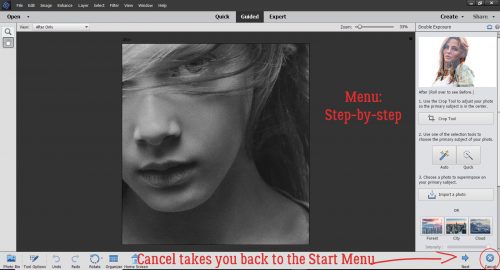
Once I clicked on Guided>Fun Edit>Double Exposure this is the menu that comes up. (Remember, if you click on Cancel, you’re back to the Start Menu so be very sure that’s what you want to do…)

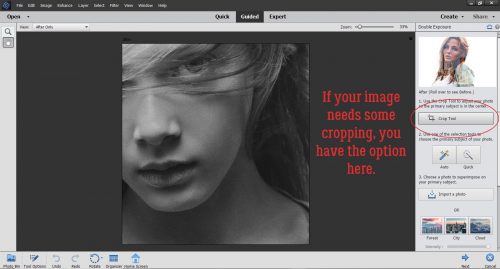
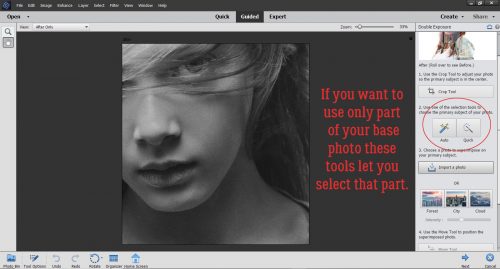
For this tutorial I just took the most basic route possible with my photo choices so as to make it as straight-forward as possible. I’ll be playing with it a lot more in the weeks to come, so you may see another more complex tut later. The Edit tools are lined up top-to-bottom for easy progression through the steps. If your photo needs to be cropped, this is when you’d do it, with the Crop tool. The Guide suggests cropping so your desired focal point is in the centre.

There’s also the option of Selecting only a portion of your photo. I skipped both the Crop and Select steps altogether.

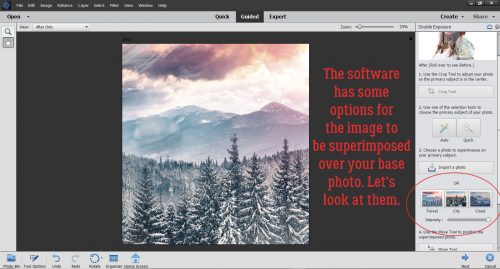
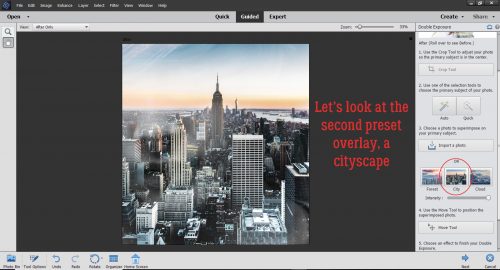
Now, the software has some images already embedded in the Edit that you can use for your double exposures: a forest scene, a cityscape and some clouds. Here I’ve superimposed the forest scene over my photo; if you look in the upper left corner you can see the girl’s eye, but it’s pretty well concealed.

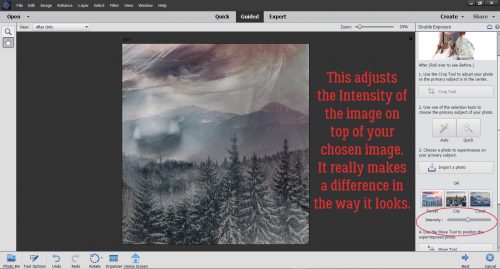
Thankfully the software knows that might not be the look you’re after. The Intensity of the superimposed photo can be easily adjusted by pulling the slider to the left. Here you can see the difference it makes to decrease it to about 47%.

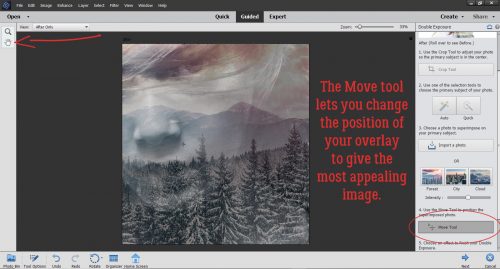
There’s also the opportunity to move the superimposed image around a bit by using the Move tool. It can be activated either by clicking on the tool image in the upper left of your workspace, or by clicking on the tool bar in the menu.

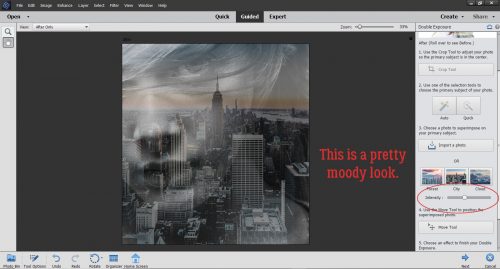
The cityscape almost completely obliterates the original photo. Good thing it’s adjustable!

I decreased the Intensity to about 35% and the resultant image is really moody. It suggests the girl is homesick for this view, at least in my imagination…

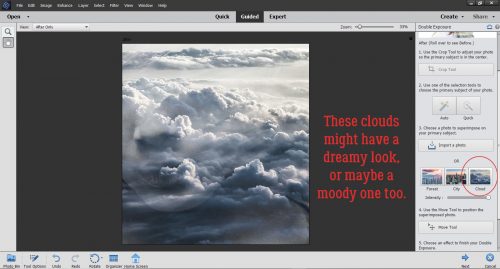
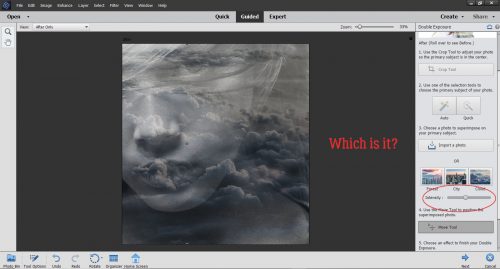
What will the clouds do? Well, at first glance, we can see her nose and chin fairly clearly, but not her eye, and I think the eye is the key.

I’m conflicted as to which emotion this evokes. I think she looks wistful, so maybe it’s dream-like.

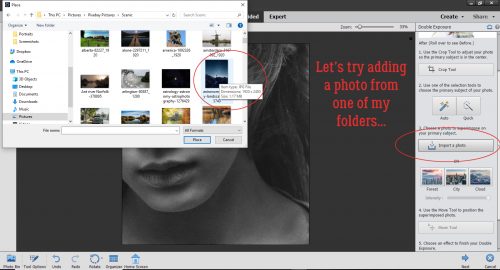
Okay, before we move on, I want to show you how to use another of your own photos. So instead of using a preset, I clicked on Import a Photo. It opened up Windows Explorer and let me find a suitable photo for the look I’m aiming for. Once I clicked on the thumbnail in the photos folder, I clicked on the Place button.

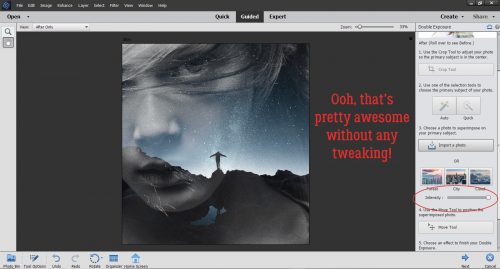
Wow! That’s a really dramatic image!! I don’t even know if there’s any adjustment needed.

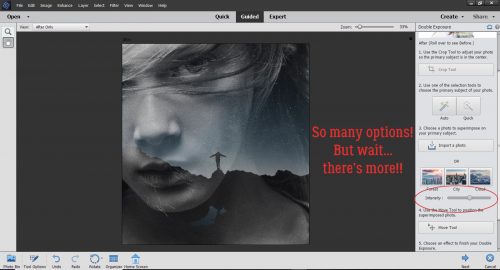
But just to be sure, I decreased the Intensity  by 50%. There are still more ways to manipulate the image so let’s keep going.

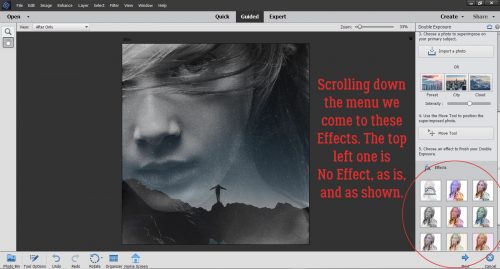
Before I moved on, I opted to shift the rocks in the superimposed photo down and almost off her face. It makes the sky more of an element in the image and you can’t see the demarcation where the superimposed photo ends. Further down the menu, there are some more Effects presets. So working with the image with the superimposed photo at 50%, let’s hit it with each of the Effects to see what they do. The very first one, top left of the tool menu is No Effect… just the way it is.

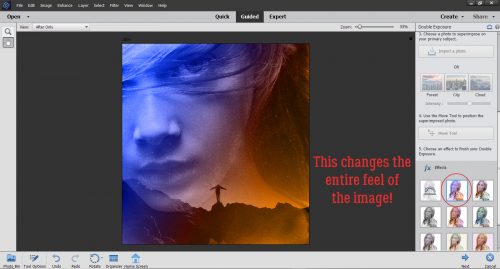
I’ve circled the Effect with each image so you can see what they look like right out of the box. This one adds a lot of colour.

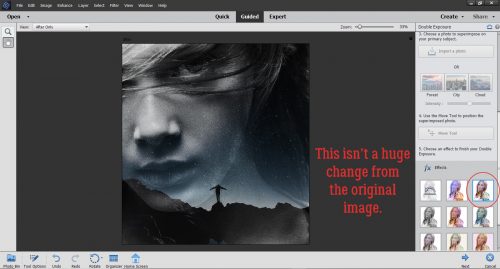
This one makes the original image more vivid and increases the contrast.

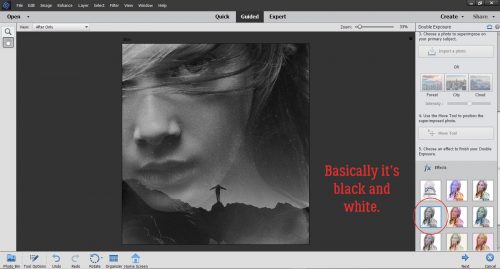
Here, it’s basically a black-and-white version. If my original photo had been a colour portrait, it might make a big difference to use this Effect.

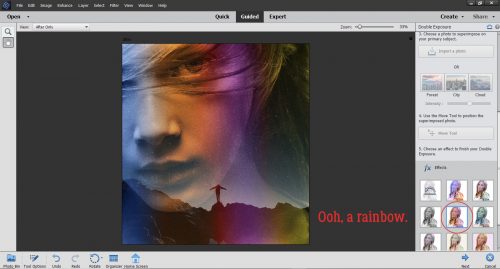
This one is a soft, rainbow-hued look.

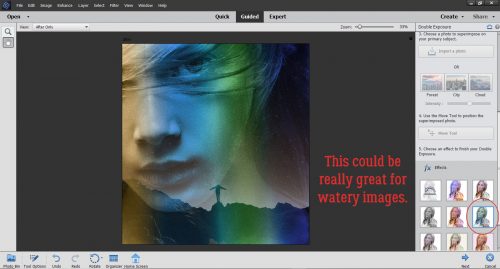
I think this one would be amazing with underwater photography, or for photos with a beachy, watery theme.

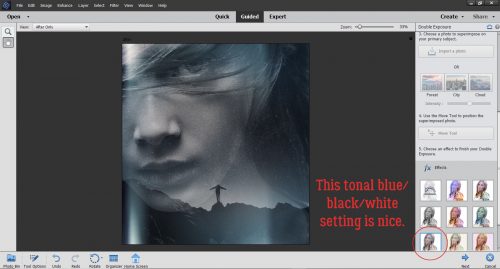
This adds a touch of cool colour to a tonal black-and-white image.

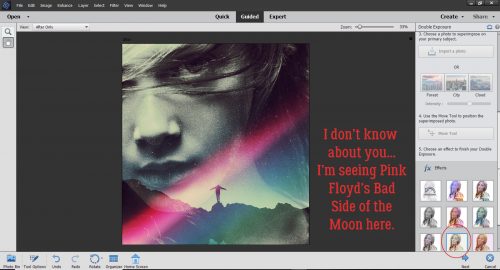
I’m showing my age. All that’s missing is a prism in the middle.

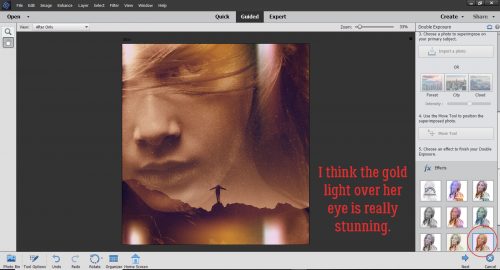
The last one gives the whole image a warm, golden look.

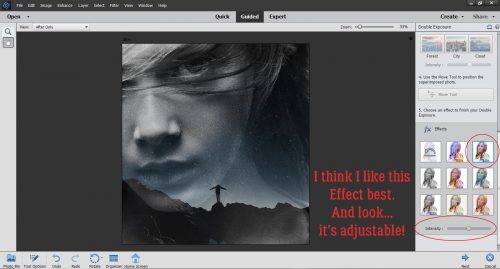
After seeing them all, I decided I like the third version best. I decreased the Intensity to 50% again and have a really eye-catching image. I might add an inspirational quote into the dark area to the right of her neck. What do you think?

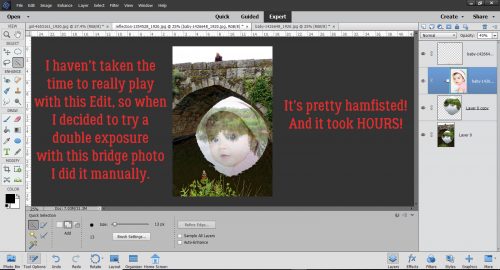
Before I shut down for the night, I decided to play with a couple of other photos I had. The one of the stone bridge provided a perfect frame for a superimposed face, but I didn’t take the time to figure out how to use the Guided Edit. Instead… I took a lot more time doing it manually. Duplicated layers, layer masks, erased areas, clipping masks, more layer masks to bring out the blue in her eyes, blend modes, sheesh. There’s gotta be a better way! When I find it I’ll share it with you!

I hope that whatever 2019 brought your way is greatly improved on in 2020! I know there are big things coming up for our family, details to follow. Happy New Year, dear GingerScrappers!

Tutorial Tuesday (Photoshop Elements)

Another Paper-Scrapping Digi-Hack!

Are y’all enjoying GingerScraps‘ Eleventh Birthday Bash?

So, I was wasting a rainy Sunday afternoon browsing Pinterest, trying to ignore the chill in the air and looking for distraction. And suddenly, there was some inspiration for a tutorial (as soon as I figured out how to do it!) for another digital version of a paper-scrapping technique. And it builds on the heat-embossing tutorial from last week, so it seemed like it was meant to be. Here’s the photo that caught my eye, from the Stampin’ Up design team. Do you see where I’m going?

If you’ve read any of my other tutorials, you’ll know that I like to do things like this on their own canvas, and I like to work large, then make small. To that end, I opened up a 12×12 canvas on my workspace. Then I browsed through my brush collection until I found a great set of snowflake brushes that came from a former GS designer, Pretty in Green.

I like the look of my inspirational image so I’m going to use black, but of course you do you!

I enlarged the brush to its maximum size. It can always be resized later (as long as it’s on its own layer).

Then I dropped a tonal paper from Connie Prince‘s pretty Snowflake Kisses kit UNDERNEATH the brush layer.

I’m not going to pretend that the next few steps didn’t take a lot of trial and error to get it right. The first step is to click on the Layer Thumbnail of the BRUSH layer to select the edges of the brush.

Then I clicked Select>Modify>Expand to make the selection bigger.

Here’s where the take-a-guess-and-hope-for-the-best comes in. I want all the various parts of the brush area to be contiguous with the others. I finally settled on 75 pixels.

Because the brush was designed by a human and not a machine, the hearts weren’t exactly and precisely spaced away from the solid line outline so the pixel width had to accommodate for that in order to eliminate the gaps. When you try this yourself you’ll soon see what I mean. But the gaps can’t stay, they mess up future steps so getting it right now is vital.

I played with this whole technique for several hours before I got it all settled in my head. I want the paper to be a solid background for the brush, and that meant I had to eliminate those “coffin” areas. I knew I’d have to ensure there are NO tiny little open areas in the paper when I “fussy cut” it, so to make sure I got the job done in the most efficient manner I put a blank layer in between my paper and my brush. (If you look closely you can see the marching ants around the edges of the selection.)

But first I had to fill the selection to be able to see where the little gaps might be. On the blank layer, I chose the Paint Bucket tool and my black foreground. Then I clicked on a random spot inside the snowflake shape.

Of course, the marching ants still outlined the “coffins” so they’ll have to be manually filled.

To turn off the marching ants, you can click Select>Deselect or you can use the keyboard shortcut D.

Then I went back with the Paint Bucket and filled in each “coffin”. After they were all filled in, I clicked in several more random spots inside the outlined area to fill in as many of the invisible gaps as I could.

Then, just because I had tried to make this technique work as simply as possible about a dozen times already, I zoomed in on my black snowflake and using a black round brush, I covered up any remaining gaps.

There are two ways to use this shape as a clipping mask. This is the labour-intensive way. With the PAPER layer active, click on the mask Layer Thumbnail to select the edge and get the marching ants. Then click Select>Inverse (CTRL/CMD>Shift>I) to have the PAPER selected, not the shape.

Now you can Edit>Cut (X) the paper surrounding the mask away.

Now the mask layer can be Deleted. (Obviously, to Work Smart Not Hard, I could have moved the mask layer below the paper layer then Clipped the paper to the mask… which is what I did with the second example below. Live and learn!)

To get the flocked look on my brush, first I applied a Bevel Layer Style. Just as I did last tutorial, I clicked on the Styles button at the bottom of the Layers panel, then chose Bevels>Soft Pillow Emboss.

The default settings are fine, so on to the next step.

It’s a really good idea to Simplify layers when you’re planning to layer Styles, like I’m going to do here. Otherwise that bevel could disappear.

Several GS designers create Style sets to go with their collections but Katie of Just So Scrappy/Ooh La La Scraps is the only one who has a FELT style. I used JSS Lucky Me‘s black felt.

Look at that! And I Simplify

Now to do the digital version of “fussy cutting”, which leaves a thin white edge around the image. Super simple with a Stroke! Edit>Stroke (Outline Selection)

I just pulled 30 pixels out of the air and applied it to the INSIDE of the edge.

For those of you who have paper-scrapped, you know how the Stampin’ Up designers got the elevated look with their ornament cutouts. They used double-faced foam tape. Digitally, it’s a simple shadow! If you need a refresher on creating custom shadows, you can find my quick-and-easy method here. It starts with a blank layer UNDERNEATH the cutout.

I clicked on the cutout Layer Thumbnail with the blank layer active.

Then I Filled the outline with black.

So there’s the basic shadow layer. Clicking D gets rid of the marching ants and clicking V activates the Move tool.

I decided that I wanted a right-sided 30° angle on my light source so I nudged the shadow layer over as shown. To turn a flat black blob into something that looks like a shadow, it’s necessary to Blur it. Filter>Blur>Gaussian Blur it, to be more precise.

To see the effect the Blur filter has, you can click on an edge with the cursor and it’ll pop up in the box as shown. Slide the handle to the right until it looks good to your eye. I went to 11.1 pixels.

I always change the Blend Mode for my shadow layers, which will change the transparency and the overall effect, but it’s an optional step. With this one I used Color Burn. It’s important to do this step BEFORE you adjust the Opacity, because the Blend Mode tool will stay turned on if you do it later, and then when you use your arrows thinking you’re going to nudge something, it isn’t going to move, but it might change colour or disappear altogether…

And then adjust the Opacity to what looks right.

Then I went ahead and made a second snowflake cutout using (most of) the same steps.

When you have two objects overlapping, the shadow will look different where the items actually touch. So I used the Smudge tool (the one that looks like a fingertip) to push the shadow a little closer to the upper layer and to pull it away a little where there would be more space between the paper and the background. It’s subtle but it does make a difference. (Take another look at the inspiration photo if you’re still confused.)

How did I do?

Tutorial Tuesday (Photoshop Elements)

Numbers-Go-Round

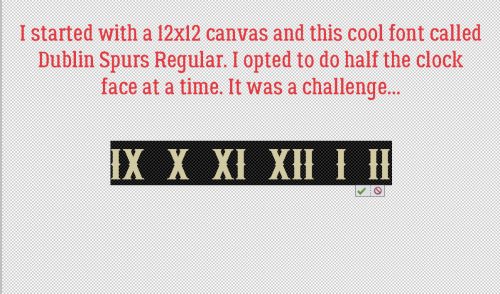
I almost didn’t think there would be a tutorial this week. I spent a huge chunk of time going through the paper clutter in my dining room sorting what needs to be kept and what could go to the shredder and at the end of it I was mentally exhausted. So I figured I’d do something fun; we’re redecorating and I want one of those huge farmhouse style clocks to go in the dining room. Bargain shopper that I am and not thrilled with the retail prices on these clocks, I took my $50 Lowe’s gift card and bought an 18″ chunk of stain-ready pine then started looking at examples on Pinterest. I knew I wanted Roman numerals on my clock so those are the ones I concentrated on. But how to get those numerals onto my slice of pine… PSE to the rescue. I thought.

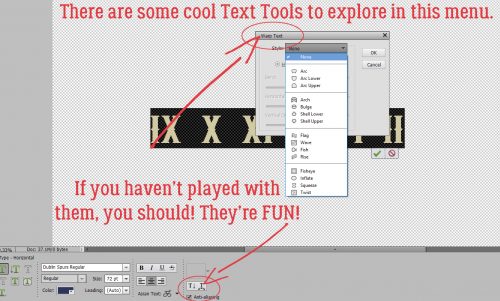
I wasn’t anticipating the number of times I’d have to undo it all and start over. So I thought, “Maybe someone else could learn from my mistakes!” I had already decided I would use the Warp text tool and had to figure out how to bend it to my will.

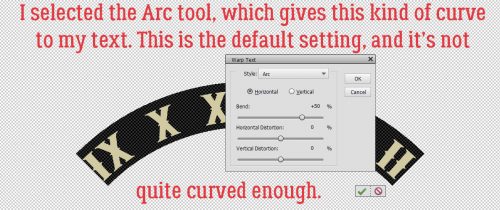
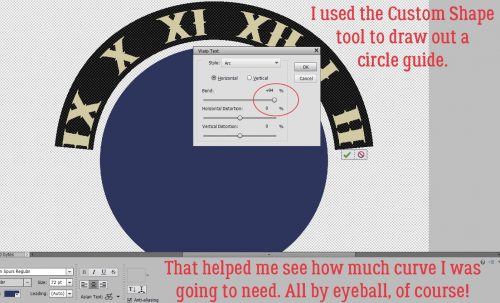
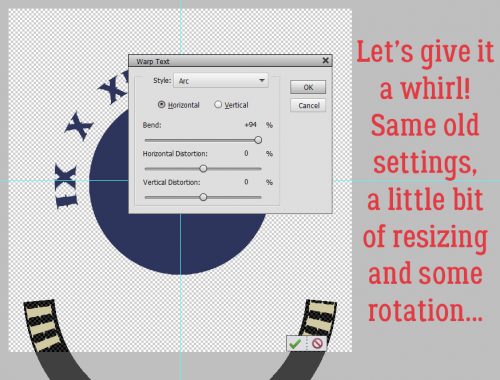
I tried a couple of options from the menu before settling on the Arc warp. It gives a beautiful curve but doesn’t distort the text too much.

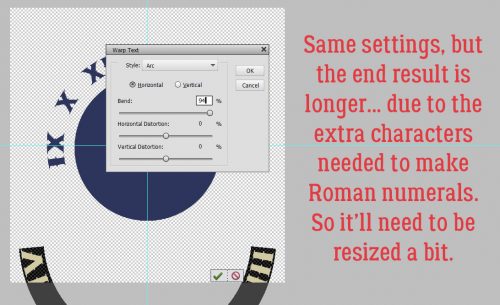
To give myself something to gauge the curve against, I used the Custom Shape Tool to pull out a nice perfect circle. The sliders do some crazy things to text! I went all the way over to the right with the Bend slider, but felt it didn’t leave quite enough space between the 8 and 9 or the 2 and 3. So I adjusted back to 94%

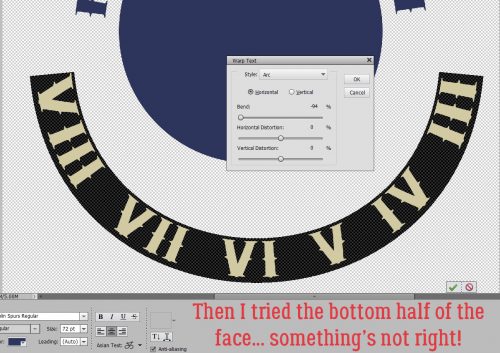
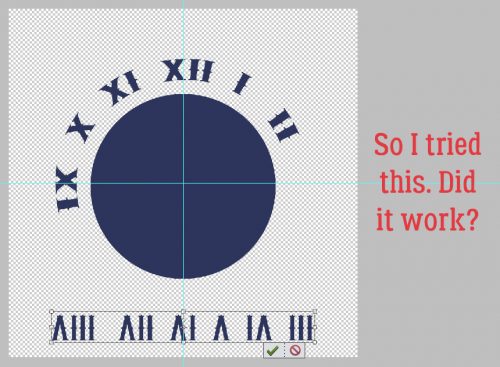
Then I typed out the rest of the numerals and warped them. But something doesn’t look right. I went back to my example on Pinterest and yep… it’s not right. The numerals on the bottom half are backwards.

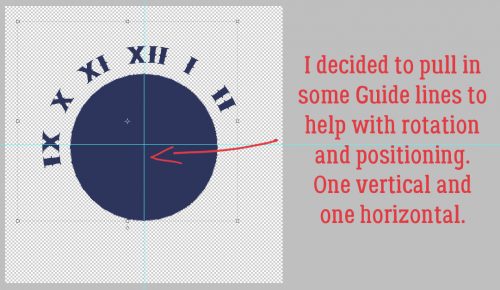
So I deleted that text layer but while I was trying to figure out how to turn the numerals on the bottom half around, I pulled in some Guide lines to make positioning the 12, 3, 6 and 9 easier.

And I tried it again.

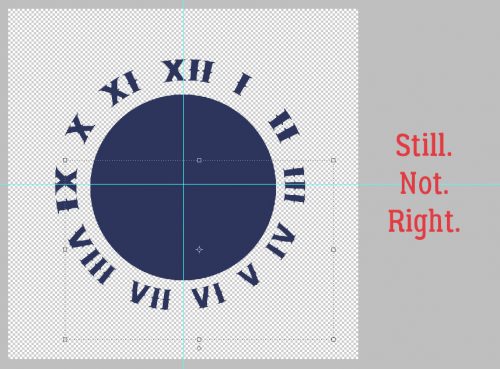
And failed. Again. So I thought, what if I flip the numerals horizontally?

Think it worked? As you can see, the bottom arc is a LOT bigger than the top one, which I did nothing to other than warp it.

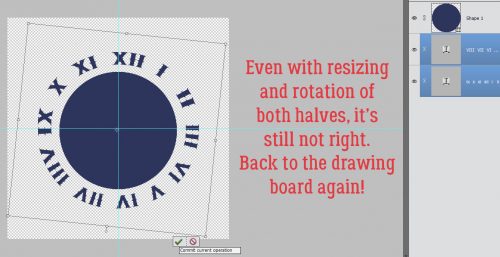
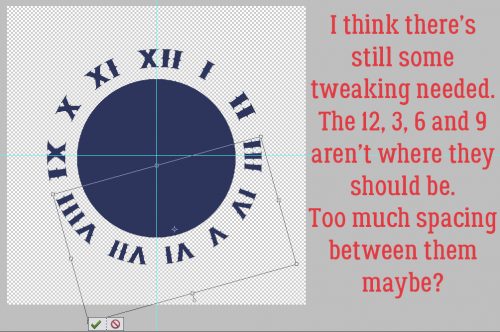
Even after I resized and rotated the two halves to a more correct position, it still was wrong. Even after several more tries to get it right, I still didn’t have it.

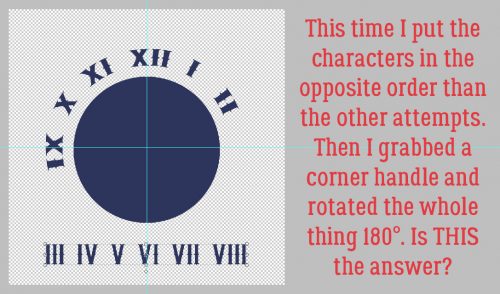
So I took a break. I went to work, spent the day recertifying my special competencies and writing two exams. I put it out of my mind altogether. Then after I got home and had a nice glass of pino grigio to forget the stress of my math exam, I had a EUREKA moment! Maybe I needed to put the characters in reverse order then spin them around 180°.

Did it work?

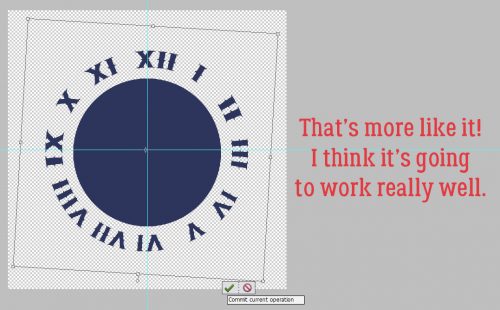
YES!! With some caveats.

I adjusted the space between some of the numerals and rotated everything a smidge.

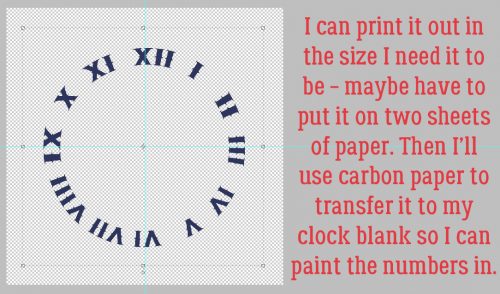
WooHOO! Now I can print it out in the size I want – even if I have to put it on four sheets – and trace them with carbon paper onto my clock. I’m so excited to see it all finished!

So there’s another way to add some originality to your text!

Pinspiration | Big Titles

GS_blog_BePinspired_Header

Happy Saturday scrappers! I was perusing around Pinterest today looking for ideas. I stumbled upon a lovely layout (will show you below) with a big title. That got my scrappy gears moving in my brain. So, I thought I would share that inspiration with you.

So often we allow the photos or a great paper to be the focal point of our layout. We plop a title on at the very end of it all (if we do at all). Personally, I struggle with coming up with a great title. Really, as I scrap mostly my son, I feel like slapping “Isaiah” on every page. lol. I searched “scrapbook big title” on Pinterest & was inspired! Here are some great examples of making the title your focal point. Making a statement with a big title.

399614757ad42d854a1e6e689511aabe

The Pin | Original Source

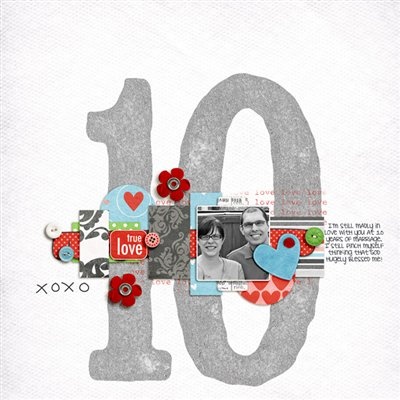
I really like the idea of the large number that signifies something. It works at the title as well as a great backdrop. The choice of alpha allows for the large number to blend perfectly to the layout & not over power it. Who doesn’t have a number that is significant to them. A person’s age, an anniversary, or a reunion. The next time you are scrapping a memory that has a significant number marker, think about making that your focal point. Scrap it with a big title!

499e14bfe7044229cceafe3688c27a78

The Pin | Original Source

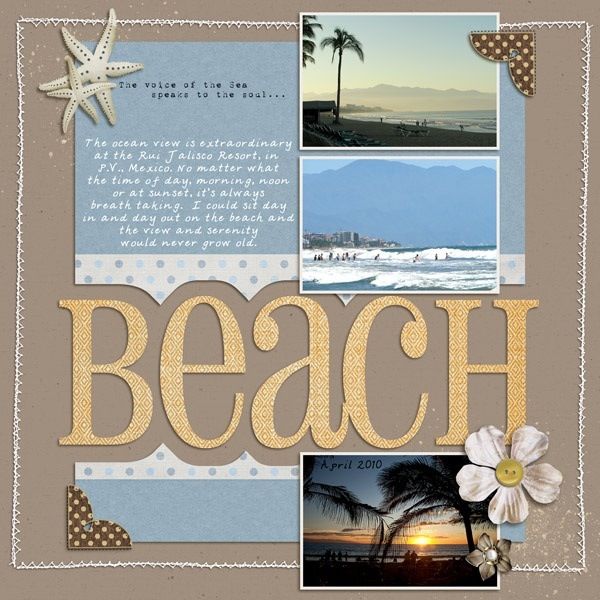
This really is the focal point of the layout. I really like how the paper is cut around the title. I feel like when it is time for me to go to the beach, I want to yell it to everyone. Just go around yelling, “BEACH!” lol. This large titled layout really brings all the pretty and fun beach photos together. Your eyes are drawn to the large title to start with. At the same time, it is bringing your eyes to the photos around it. This would make a great title page to a vacation book too!

[Read more…]

Be Pinspired – Creative Photos

How insane is it that we are half the way through 2017. I swear it seems just a few weeks ago we were starting this year! That just blows my mind. Anyway, team member La’Shawn here to bring you some fun inspiration for your digital scrapbooking this Saturday.

I am not going to lie. Pinterest is one of my favorite go-to sources for inspiration. I thought it would be fun to take a look at some creative photo ideas for our layouts. I found ten out-of-the-box ideas when it comes to photos on pinterest. All images are linked as well!

You can take this idea and run with it in so many ways! Moons, stars, hearts, and so much more! I absolutely will be using this on a future layout.


I love stitches on a layout. To me they add depth to it. I like the almost quilt like look of this! Taking whatever stitches, ribbons, or paper strips and using them to outline paper and photos.


This one is adorable! We have a lot of great expecting items in the store as well. I know a few of them have the silhouette you can do this with.


I am not much of a traveler myself. This is super cool to me though. Taking photos and clipping them to a state shape for each one you have visited. So cool!


You cannot go wrong with some good ol blocking!


I just love the idea of taking photos and building them into a shape to go along with a theme. Miss Fish Templates actually has one in her store to get you going with this idea!


This one would be pretty easy to do. Some cleverly placed triangles. Really makes those b&w photos pop with all that pretty paper.


I absolutely love this idea and will be recreating it. It would be another one pretty simply created. You know what though? Check out this template from Craft-tastrophic!


Like I mentioned before, I am not much of a traveler. If I ever take an out of county trip though, this will be in my book! This collab has a template that would work for this perfectly!


I have done something like this with my son’s initial and age. I love this idea. Check out these number templates from Connie Prince!