Archives for November 2022

Tutorial Tuesday (Photoshop Elements)

Custom Christmas Cards – a Re-view

PDF Version : http://bit.ly/3XM3OHp

Well, I knew it would happen sooner or later. I overdid it last week and have been dragging my butt around for the last couple of days. My brain has been MIA… Not even 12 hours of sleep has helped; I still feel like I’m running through wet concrete. Instead of just posting a sorry-there’s-no-tut-this-week message, I’m going to update an older, but still timely, tutorial for you. Have you seen the price on commercial Christmas/Chanukah cards lately? Crazy. It’s just crazy. So why not make your own?

I’m going to show you how to make 2 personal Christmas cards from 1 sheet of cardstock. The resulting cards are 4 1/4 inches by 5 1/2 inches. You can get 50 envelopes that will hold these beauties at Michaels for $8 (Canadian, so about $5 in the US).

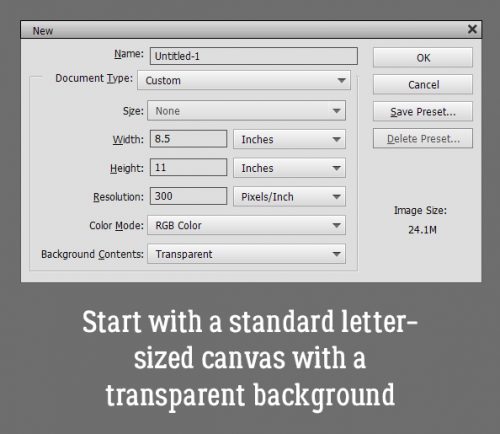
If I would have been thinking I could have skipped this step by putting the dimensions in reverse in the New Document screen. But I didn’t so I had to Rotate the canvas 90°.

Next I snapped a line across the centre of the page, and another from top to bottom. I used the Ruler and the Pencil Tool. To snap a straight line in a project, select the Pencil Tool and set the size of the line you want. I wanted these lines to be faint, so I went with 1 pixel. Line up the cursor with the halfway point along one side of your canvas. You can see a moving dashed line on the Ruler so you’ll know when you’re in the right place. Click once just barely inside the edge of your canvas. Then hold down the Shift key and move the cursor to the same spot on the opposite side and click again. It’s just that easy. Then do the same with the top-to-bottom centre point. These are guidelines for placement of elements and for cutting and scoring later.

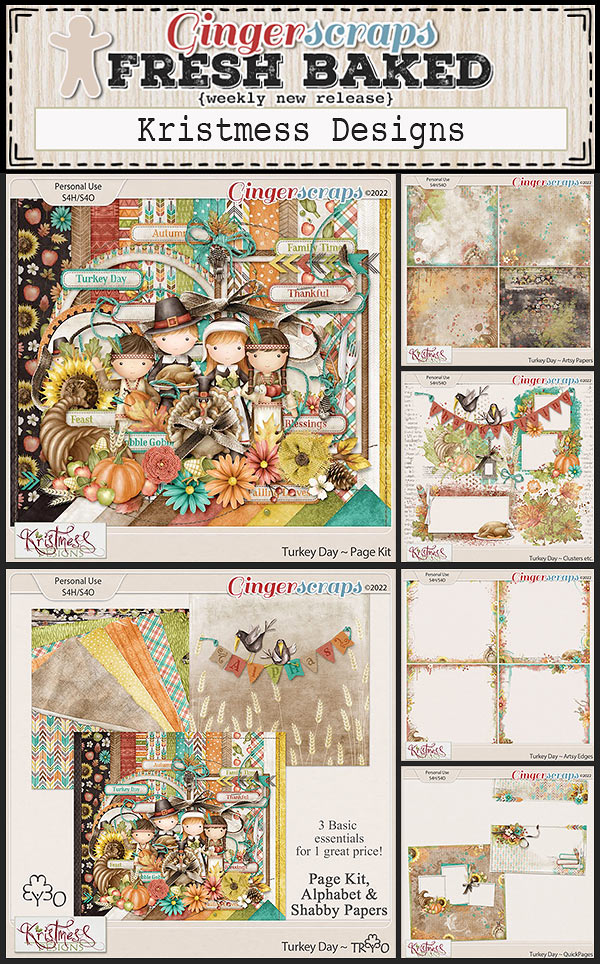
Then I opened up the folder where I’d collected the objects I wanted to use. I have a photo taken several Christmases ago, a 3D snowflake from Lindsay Jane‘s Snowed Under kit and a mask from PrelestnayaP‘s December Wishes.

Working in the lower left corner of the canvas, I opened up the Shape Tool, chose the Rectangle, set a Fixed Size of 5.25 by 4 inches and chose a darkish green colour.

The resulting rectangle will fit inside the guidelines for one card. and by Simplifying the layer, I can make adjustments to it as needed because it’s now a Smart Object.

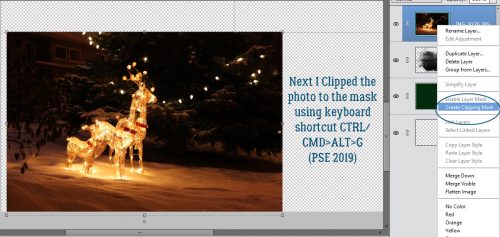
The next step is to add the mask. I resized it to fit inside the green rectangle completely.

The photo went on top of the mask and was resized to approximately the size I’d need. I want the deer and some of the illuminated snow visible later.

Clipping the photo to the mask is simple. Right click>Create Clipping Mask or CTRL/CMD>ALT>G for more recent versions of PSE or just CTRL/CMD>G for versions pre-15.

Final position tweaks included a little shifting and a little more shrinking.

I chose a gold colour from my photo to use for the sentiment. Here’s where all those amazing fonts you have in your stash will come in handy. You can make this text as personal as you want, even making it family- or person-specific. But it still looked like it needed something. So I CTRL/CMD>clicked on the green rectangle layer’s thumbnail to select the outer edges of the rectangle. Then Select>Modify>Contract.

I pondered for a nanosecond how much I should shrink my selection and settled on 25 pixels.

And then I added a Stroke to the new selection. Edit>Stroke (Outline) Selection

I then used the same gold as for the text and added my Stroke. The position for this isn’t a make-or-break thing, so don’t obsess over it.

Yes, I think that’s what it needed.

The final step for this card is to add a trademark to the back. I went with the green for this.

Knowing that it’s on the BACK of the card and should be readable with the card right-side-up, I Rotated the text 180°. Alternatively, I could use that tip Pam K posted from a few weeks ago: Click the Image tab>Rotate>Flip Layer Vertical. Much easier!!

I’m going for 100% honesty here… I saw a card like this second one on Pinterest so I’m not taking credit for the idea. (Ignore the typo on the screenshot please!) I added a new blank layer to the stack and Loaded some watercolour Brushes. These are from a set of 20 free brushes from Brusheezy. I chose 3 shades of wintery blue for the brush area.

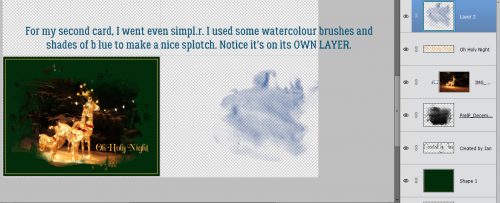
I layered the brushes, each on its own layer so I can make adjustments to just one – or all – if I need to.

For a bit of contrast I chose an aqua for the topmost brush layer.

I added in the snowflake and sized it appropriately. But it wasn’t quite enough by itself. So I added a Layer Style from Ooh La La Scraps‘ In the Frosty Air collection.

It still was missing something so I turned off the snowflake layer for a second and added a white paint splatter. That makes a big difference!

A few words and it’s pretty much what I was looking for.

A trademark on the back in the dark blue and it’s finished! [Just Copy the trademark layer and nudge it into place.]

I saved the file as a .png so the printer wouldn’t need to add a white background to everything. To turn this into cards, I’ll load up my printer with white cardstock and print several copies. Using my guillotine cutter I’ll cut the cards apart on the top-to-bottom guideline and score then fold along the side-to-side guideline. I choose to print my sentiments for the inside of the card on resume paper (it’s a bit fancier than regular printer paper) and trim to fit the inside of the folded card. Word art would be perfect for this! Here’s a handy tip for searching in the GingerScraps Shop. On the left side of the Shop home page there’s a Search box. Type the theme/word you’re looking for in the box, then click on Advanced Search. When the Search panel opens up, untick Product Title and SKU, then type Word Art in the Search in Category box as shown. Magically, you’ll have a handful or so of results – only word art that relates to your key words! It’s fabulous.

Another option is to use a sentiment stamp and ink in a colour to match the front of the card. All that’s left is to sign them, pop them into their envelopes and mail them! Best part? There’s still time to make a stack of them and get them in the mail!

PDF Version : http://bit.ly/3XM3OHp

Gingerscraps Black Friday Sales and Fresh Baked Goodies: November 18, 2022

Happy Black Friday. We’ve got a large newseltter for you today so we’ll just jump right in.

Remember if you spend $10 in the store, you get this great kit free.

Are you ready? Let’s GO!

Happy Shopping!!!

Tutorial Tuesday (Photoshop Elements)

Quick Trick: Auto Colour Correction

PDF Version : http://bit.ly/3GTAA3e

With Thanksgiving looming over all our American members, it’s pretty convenient that today’s regularly-scheduled tutorial is a Quick Trick.

Today’s Quick Trick is another CS/CC-to-PSE workaround. Colour correction can be a bit of a time suck in Elements. But this little trick is brilliant! It uses an Adjustment Layer to accomplish in a couple of steps what can take MANY steps in any other method. The colours in this photo were so much more vivid in real life and just didn’t make it into the camera. So let’s give it a whirl.

Click Layer>New Adjustment Layer>Levels. All changes to the photo will happen on the new layer, so if you don’t like the change you can save the original as is.

I like to Clip the mask to the previous layer. It isn’t essential, but it does ensure that the two layers move as one. Click OK. The dialog box in the upper corner will come into play in the next step.

To access this hidden menu, hold down the ALT/OPT key then click the Auto button. As the screenshot says, the default setting is Enhance Per Channel Contrast. For this tutorial we’ll select Find Dark & Light Colors and Snap Neutral Midtones. You’ll see what’s happening to the image in real time behind the dialog box. If you think you might use this trick again, it can be set as a default so that when you click Auto in the Adjustment Layer menu, Elements will automatically do all these steps.

Here’s the result. It’s subtle, but definitely better. The artemesia in the background is whiter, the pink coneflower is pinker, the centaurea montana is bluer, there’s more definition in the leaves and the green cast is gone! No tinkering, just boom!

Since I’ve gotten some feedback about a side-by-side look, here it is!

That’s it. That’s all! Happy Thanksgiving to those celebrating this week. And remember, football is just a game…

PDF Version : http://bit.ly/3GTAA3e

November 18, 2022: Fresh Baked

Happy Friday everyone! I hope you have all had a great week. I’ve been on vacation part of the week and it’s gone entirely too fast.

Remember if you spend $10 in the store, you get this great kit free.

Let’s see what our fabulous designers have for us this week. 

Have you grabbed the November Monthly Mix yet? It’s perfect for those Thanksgiving or fall family gathering pictures.

How about those challenges? We’re just over halfway through the month. How are you doing. Remember if you complete any 10 challenges, you get this kit as a reward.

Tutorial Tuesday (Individual Style)

Challenge Spotlight: Created With Rewards

Here we are, at the third Tuesday of the month again. Crazy how time flies!! This month our Challenge Spotlight falls on Created With Rewards. For those unfamiliar, each month our GingerBread Ladies – the GingerScraps Design Team – work together to produce two Rewards kits, one for completing 10 Challenge layouts and one as a Free-with-Purchase. The Created With Rewards Challenge requires participants to use only the previous month’s Rewards kits; templates are the exception – they can come from anywhere. For October 2022, the Free With Purchase kit is called Bootiful; the Challenger Reward is We Are Family. Let’s see how our intrepid GingerScrappers have risen to the occasion. The layouts are in the order they were posted; each is linked to the Gallery – click on the scrapper’s nom de plume and you’ll jump right to the Gallery, where I hope you’ll leave some words of praise.

Our first layout is from Dovedesign. Her layout has a good portion of white space. She used Bootiful and took it off-theme, which is awesome!

Next up is this CUTE little Hallowe’en layout by Jill. I really like the spiderweb base for her paper cluster. She too used Bootiful.

For this layout, becky_a has used a block style to anchor her photos and added some seasonal clusters. Bootiful is getting lots of airtime!

Ah! Finally We Are Family makes an appearance. I like how hiddenartist has stacked papers in several ways and positioned her clusters to frame her photo.

I love how fontaine has used blended masks to such good effect here. The green and orange contrast beautifully and the little Bootiful witch and warlock are cute additions.

See how kabrak1207 has turned a very theme-specific kit into an all-purpose one? Without the word strip and sticker, it’s hard to tell this started out as a Hallowe’en kit.

This looks like greenfiend27 went to a lot of trouble adding all those little bats! I think they’ve been cut from the background paper and individually shadowed. Impressive!!

I love how Katherine Woodin used the Hallowe’eenie kit for a fall layout that has no Hallowe’en flavour at all.


What a clever riff on the donuts mum23ms has in her photos!

Here’s another mainly purple layout using Bootiful. The pops of orange breoni has added, along with vignetting some photos, give the layout depth.

Look at all the spookiness angbrey has injected into her layout! I love how the elements move the eye around and right back to the photos.

Here’s another look at We Are Family. The way gadawg83 has echoed the bluebonnets in her photo with her tiny-flower borders is perfection.


Tbear has used some incredibly inventive techniques here to give the impression that the beaker has bats painted onto the glass. And maybe I’ve been watching too much paranormal investigation TV, but I think I see a ghost flying out of the test tube!

Tamsin McAtee went for complementary colours here, with her orange and blue palette. I like how she picked out the brown from the ceiling in her photo and included it in the elements she used from We Are Family.

Our last layout comes from mom2triplets04. She too has used We Are Family and kept her layout simple, focusing on the photos and her journaling.

I find it fascinating that more than 75% of these layouts were created with the Free With Purchase kit. It tells me there was a lot of traffic in the shop in October, and that’s fantastic! It’s also really interesting to see how different scrappers’ visions are when it comes to using a single kit. It’s inspiring!!

See you next week for Quick Trick Tuesday.

$1 Bake Sale & $2 Tuesday NOW OPEN

Happy Tuesday scrappers! Today is a super exciting day if you are looking for and amazing deal! We have $2.00 Tuesday AND the $1.00 Bake Sale! Whoop Whoop!!

*Remember* all our sales are based on Eastern Time, be sure to shop early so you don’t miss out on these deals!

Remember if you spend $10 in the store, you get this great kit free.

Here is what we have in the Bake Sale this month!


How are your challenges going? We are half way through the month of November, there is still plenty of time to get those challenges done! Complete any 10 challenges and get this great kit as a reward.

November 11, 2022: Fresh Baked

Happy Friday! I hope everyone is enjoying the week. It’s been a fast one.

Remember if you spend $10 in the store, you get this great kit free.

Let’s see what our designers have for us this week. There is a lot of fall, thanksgiving and we’re starting to see a little Christmas mixed in.

How are your challenges going? Complete any 10 challenges and get this great kit as a reward.

Tutorial Tuesday (Potpourri)

Calling All Genealogist/Scrapbookers!

PDF Version : bit.ly/3EsDCc3

At the end of this week, Commonwealth countries will be taking a moment to remember our war dead. November 11th is Remembrance Day. (In the US it’s Veteran’s Day, a slightly different theme.) This time of year I think about all the people I’m connected to who have served in the military, not just the ones who died, but all of them. That got me thinking about how scrapbookers are family historians, whether they chronicle the current generation or dig up bones many generations past. Reading some discussions in the Forum has told me there are a lot of GingerScrappers who are interested in genealogy, and I’m sure many of them have treasured family photos of long-deceased ancestors. So today I’m going to talk a bit about scrapping with heritage photos, and share some scrapbooking collections I think are especially suited.

Photography came into being almost 200 years ago, with the first permanent image captured by Nicéphore Niépce, but it wasn’t 1839 and the invention of the daguerrotype by Louis Jacques Mandé Daguerre that it really got attention. Over the next couple of decades, many innovations were developed that allowed photos to be taken more quickly and for them to be printed on paper. Long exposure times meant that people being photographed had to remain as still as humanly possible for several minutes – motion blur was a real problem. It’s harder to smile consistently for several minutes than it is to keep one’s features relaxed, so most early photos with people in them looked pretty grim. Then too, life in those days was pretty harsh for the average person, so maybe smiling didn’t come naturally. If a family had the financial means to be photographed in the mid-1800s, they viewed it as a status symbol. Matthew Brady changed the photographic world forever when he captured the horrors of the War Between the States (nothing civil about it!).

Very few of us can claim famous ancestors. Mine were labourers: farmers, thatchers, miners, factory-workers, servants. Days were long and they worked hard. Clothing was utilitarian; dark colours were preferred because doing the laundry was a HUGE chore. And many dyes were very expensive, so only the wealthy could wear bright colours. Even when they wore their Sunday best, most people’s clothing was plain. My 3x Great-grandmother Sarah Ann Rump was a dressmaker, so she was dressed a little more fancy. Here’s a swatch to help you see what I’m talking about.

Furnishings were handed down from generation to generation. Upholstered items typically were also darker in colour to conceal the day-to-day dinginess that came from not having a vacuum cleaner. All of these things can be used to help date a photo if there’s no information about it. It can be a lot of fun trying to decide when a photo was taken, and it helps narrow down who the people could be. Then… the real fun begins! Turning the photos into memories preserved.

GingerScraps is lucky to have a very talented pool of designers whose heritage collections are treasures in and of themselves. I’m going to introduce you to some of them, and show you some impressive kits they’ve created. I know you’ll love them!

First, Diane of ADB Designs is the QUEEN of historical collections. She has one for pretty much every era and facet of life in North America. In the interest of keeping it reasonably fair, I’m only going to show you three of her collections. Each of them will be linked to the store so if you see something you like, you can go right to it!

Ancestors

Descendants

Cottage Retreat

Aimee Harrison is another designer with a sizeable assortment of beautiful kits. Here are two that I particularly like.

Old Lace

Somewhere In Time

Returning to GS after a few years’ hiatus, Cheré Kay Designs too has some very charming collections.

Thrifty Treasures

Connie Prince is prolific. She just cranks out amazing collections one after another!

Faded Memories

Heritage: Ancestors

Heritage: Ancestress

Dani, aka JB Studio, is quickly becoming a favourite designer for me.

A Walk Down Memory Lane

Kristina, whose designs are labelled Kristmess, has some very elegant kits in her store. This first one is a selfish inclusion – half of my DNA comes from Scotland, Ireland and Wales.

Celtic Charm

Roots

Memory Mosiac is Joy, one of our November Spotlight designers. I think I need this collection…

September Past

Ooh La La Scraps is one of the brands designed by Katie.

Remember When

And finally, Tami Miller Designs has some beautiful choices too.

I Collect Memories

I’ve barely scratched the surface here! And I’ve got the scrapping itch. Excuse me while I go peruse my photos… I think Sarah Ann needs a layout.

PDF Version : bit.ly/3EsDCc3

Designer Spotlight: November 2022

Memory Mosaic and Polka Dot Chicks

Now that the first-of-the-month insanity dust has settled, let’s get to know this month’s Spotlight Designers, Joy aka Memory Mosaic, and Tammy aka Polka Dot Chicks. [Editor’s note: It’s Joy‘s birthday month!] These two ladies sat down with me (and Tammy‘s 18 month-old grandson) to do a little Q&A session. What follows is a transcript… to minimize confusion, I’m taking the “O”.

O: Thanks so much for chatting with me and letting me give our readers a peek into your lives. I like to get the meat-and-potatoes out of the way first, then get to the sweets after, so I’ll throw you a softball. How long have you been designing?


J: I started designing in 2015.

T: Since 2008

O: So a good, long time! Joy, what led you to designing?

J: I will admit, when I started digital scrapbooking, I didn’t think I had the ability to do design work. In 2013, I started as a CT member for a designer. She taught me a few basic things that started to give me more confidence, to try more. In 2015 I made my first kit. I will admit, when I look at it now, it wasn’t very good. But, it was the start, and I’ve been doing it ever since.

O: Boy can I relate! I came to digital scrapbooking in about 2010, and those first layouts were so… awful! When I found my first digi home and started working through their challenges, my skills grew and so did my confidence. I never dreamed that I’d be doing what I’m doing now. What does your design space look like? [Editor’s note: Tammy is wrangling her little person ATM.]

J: This past year, I have tried a couple different places. I now have a small office that I work in a lot. It has an old tall secretary, some books shelves and a dresser with some baskets and file organizers. I still take my laptop out to the living room and work and sit on the sofa while watching TV. I hardly ever can just sit, and watch TV, most of the time, I am always doing something else at the same time.

O: I’m the same! Multitasking is like breathing for me. Where do you find your inspiration?

J: A lot of my inspiration comes from my everyday life, childhood memories/experiences, and my family.

O: I think you’re speaking for most of us. Do you have a favourite kit in the GS Shop? I know, it’s like asking you which one of your kids is your favourite. It changes from day to day!

J: One of my favorite kits right now is “Artsy Bits #6“. I love making kits with a “vintage feel” and “grunge”. I was challenged last year to come up with some “Art Journaling” kits. And I started making my Artsy Bits collection. This last one is my favorite. I love the colors and just how it came together.

O: Art journaling is a difficult thing for me. I never feel like I’ve done it well. Strong work! Oh, Tammy‘s back. Hey Tammy, Are you more likely to dance or sing in the shower?

T: Sing – even though I can’t sing! What about you, Joy?

J: Sing. I am not the most coordinated, and I would probably fall if I tried to dance in the shower. LOL!

O: I’ve asked that question a few times. And I’ve done both. Immediately followed by a trip to the hardware store and some no-slip strips for the shower pan. 🙂 Here’s another softball. What colours do you like best, and which make you shudder?

T: My favorite colors are red, pink and black/gray – well technically my favorite color is plaid but I am quirky. My least favorite colors are orange and green.

J: I love blues. I like to mix it with red/burgundy. I also really like blue and yellow together. These colors feel calm and happy. My least favorite is mustard yellow.

O: I don’t love orange or yellow. Tammy, you know plaid’s technically not a colour, right? 😉 Do you have a green thumb, even though you don’t like green?

T: I can keep indoor plants alive. I have a philodendron that I received when my grandma passed away in 1992 and it’s still alive
and now has an offshoot. Big plant is named Papa Phil and the off shoot is Phil Jr.

O: I’ve gotten pretty good at gardening, indoors and out. I bought a foot-tall fiddle leaf fig at Costco a couple of years ago and now it’s four feet tall, with branches everywhere. But I waited to long to clean up my flowerbed and got caught by a snowstorm. Too late now. Pray for me? Crazy question alert: If you could only eat one meal every day for the rest of your life, what would it be?

T: Steak, mashed potatoes, green beans & creme’ brûlée for dessert.

O: Yum! If you could have a super power, what would you like it to be?

T: To clone myself to be able to help out my kids/grands when they all ask at same time…lol.

O: YES!! If I had a clone, one of us could be cleaning up the yard while the other grocery-shopped. Oh well. Can you play a musical instrument?

J: I play the piano… not very well, especially considering all the money my parents spent on lessons. I started taking lessons when I was 6 and pretty much took them off and on through college. I did play in church when we were missionaries in Ecuador.

T: The radio! Nope. Not musical at all unlike all my kids.

O: I took piano lessons for a couple of years but we didn’t have a piano so I practiced at the school. Didn’t work so well. What would your dream car be?

J: Honestly we have only had older used cars for a long time, so I would say, my “dream car” would be a “new car”. You know one with all the new “bells & whistles”. But, for now I am happy to have a car that runs. 🙂

O: Been there! My current vehicle is a seven-year-old SUV with room for both people and my son’s wheelchair. I think my next one – when the day comes – will be a hybrid. I travel too many backroads with no services to feel safe going all electric. What did you want to be when you were small?

T: A nurse or a teacher.

O: Did you know that nurses are also teachers? That was my favourite part of my job, teaching parents about what was making their child sick and what we were doing to fix it. Aside from necessities, what one thing could you not go a day without?

J: My laptop. I am on it every day. It is what I use to make my designs, and I use it for other work.

O: Me too! If you had a warning label, what would yours say?

T: Caution: Will start snort laughing when cracking up…. lol.

O: Last question, I promise! What celebrity would you like to meet at Starbucks for a cup of coffee?

T: Any of the actors who played James Bond but Pierce Brosnan would be at the top of the list.

O: <fans herself> I can see it! Well, thanks again for giving our GingerScraps community a little glimpse of yourselves. Before we go, I’d like to remind everybody that not only are the ladies providing this month’s Daily Download (found right here on the Blog!), they’re also hosting the Designer Spotlight Challenge and have some coupons for all of us! Check ’em out.

See you all again next month for the December Designer Spotlight.

November 4, 2022: Fresh Baked

Here we are at another Friday my friends. I do hope you had an amazing week and have been enjoying the fun stuff in the November Buffet. You still have a couple of days to grab the Buffet deals.

Remember if you spend $10 in the store, you get this great kit free.

Let’s take a look at some of the new products in the store this week.

Have you gotten a start on those challenges? Complete any 10 challenges (there are over 30 to choose from) and get this great kit as a reward.